1. Introduction
This manual provides comprehensive instructions for the installation, configuration, and operation of the ASUS A8N32-SLI Deluxe AI Gaming Edition ATX Motherboard. Designed for Socket 939 AMD processors, this motherboard offers advanced features for high-performance computing and gaming. Please read this manual thoroughly before proceeding with installation to ensure proper setup and optimal performance.
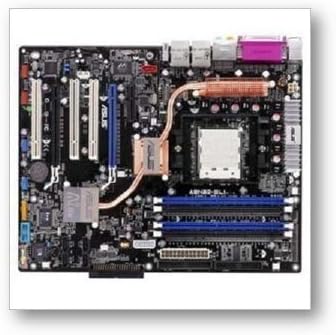
Image 1.1: The ASUS A8N32-SLI Deluxe Motherboard, showcasing its layout with CPU socket, memory slots, and expansion slots.
2. Key Features
The ASUS A8N32-SLI Deluxe motherboard incorporates several advanced technologies and features to enhance system performance, stability, and user experience.
- AMD Socket 939 Support: Compatible with AMD Athlon 64 FX, Athlon 64 X2, Athlon 64, and Sempron processors, including dual-core and 64-bit CPUs.
- True Dual X16 SLI: Supports two PCI Express x16 slots operating at full speed for enhanced graphics performance.
- 8-Phase Power Design: Provides stable and efficient power delivery to the CPU, reducing heat generation and extending component lifespan.
- Fanless Design (Heat Pipe & Stack Cool 2): Utilizes passive cooling solutions for chipsets and critical components, ensuring quiet operation and improved heat dissipation without active fans.
- Precision Tweaker: Offers fine-grained control over vDIMM (8-step voltage control), vCore (0.0125V increments), and Stepless Frequency Selection (SFS) for FSB, Memory, and PCI Express frequencies, enabling advanced system tuning.
- AI NOS (Non-delay Overclocking System): Automatically boosts CPU performance based on system load for demanding applications.
- PEG Link Mode: Allows users to enhance graphics card performance by adjusting GPU and VGA memory throughput via the BIOS.
- AI Clock Skew: Optimizes memory overclocking capability by automatically skewing memory clock signal timing.
- C.P.R. (CPU Parameter Recall): Recovers previous CPU settings after an overclocking failure without clearing CMOS.
- AMD Cool 'n' Quiet! Technology: Dynamically adjusts CPU voltage and frequency for reduced heat and noise.
- ASUS Q-Fan 2: Intelligently adjusts CPU and chassis fan speeds based on system loading.
- Dual Gigabit LAN: Integrated network interfaces for high-speed network connectivity and gateway functionality.
- NV Firewall: Hardware-accelerated firewall for enhanced network security.
- PCI Express Architecture: Supports the latest I/O interconnect technology for high-bandwidth expansion.
- Serial ATA 3Gb/s & SATA on the Go: High-speed storage interface with external SATA port for easy data backup.
- Dual RAID: Supports RAID 0, 1, 0+1, 5, and JBOD configurations for data protection and performance.
- IEEE 1394a Interface: High-speed digital interface for audio/video appliances.
- S/PDIF-out: Coaxial S/PDIF-out port for digital audio connectivity to external home theater systems.
- Max. 10 USB 2.0 Ports: Provides extensive connectivity for peripherals with transfer speeds up to 480Mb/s.
- Multi-language BIOS: Offers BIOS setup in multiple languages.
- ASUS CrashFree BIOS2: Features BIOS auto-recovery function using a support CD.
- ASUS EZ Flash: Allows BIOS updates without entering the operating system.
- ASUS MyLogo2: Customizes the boot logo with a personal image.
3. Setup and Installation
Follow these steps carefully to install your ASUS A8N32-SLI Deluxe motherboard and its components.
3.1 Pre-Installation Checklist
- Ensure you have a compatible AMD Socket 939 CPU.
- Gather necessary tools: Phillips screwdriver, anti-static wrist strap.
- Prepare your computer case with adequate ventilation.
- Unpack the motherboard and verify all accessories are present (SLI connector, cables, modules, manual, etc.).
3.2 Motherboard Installation
- Install the I/O Shield into the rear opening of your computer case.
- Carefully align the motherboard with the standoffs in your case.
- Secure the motherboard with screws, ensuring it is firmly seated.
3.3 CPU Installation
- Open the CPU socket lever.
- Align the CPU with the socket, ensuring the golden triangle on the CPU matches the triangle on the socket.
- Gently place the CPU into the socket without forcing it.
- Close the CPU socket lever to secure the CPU.
- Apply thermal paste (if not pre-applied to cooler) and install the CPU cooler according to its manufacturer's instructions.
3.4 Memory Installation
- Open the clips at both ends of the DIMM slot.
- Align the notch on the DDR memory module with the key in the DIMM slot.
- Insert the module firmly into the slot until the clips snap into place.
- For dual-channel operation, install modules in matching colored slots (e.g., both blue or both black).
3.5 Expansion Card Installation
- Remove the metal bracket cover from the desired expansion slot on your case.
- Align the expansion card with the slot and press down firmly until it is fully seated.
- Secure the card with a screw to the case.
- For SLI configuration, install two compatible PCI Express x16 graphics cards and connect them with the provided SLI bridge connector.
3.6 Connecting Peripherals and Power
- Connect the 24-pin ATX power connector and the 4-pin ATX 12V power connector from your power supply to the motherboard.
- Connect SATA and IDE cables from your storage devices to the corresponding ports on the motherboard.
- Connect front panel headers (power switch, reset switch, HDD LED, power LED, USB, audio) to the designated pins on the motherboard. Refer to the motherboard layout diagram in the full manual for exact pin locations.
- Connect any additional USB, FireWire (IEEE 1394a), or other modules to the appropriate headers.
4. Operating Instructions
4.1 First Boot and BIOS Setup
- After connecting all components and power, turn on your computer.
- Press the DEL key during the Power-On Self-Test (POST) to enter the BIOS Setup Utility.
- In the BIOS, you can configure various system settings, including boot order, date/time, CPU/memory frequencies, and voltage settings (using Precision Tweaker).
- Save changes and exit the BIOS to continue booting into your operating system installation media.
4.2 Driver Installation
After installing your operating system, install the necessary drivers for the motherboard components. These are typically found on the included support CD or can be downloaded from the ASUS support website.
- Install chipset drivers.
- Install graphics card drivers (if applicable).
- Install audio drivers.
- Install network (LAN) drivers.
- Install any other utility drivers (e.g., USB, SATA RAID).
5. Maintenance
Regular maintenance helps ensure the longevity and stable operation of your motherboard.
- Dust Removal: Periodically clean dust from inside your computer case, especially from heatsinks and fanless cooling components, using compressed air. Ensure the system is powered off and unplugged before cleaning.
- BIOS Updates: Check the ASUS support website for the latest BIOS versions. BIOS updates can improve compatibility, stability, and performance. Use the ASUS EZ Flash utility for safe updates.
- Driver Updates: Keep your drivers updated to ensure optimal performance and compatibility with new software and hardware.
- Cable Management: Ensure internal cables are neatly routed to promote good airflow and prevent interference.
6. Troubleshooting
This section addresses common issues you might encounter with your motherboard.
6.1 System Does Not Power On
- Verify that the 24-pin ATX and 4-pin ATX 12V power connectors are securely plugged into the motherboard.
- Ensure the power supply is switched on and connected to a working power outlet.
- Check that the front panel power switch cable is correctly connected to the motherboard header.
6.2 No Display on Monitor
- Confirm that your graphics card is properly seated in its PCI Express slot and any necessary auxiliary power connectors are attached.
- Ensure the monitor is connected to the graphics card and powered on.
- If using multiple graphics cards in SLI, ensure the SLI bridge is correctly installed.
- Try booting with only one stick of RAM, or reseat all RAM modules.
6.3 System Instability or Crashes
- Check CPU and system temperatures. While the motherboard features fanless cooling, ensure adequate case airflow.
- If overclocking, revert to default BIOS settings using C.P.R. or by clearing CMOS.
- Ensure all drivers are correctly installed and up to date.
- Test memory modules individually to rule out faulty RAM.
6.4 Network Connectivity Issues
- Verify that the Ethernet cable is securely connected to the LAN port and your network device (router/modem).
- Ensure LAN drivers are installed correctly.
- Check network adapter settings in your operating system.
- If one LAN port is unresponsive, try the other integrated Gigabit LAN port.
7. Specifications
| Feature | Detail |
|---|---|
| Brand | ASUS |
| Model Number | A8N32-SLI-Deluxe |
| CPU Socket | Socket 939 |
| Compatible Processors | AMD Athlon 64 FX, Athlon 64 X2, Athlon 64, Sempron |
| Chipset Type | NVIDIA nForce4 SLI X16 |
| RAM Memory Technology | DDR |
| Memory Clock Speed | Up to 800 MHz (via SFS) |
| Memory Storage Capacity (Max) | 4 GB |
| PCI Express Slots | 2 x PCI Express x16 (True Dual X16 SLI) |
| Storage Interfaces | 4 x SATA 3Gb/s (nForce4), 2 x SATA (Silicon Image), 2 x ATA133 |
| RAID Support | RAID 0, 1, 0+1, 5, JBOD |
| LAN | Dual Gigabit LAN |
| USB Ports | Max. 10 x USB 2.0 |
| FireWire (IEEE 1394a) | Yes |
| Audio | 8-channel Audio, S/PDIF-out |
| Form Factor | ATX |
| Dimensions | 13.3 x 10.9 x 3.3 inches (Package) |
| Item Weight | 5.05 pounds |
8. Warranty and Support
ASUS products are designed for reliability and performance. For specific warranty terms and conditions, please refer to the warranty card included with your product or visit the official ASUS website.
For technical support, driver downloads, BIOS updates, and further product information, please visit the official ASUS support website:
When contacting support, please have your motherboard model number (A8N32-SLI-Deluxe) and serial number ready.


