Introduction
The Pioneer DJM-400 is an entry-level 2-channel DJ mixer featuring an all-digital mixing bus (24bit/96kHz). Designed to complement Pioneer's CDJ-200 CD turntable, it offers a compact symmetrical design suitable for various DJ setups. This manual provides essential information for setting up, operating, and maintaining your DJM-400 mixer.
Key Features
- 2-channel, 24 bit/ 96 kHz processing mixer designed for the Mobile DJ.
- Ability to select either of two microphone connections or one stereo line connection.
- Seven high-quality 24bit effects: Delay, Echo, Filter, Flanger, Phaser, Robot, and Roll.
- Full range EQs adjustable from +9dB down to -∞ (infinity) for total sound control.
- Compact size and color designed to complement the CDJ-200 or CDJ-400.
- Intelligent 24bit/96kHz sampler with automatic tempo detection and looping.
- Beat Select button for intuitive DJ playing and remixing.
- Fader start function when connected to a Pioneer CDJ product.
- Peak level meter for monitoring audio input levels.
- Talk Over feature that automatically lowers track volume for microphone use.
Setup
Before connecting your DJM-400 mixer, ensure all audio equipment is powered off. Refer to the diagrams below for proper connection of your audio sources and output devices.
Front Panel Overview
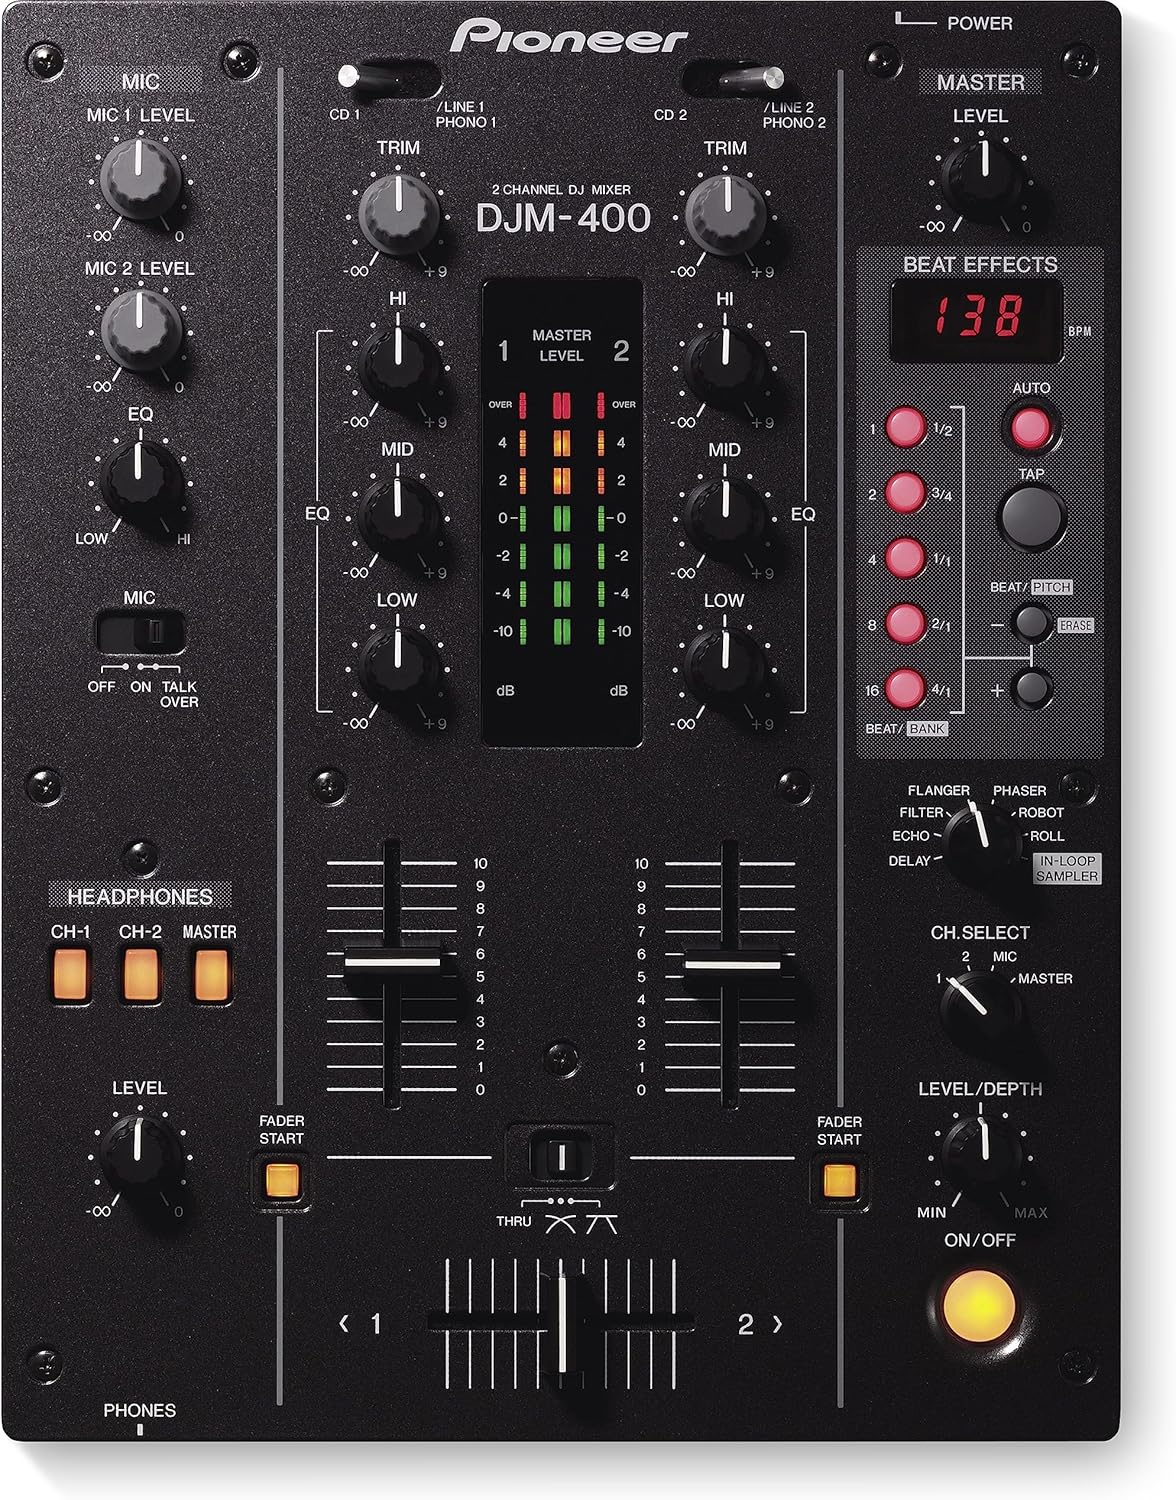
Figure 1: Front panel of the Pioneer DJM-400 mixer, showing controls for channels 1 and 2, microphone inputs, headphones, master level, and beat effects.
Rear Panel Connections
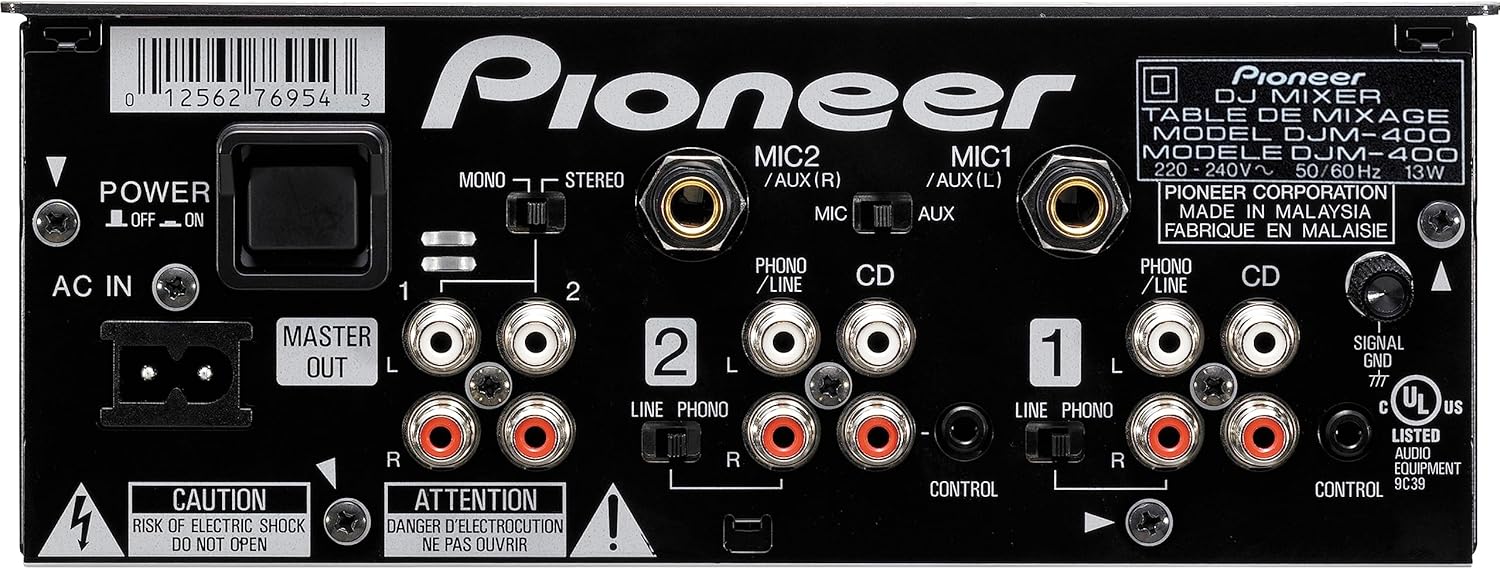
Figure 2: Rear panel of the Pioneer DJM-400 mixer, displaying various input and output ports including RCA, microphone inputs, and power connection.
Connecting Audio Sources:
- Connect your CD players (e.g., CDJ-200, CDJ-400) to the CD inputs on the rear panel using RCA cables.
- Connect turntables to the PHONO inputs. Ensure the PHONO/LINE switch is set correctly for each channel.
- For other audio devices (e.g., media players, computers), use the LINE inputs.
- Connect microphones to the MIC1 or MIC2/AUX inputs.
Connecting Output Devices:
- Connect your main amplifier or powered speakers to the MASTER OUT RCA ports.
- Connect headphones to the PHONES jack on the front panel.
Power Connection:
Connect the supplied power cord to the AC IN terminal on the rear panel and then to a suitable power outlet. Ensure the power switch is in the OFF position before connecting.
Operating Instructions
Basic Operation:
- Power On/Off: Use the POWER switch on the rear panel to turn the unit on or off.
- Input Selection: Use the input selector switches (PHONO/LINE 1, PHONO/LINE 2, CD 1, CD 2) above the TRIM knobs to select your audio source for each channel.
- TRIM Control: Adjust the TRIM knob for each channel to set the input level. The MASTER LEVEL indicators should ideally peak around 0 dB.
- Channel Faders: Use the channel faders to control the volume of each channel.
- Crossfader: Use the crossfader to smoothly transition between Channel 1 and Channel 2. The crossfader curve can be adjusted.
- Master Level: Adjust the MASTER LEVEL knob to control the overall output volume.
- Headphones: Connect headphones to the PHONES jack. Use the CH-1, CH-2, and MASTER buttons to monitor individual channels or the master output. Adjust the HEADPHONES LEVEL knob.
Equalizer (EQ) Controls:
Each channel features 3-band isolator EQ (HIGH, MID, LOW) with full cut capability. Rotate the knobs to adjust the frequency response for each band, ranging from +9dB to -∞ (infinity).
Microphone Operation:
- MIC Level: Adjust the MIC 1 LEVEL and MIC 2 LEVEL knobs to control the microphone input volume.
- MIC EQ: Use the MIC EQ knob to adjust the tone of the microphone.
- Talk Over: Engage the TALK OVER switch to automatically lower the music volume when speaking into the microphone.
Beat Effects:
The DJM-400 includes seven onboard effects: Delay, Echo, Filter, Flanger, Phaser, Robot, and Roll. These effects automatically detect the beats per minute (BPM) of the music and sync to the beats.
- Effect Selection: Use the rotary selector to choose the desired effect.
- Beat Buttons: Select the beat division (e.g., 1/2, 1/1, 2/1) for the effect.
- TAP Button: Manually tap the tempo if auto BPM detection is inaccurate.
- LEVEL/DEPTH: Adjust the intensity or depth of the selected effect.
- CH SELECT: Choose which channel (1, 2, MIC, or MASTER) the effect will be applied to.
- In-Loop Sampler: The sampler automatically detects song tempo, samples for 4 beats, and loops the sample in sync with the music. Five samples can be stored onboard for a total of 12 seconds.
Maintenance
- Cleaning: Use a soft, dry cloth to wipe the exterior of the mixer. Avoid abrasive cleaners or solvents.
- Dust Protection: Keep the mixer covered when not in use to prevent dust accumulation, especially on faders and knobs.
- Ventilation: Ensure proper ventilation around the unit to prevent overheating. Do not block ventilation holes.
- Cable Management: Organize cables neatly to prevent damage and ensure stable connections.
Troubleshooting
| Problem | Possible Cause | Solution |
|---|---|---|
| No sound output. | Incorrect cable connections, low volume levels, incorrect input selection. | Check all RCA and power connections. Increase MASTER LEVEL and channel fader levels. Verify input selector switches. |
| Distorted sound. | Input levels too high (clipping), damaged cables, faulty audio source. | Adjust TRIM knobs to prevent clipping (indicators should not consistently be in the red). Check cables for damage. Test with a different audio source. |
| Microphone not working. | MIC level too low, MIC switch off, incorrect microphone connection. | Increase MIC LEVEL. Ensure MIC switch is ON. Verify microphone is correctly plugged into the MIC input. |
| Effects not applying. | Effect not selected, LEVEL/DEPTH too low, incorrect CH SELECT. | Select an effect. Increase LEVEL/DEPTH. Ensure CH SELECT is set to the desired channel (1, 2, MIC, or MASTER). |
Specifications
| Feature | Detail |
|---|---|
| Model Number | DJM-400 |
| Number of Channels | 2 |
| Digital Processing | 24-bit/96kHz |
| Inputs | 4 Line, 2 Turntable, 2 Switchable Phono/Line, 2 Mic (1/4-inch) |
| Outputs | 2 RCA Master Output |
| EQ per Channel | 3-Band Isolator EQ (-∞ dB to +9dB) |
| Onboard Effects | 7 (Delay, Echo, Filter, Flanger, Phaser, Robot, Roll) |
| Sampler | In-Loop Sampler (4-beat loop, 12 seconds total storage) |
| Dimensions (W x D x H) | 12 x 13-9/16 x 4-5/16 inches (approx. 30.5 x 34.4 x 11 cm) |
| Weight | 8.8 pounds (approx. 4 kg) |
| Power Source | Corded Electric |
Warranty and Support
Pioneer DJ products typically come with a limited manufacturer's warranty. For specific warranty details, registration, and technical support, please refer to the official Pioneer DJ website or contact their customer service directly. You can also visit the Pioneer DJ Store on Amazon for additional product information and resources.