
1. Overview
The Coby TF-DVD7380 is a compact and portable DVD player featuring a 7-inch TFT color display with a 16:9 widescreen aspect ratio. This device is designed for versatile media playback, supporting DVD, DVD+R/RW, CD, CD-R/RW, MP3, and JPEG formats. It includes a built-in high-sensitivity NTSC TV tuner, allowing for television reception. The swivel screen enhances viewing flexibility, and the integrated anti-skip circuitry ensures stable playback. For private listening, a headphone jack is provided. The unit is powered by a rechargeable Lithium-ion battery, and comes with various accessories for home and car use.
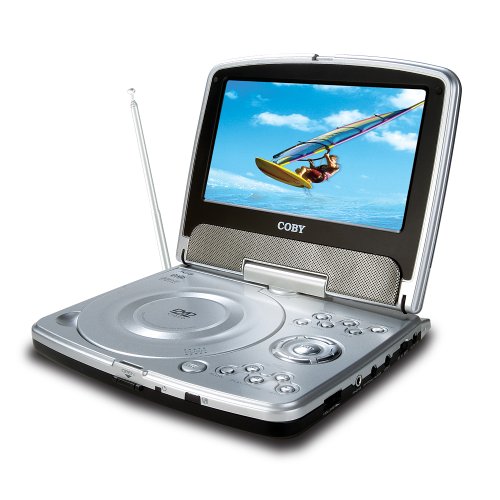
Image 1.1: Coby TF-DVD7380 Portable DVD Player with its 7-inch screen swiveled for viewing.
2. Package Contents
Verify that all items listed below are included in your package:
- Coby TF-DVD7380 Portable DVD Player
- Remote control
- AV cable
- 100-240V UL listed AC adaptor
- DC car adapter
- Stereo headphones
- Lithium-ion Rechargeable battery
- External antenna adapter
3. Key Features
- Compact Portable Design
- 7-inch Widescreen (16:9) TFT Color Display
- Swivel Screen for flexible viewing angles
- Plays DVD/DVD+R/RW/CD/CD-R/RW/MP3 and JPEG Compatible
- Built-in high sensitivity NTSC TV tuner
- Built-in anti-skip circuitry for stable playback
- Convenient on-screen display (OSD)
- Headphone jack for private listening
- Integrated Lithium-ion rechargeable battery
4. Controls and Connections
Familiarize yourself with the various controls and connection ports on your Coby TF-DVD7380 unit. Specific button layouts may vary slightly, but common functions are described below.
4.1. Front/Top Panel Controls
- Power Button: Turns the unit on or off.
- Play/Pause Button: Starts or pauses disc playback.
- Stop Button: Stops disc playback.
- Skip/Search Buttons: Skips to the next/previous track or chapter, or fast forwards/rewinds during playback.
- Menu Button: Accesses the disc menu or system settings.
- Volume Controls: Adjusts the audio output level.
- Mode Button: Switches between DVD, CD, MP3, JPEG, and TV modes.
- Open Button: Releases the disc tray cover.
4.2. Side/Rear Panel Connections
- DC In Jack: Connects the AC adapter or car adapter for power and charging.
- AV Out Jack: Connects to an external display or audio system using the supplied AV cable.
- Headphone Jack: For connecting stereo headphones.
- Antenna Input: Connects the external antenna adapter for TV reception.
5. Setup Guide
5.1. Charging the Battery
- Connect the AC adapter to the DC In jack on the unit.
- Plug the AC adapter into a standard wall outlet.
- The charging indicator light will illuminate. Allow approximately 4-6 hours for a full charge.
- For car use, connect the DC car adapter to the DC In jack and plug it into your vehicle's cigarette lighter socket.
Note: It is recommended to fully charge the battery before first use to maximize battery life.
5.2. Inserting a Disc
- Press the "Open" button to release the disc tray cover.
- Carefully place the DVD or CD onto the disc spindle with the label side facing up.
- Gently press the disc down until it clicks into place.
- Close the disc tray cover until it latches securely.
5.3. Connecting the External Antenna (for TV Tuner)
- Locate the Antenna Input jack on the unit.
- Connect the supplied external antenna adapter to this jack.
- Extend the antenna fully for optimal reception. For improved reception, especially indoors, consider connecting a larger external antenna (not included) to the adapter.
6. Operating Instructions
6.1. Basic Disc Playback (DVD/CD/MP3/JPEG)
- Ensure the unit is powered on.
- Insert a compatible disc as described in Section 5.2.
- The unit should automatically detect the disc type and begin playback or display the disc menu.
- Use the Play/Pause, Stop, Skip/Search, and Volume buttons on the unit or remote control to manage playback.
- For DVD menus, use the directional buttons and Enter button on the remote to navigate.
6.2. Using the TV Tuner
- Connect the external antenna as described in Section 5.3.
- Press the "Mode" button repeatedly until "TV" mode is selected.
- The first time you use the TV tuner, you may need to perform a channel scan. Access the TV menu (usually via the "Menu" button on the remote) and select "Auto Scan" or "Channel Search."
- Once channels are scanned, use the Channel Up/Down buttons on the unit or remote to change channels.
- Adjust volume using the Volume controls.
Note: TV reception quality can vary significantly based on location, antenna type, and local broadcast signals.
6.3. Using the Remote Control
The included remote control provides full functionality for the TF-DVD7380. Ensure batteries are correctly inserted. Point the remote control directly at the unit's IR sensor for optimal response.
- Power: On/Off
- Numeric Keypad: Direct track/chapter selection, channel input.
- Directional Buttons (Up/Down/Left/Right) & Enter: Menu navigation.
- OSD: On-Screen Display information.
- Setup: Accesses system settings.
- Title/Menu: Accesses DVD title or root menu.
- Audio/Subtitle: Changes audio tracks or subtitle languages.
- Zoom: Adjusts screen zoom level.
- Repeat: Repeats current track/chapter/disc.
7. Maintenance and Care
7.1. Cleaning the Unit
- Wipe the unit's exterior with a soft, dry cloth.
- For stubborn marks, slightly dampen the cloth with water. Do not use abrasive cleaners, waxes, or solvents.
- Keep the screen clean using a soft, lint-free cloth. Avoid pressing hard on the screen.
7.2. Battery Care
- Recharge the battery regularly, even if the unit is not used frequently.
- Avoid fully discharging the battery for extended periods.
- Do not expose the battery to extreme temperatures.
- If the unit will not be used for a long time, store it with a partially charged battery (around 50%).
7.3. Disc Care
- Handle discs by their edges to avoid fingerprints and scratches.
- Store discs in their cases when not in use.
- Clean discs with a soft, lint-free cloth, wiping from the center outwards.
- Do not use solvents or abrasive cleaners on discs.
8. Troubleshooting
| Problem | Possible Cause | Solution |
|---|---|---|
| Unit does not power on. | Battery is discharged; AC adapter not connected or faulty. | Connect the AC adapter and charge the battery. Ensure the power outlet is functional. |
| No disc playback. | Disc inserted incorrectly; disc is dirty or scratched; incompatible disc format. | Reinsert the disc correctly. Clean the disc. Ensure the disc format is supported (DVD, CD, MP3, JPEG). |
| Poor TV reception. | Antenna not connected or positioned poorly; weak broadcast signal. | Ensure the external antenna is connected and fully extended. Try repositioning the antenna or the unit. Perform a channel scan. Consider a stronger external antenna. |
| No sound. | Volume too low; headphones not fully inserted; audio settings incorrect. | Increase the volume. Ensure headphones are fully plugged in. Check audio settings in the system menu. |
| Remote control not working. | Batteries are dead or inserted incorrectly; obstruction between remote and unit. | Replace remote control batteries. Ensure correct polarity. Remove any obstructions and point directly at the unit's IR sensor. |
9. Specifications
- Model: TF-DVD7380
- Display: 7-inch TFT Color Display, 16:9 Widescreen
- Compatible Disc Formats: DVD, DVD+R/RW, CD, CD-R/RW, MP3, JPEG
- TV System: NTSC (Built-in high sensitivity TV tuner)
- Anti-Skip: Built-in circuitry
- Audio Output: Stereo headphone jack, AV output
- Power Source: 100-240V AC adapter, DC car adapter, Lithium-ion Rechargeable battery
- Dimensions: Approximately 8 x 6 x 2 inches (20.3 x 15.2 x 5.1 cm)
- Weight: Approximately 5 pounds (2.27 kg)
10. Warranty and Support
Coby products are designed and manufactured to high quality standards. For information regarding warranty coverage, technical support, or service inquiries, please refer to the warranty card included with your product or visit the official Coby website. Please retain your proof of purchase for warranty claims.
Note: Warranty terms and conditions may vary by region.


