
Introduction
Thank you for purchasing the Lexon Cubissimo Alarm Clock. This manual provides detailed instructions to help you set up, operate, and maintain your new alarm clock. Please read this manual thoroughly before use and keep it for future reference.
Safety Information
- Do not expose the device to extreme temperatures, direct sunlight, or high humidity.
- Avoid dropping or subjecting the device to strong impacts.
- Keep out of reach of children.
- Do not attempt to disassemble or repair the device yourself. Contact qualified service personnel.
- Dispose of used batteries according to local regulations. Do not mix old and new batteries or different types of batteries.
Package Contents
Please check the package for the following items:
- Lexon Cubissimo Alarm Clock (1 unit)
- Instruction Manual (this document)
Note: AAA batteries are required but not included in the package.
Product Overview
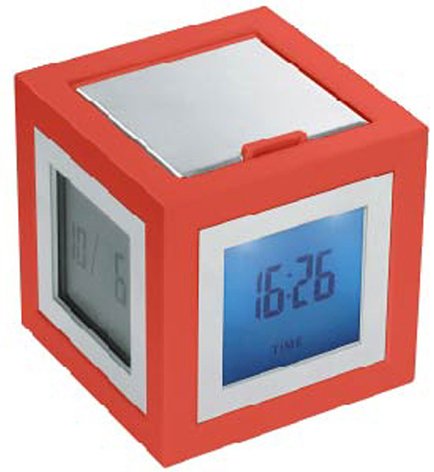
Figure 1: Front view of the Lexon Cubissimo Alarm Clock.
The Lexon Cubissimo Alarm Clock is a compact, cube-shaped device designed for timekeeping and alarm functions. It features a digital display and intuitive controls for setting time and alarm. Its minimalist design makes it suitable for various environments.
Key components typically include:
- Digital Display: Shows time and alarm status.
- Control Buttons: For setting time, alarm, and other functions.
- Battery Compartment: Located on the back or bottom.
Setup
1. Battery Installation
- Locate the battery compartment cover on the back or bottom of the alarm clock.
- Open the cover by sliding or gently prying it off.
- Insert two (2) AAA batteries, ensuring the correct polarity (+ and -) as indicated inside the compartment.
- Replace the battery compartment cover securely.
2. Initial Power-On
Once batteries are installed, the clock should automatically power on and display the time (possibly 12:00 AM or a default time). If not, check battery installation or press any button to activate the display.
Operating Instructions
1. Setting the Time
- Press and hold the TIME SET button (or similar, refer to device markings) until the hour digits begin to flash.
- Use the HOUR and MINUTE buttons (or +/- buttons) to adjust the hour and minute respectively.
- Press TIME SET again to confirm and exit time setting mode.
2. Setting the Alarm
- Press and hold the ALARM SET button (or similar) until the alarm hour digits begin to flash.
- Use the HOUR and MINUTE buttons (or +/- buttons) to adjust the desired alarm hour and minute.
- Press ALARM SET again to confirm and exit alarm setting mode.
3. Turning the Alarm On/Off
Press the ALARM ON/OFF button (or similar) to toggle the alarm function. An alarm icon (e.g., a bell) will typically appear on the display when the alarm is active.
4. Snooze Function
When the alarm sounds, press the SNOOZE button (often a large button on top) to temporarily silence the alarm. The alarm will sound again after a few minutes (typically 5-10 minutes).
5. Stopping the Alarm
To stop the alarm completely, press any button other than the SNOOZE button, or press the ALARM ON/OFF button to deactivate it.
Maintenance
Cleaning
Wipe the clock with a soft, dry cloth. Do not use abrasive cleaners or solvents, as they may damage the finish.
Battery Replacement
When the display dims or the clock functions erratically, it's time to replace the batteries. Follow the "Battery Installation" steps in the Setup section to replace the two AAA batteries.
Troubleshooting
| Problem | Possible Cause | Solution |
|---|---|---|
| Clock does not turn on. | Batteries are not installed or are depleted. Incorrect battery polarity. | Ensure batteries are correctly installed with proper polarity. Replace with new AAA batteries. |
| Alarm does not sound. | Alarm function is not activated. Alarm volume is too low (if adjustable). | Ensure the alarm is turned ON (check for alarm icon on display). (Note: This model may not have adjustable volume). |
| Display is dim or flickering. | Low battery power. | Replace batteries with new AAA batteries. |
Specifications
- Brand: Lexon
- Model Number: lr79-DR 2910146
- Material: Acrylonitrile Butadiene Styrene (ABS), Aluminum
- Weight: 6.4 ounces (approximately 157g)
- Dimensions: 2.52 x 2.44 x 2.44 inches (6.4 x 6.2 x 6.2 cm)
- Power Source: 2 x AAA batteries (not included)
- Mounting Type: Tabletop
- Alarm Function: Yes
- Operation Mode: Electrical
Warranty and Support
Lexon products are designed for quality and reliability. For specific warranty information, please refer to the warranty card included with your purchase or visit the official Lexon website. If you encounter any issues or require technical assistance, please contact Lexon customer support through their official channels.
You can often find support contact information on the manufacturer's website or by searching for "Lexon customer support".