
1. Introduction
This manual provides essential information for the safe and efficient installation, operation, and maintenance of the Schneider Electric Harmony 9050 JCK Multifunction Programmable Timer Relay. Please read this manual thoroughly before using the product.
The Harmony 9050 JCK timer relay is designed for industrial control applications, offering precise timing functions in a compact, plug-in housing. Its multifunctionality allows for versatile use across various timing requirements.
2. Product Features
- Multifunctionality: Supports various timing modes including on-delay, off-delay, interval, one-shot, repeat cycle (on/off), on/off delay, one-shot falling edge, watchdog, and trigger on-delay.
- Programmable Time Range: Adjustable from 0.5 seconds to 999 hours.
- High Current Rating: 10 Amps.
- Versatile Voltage Compatibility: Operates on 240V AC and 24V AC/DC.
- Plug-in Design: Facilitates easy installation and replacement in compatible sockets.
- Contact Type: DPDT (2 C/O) with Silver Nickel contacts.
3. Setup and Installation
The 9050 JCK timer relay is designed for socket mounting. Ensure power is disconnected before installation.
3.1 Component Identification
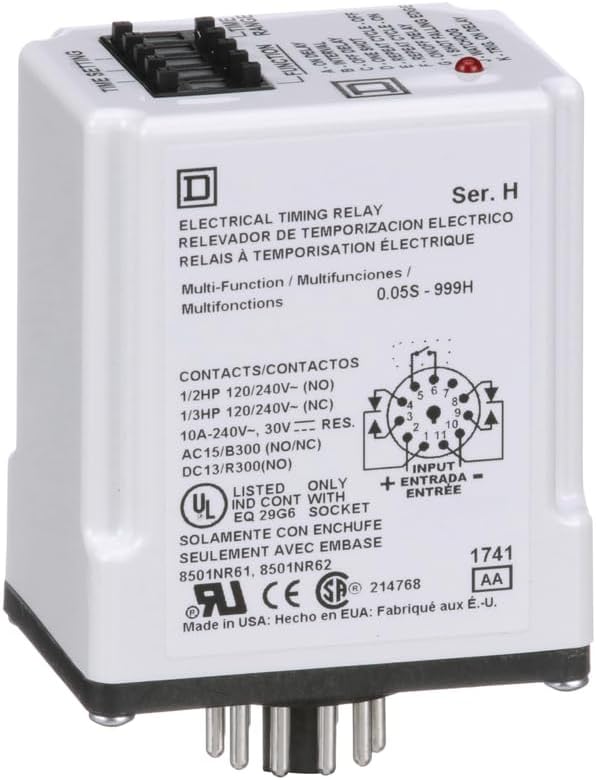
Figure 1: Front view of the Schneider Electric Harmony 9050 JCK Timer Relay, showing the model number, electrical ratings, and pin configuration. This image illustrates the main labeling and the 11-pin base for socket connection.
3.2 Mounting
- Ensure the power supply to the circuit is completely off.
- Select a suitable 11-pin socket (e.g., Schneider Electric 8501NR61, 8501NR62) for mounting.
- Align the pins of the 9050 JCK timer relay with the corresponding holes in the socket.
- Gently push the relay into the socket until it is firmly seated.
3.3 Wiring
Refer to the wiring diagram on the relay's label (Figure 1) and your application's specific requirements. The relay features quick connect terminals on the socket. Ensure all connections are secure and comply with local electrical codes.

Figure 2: Detailed front view of the Schneider Electric Harmony 9050 JCK Timer Relay, providing a clearer look at the electrical specifications and the pin layout for wiring reference.
4. Operating Instructions
The 9050 JCK timer relay offers extensive programming capabilities via its top-mounted switches.
4.1 Function Selection
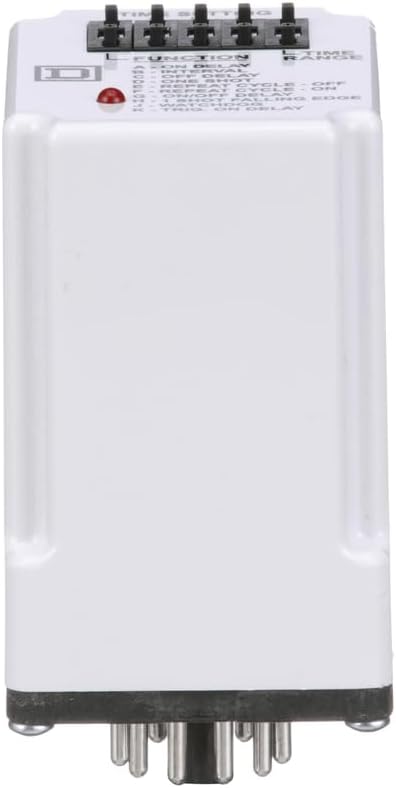
Figure 3: Top view of the Schneider Electric Harmony 9050 JCK Timer Relay, clearly showing the function selection switches and time setting dials. This interface allows users to configure the relay's operational mode and timing parameters.
Use the 'FUNCTION' switches located on the top of the relay to select the desired timing mode. Refer to the legend printed on the relay for specific function codes (e.g., A: ON DELAY, B: OFF DELAY, C: INTERVAL, etc.).
4.2 Time Range and Setting
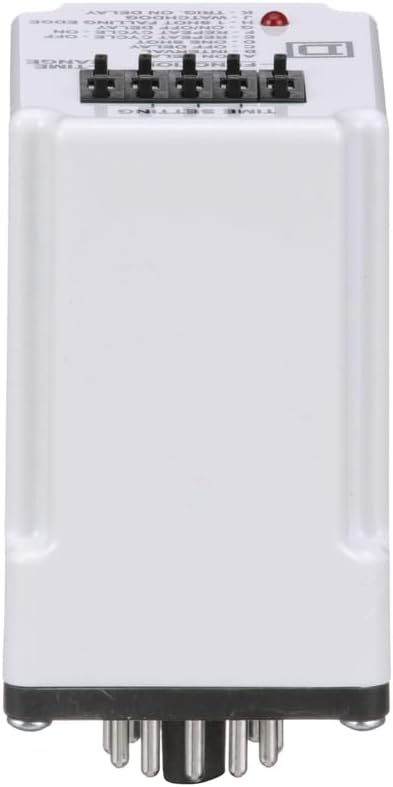
Figure 4: Close-up top view of the Schneider Electric Harmony 9050 JCK Timer Relay programming interface, providing a detailed look at the switches for function and time range selection. This view is crucial for precise configuration.
The 'TIME RANGE' switches allow you to set the overall timing duration (e.g., seconds, minutes, hours). The 'TIME SETTING' dials are used for fine-tuning the specific time value within the selected range.
- Select the appropriate time range using the 'TIME RANGE' switches.
- Adjust the 'TIME SETTING' dials to achieve the precise delay or interval required.
- Apply power to the circuit. The relay will begin its timing sequence according to the programmed function and settings.
5. Maintenance
The Schneider Electric Harmony 9050 JCK timer relay is designed for reliable operation with minimal maintenance. Regular inspection is recommended.
- Visual Inspection: Periodically check the relay and its socket for any signs of physical damage, discoloration, or loose connections.
- Cleaning: If necessary, gently clean the exterior of the relay with a dry, soft cloth. Do not use abrasive cleaners or solvents. Ensure power is disconnected before cleaning.
- Connection Integrity: Verify that the relay is securely seated in its socket and that all wiring connections are tight.
No user-serviceable parts are inside the relay. Do not attempt to open the unit.
6. Troubleshooting
If the timer relay is not functioning as expected, consider the following:
- No Power: Verify that the correct supply voltage (240V AC or 24V AC/DC) is present at the socket terminals. Check circuit breakers and fuses.
- Incorrect Timing: Double-check the 'FUNCTION', 'TIME RANGE', and 'TIME SETTING' switches. Ensure they are set according to your application's requirements.
- Relay Not Actuating: Confirm that the load connected to the output contacts is within the relay's specified current and voltage ratings (10A, 240V AC, 24V DC). Check the load circuit for faults.
- Loose Connection: Ensure the relay is fully seated in its socket and all wiring connections are secure.
- Damaged Unit: If the relay shows signs of physical damage or emits unusual odors, discontinue use immediately and replace the unit.
For persistent issues, contact Schneider Electric technical support.
7. Specifications
| Specification | Value |
|---|---|
| Model Number | 9050JCK70V14 |
| Brand | Schneider Electric |
| Operation Mode | Automatic |
| Timing Range | 0.5 seconds to 999 hours |
| Current Rating | 10 Amps |
| Coil Voltage | 24V AC/DC, 240V AC |
| Contact Type | DPDT (2 C/O) |
| Contact Material | Silver Nickel |
| Connector Type | Quick Connect |
| Mounting Type | Socket Mount |
| Product Dimensions | 4.3 x 2.5 x 1.9 inches |
| Item Weight | 4.5 ounces |
| Material | Copper |
| Certification | UL Listed |
| UPC | 785901053897 |
8. Warranty Information
Schneider Electric products are manufactured to high-quality standards. For specific warranty terms and conditions applicable to the 9050 JCK timer relay, please refer to the official Schneider Electric warranty documentation provided with your purchase or visit the Schneider Electric website.
9. Support
For technical assistance, product inquiries, or support, please contact Schneider Electric customer service or visit their official website:
- Website: www.se.com/us/en/
- Contact Information: Refer to the 'Contact Us' section on the Schneider Electric website for regional support details.


