1. Introduction
The Holley 64280 Powercharger Air Cleaner is designed to optimize air intake for various automotive applications. This air cleaner assembly features a unique low-profile design and includes POWER SHOT filters for efficient performance. Constructed from highly polished aluminum, it offers both functionality and an enhanced aesthetic for your engine bay.

Figure 1: The Holley 64280 Powercharger Air Cleaner assembly, showcasing its polished aluminum finish and dual filter elements.
2. Safety Information
CALIFORNIA WARNING: Cancer and Reproductive Harm - www.P65Warnings.ca.gov
Always wear appropriate personal protective equipment (PPE) such as safety glasses and gloves when handling automotive components. Ensure the engine is cool and the vehicle is stable before beginning any installation or maintenance procedures. Refer to your vehicle's service manual for specific safety precautions related to your make and model.
3. Package Contents
Verify that all components are present and undamaged before proceeding with installation.
- Holley 64280 Powercharger Air Cleaner Assembly
- POWER SHOT Filters (pre-installed or separate)
- Mounting hardware (stud, nut, gasket)

Figure 2: Included components, typically consisting of the air cleaner unit, mounting stud, nut, and gasket.
4. Specifications
| Model Name | Holley 64280 Powercharger Air Cleaner |
| Part Number | 64280 |
| Brand | Holley (Manufacturer) / Weiand (Brand Name) |
| Dimensions (L x W x H) | 21.6 x 10.7 x 7.2 inches (Package) |
| Unit Dimensions (L x W x H) | 7.8” x 18.3” x 3” (Unique low profile design) |
| Item Weight | 9.4 Pounds |
| Material | Polished Aluminum (Housing), Plastic (Filter elements) |
| Number of Items | 1 (Air Cleaner Assembly) |

Figure 3: Top view of the air cleaner, highlighting its low-profile design.
5. Installation (Setup)
Follow these general steps for installing the Holley 64280 Powercharger Air Cleaner. Specific vehicle requirements may vary.
- Preparation: Ensure the engine is off and cool. Disconnect the negative battery terminal.
- Remove Old Air Cleaner: Carefully remove the existing air cleaner assembly from the carburetor. Note the orientation of any gaskets or adapters.
- Inspect Carburetor: Clean the carburetor's air horn surface to ensure a proper seal.
- Install Gasket: Place the provided gasket onto the carburetor's air horn.
- Position Air Cleaner Base: Carefully place the base of the Holley Powercharger Air Cleaner onto the carburetor, aligning it with the mounting stud.
- Install Filters: Insert the POWER SHOT filters into the air cleaner housing.
- Attach Top Plate: Place the top plate of the air cleaner onto the filters and secure it with the provided nut or wing nut onto the central stud. Hand-tighten initially, then use a wrench for a snug fit without overtightening.
- Check Clearance: Close the vehicle's hood slowly to ensure there is adequate clearance and no contact with the new air cleaner assembly. Adjust if necessary.
- Final Check: Reconnect the negative battery terminal. Start the engine and check for proper operation and any unusual noises.
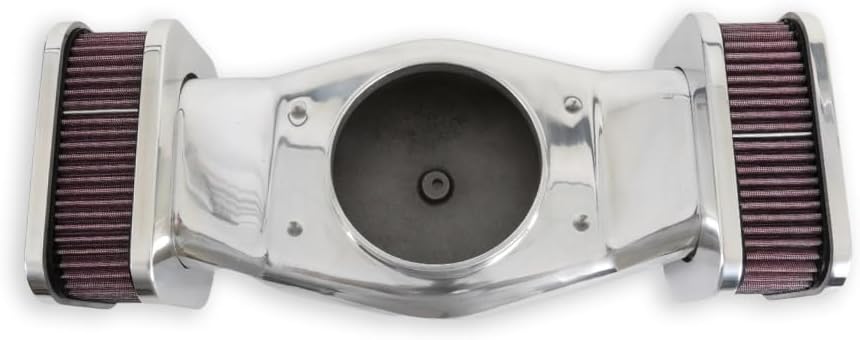
Figure 4: Underside view of the air cleaner, illustrating the carburetor mounting interface.
6. Operation
The Holley 64280 Powercharger Air Cleaner functions by filtering incoming air before it enters the engine's carburetor. Its unique low-profile design and POWER SHOT filters are engineered to provide optimal airflow while maintaining filtration efficiency. The design allows for air intake from both the sides and the top, contributing to improved engine breathing.
Video 1: A general product presentation of an air cleaner, demonstrating its features and design.
7. Maintenance
Regular maintenance of your air cleaner is crucial for optimal engine performance and longevity. The POWER SHOT filters are designed for reusability and should be cleaned periodically.
- Inspection: Visually inspect the air filter elements every 3,000 to 5,000 miles, or more frequently in dusty conditions. Look for excessive dirt, debris, or damage.
- Cleaning: If the filters appear dirty, remove them from the air cleaner assembly. Use a specialized air filter cleaning kit (typically includes a cleaning solution and oil) following the manufacturer's instructions.
- Drying: Allow the filters to air dry completely before re-oiling. Do not use compressed air, as this can damage the filter media.
- Re-oiling: Apply a thin, even coat of air filter oil to the filter elements. Do not over-oil, as this can restrict airflow and potentially damage sensors.
- Reinstallation: Reinstall the clean and oiled filters into the air cleaner housing, ensuring they are properly seated. Secure the top plate.

Figure 5: A close-up of the POWER SHOT filter, showing the pleated design for maximum surface area.
8. Troubleshooting
- Reduced Engine Performance:
- Check if the air filter elements are clogged. Clean or replace as necessary.
- Ensure the air cleaner assembly is securely mounted and there are no air leaks around the gasket.
- Improper Hood Clearance:
- Verify the air cleaner's dimensions against your vehicle's available hood clearance. This low-profile design is intended to mitigate such issues, but extreme setups may still require adjustments.
- Ensure the mounting stud is not too long, preventing the top plate from seating correctly.
- Loose Components:
- Periodically check the tightness of the top plate nut and ensure all parts of the assembly are secure to prevent vibration and potential detachment.
9. Warranty & Support
The Holley 64280 Powercharger Air Cleaner comes with a manufacturer's warranty. For detailed information regarding warranty coverage, terms, and conditions, please refer to the documentation included with your purchase or visit the official Holley website. For technical support, installation assistance, or parts inquiries, please contact Holley customer service directly.


