
Fel-Pro OS6566C-2
FEL-PRO OS 6566 C-2 Oil Pan Gasket Set User Manual
Model: OS6566C-2
Introduction
The FEL-PRO OS 6566 C-2 Oil Pan Gasket Set is engineered to provide 100% vehicle sealing, utilizing application-specific materials for reliable performance and durability. This gasket set is designed to address imperfect sealing surfaces, ensuring a superior seal for your vehicle's oil pan. It includes all necessary components for the repair, simplifying the installation process.

Image: The complete Fel-Pro OS 6566 C-2 Oil Pan Gasket Set, including the main gasket and two end seals.
Setup and Installation
Proper installation is crucial for the longevity and effectiveness of your oil pan gasket. Follow these general guidelines for a successful repair. Always refer to your vehicle's specific service manual for detailed torque specifications and procedures.
Preparation
- Clean Surfaces: Thoroughly clean both the engine block and the oil pan mating surfaces. Remove all old gasket material, oil, grease, and debris. A clean surface is essential for a proper seal.
- Inspect Surfaces: Inspect the sealing surfaces for any nicks, scratches, or imperfections. The Fel-Pro gasket is designed to accommodate imperfect sealing surfaces, but excessive damage should be addressed.
- Verify Components: Ensure all parts included in the gasket set are present and match your application. The OS 6566 C-2 set includes the main oil pan gasket and two end seals.

Image: Close-up view of an engine block surface, illustrating how the gasket is designed to seal against imperfect surfaces.
Installation Steps
- Position Gasket: Carefully place the new oil pan gasket onto the oil pan. Some gaskets may have alignment tabs or holes to assist with positioning.
- Apply Sealant (if required): While Fel-Pro gaskets are designed for excellent sealing, some applications or specific areas (like corners where cork meets rubber) may benefit from a thin bead of RTV sealant as per vehicle manufacturer recommendations.
- Install Oil Pan: Carefully lift the oil pan with the gasket in place and align it with the engine block. Insert all oil pan bolts by hand to prevent cross-threading.
- Torque Bolts: Following your vehicle's service manual, tighten the oil pan bolts to the specified torque in the correct sequence. Proper torqueing is critical for an even seal and to prevent leaks.

Image: A hand tightening a bolt on an oil pan, demonstrating the installation process. The image highlights that the gasket set includes all necessary parts for the repair.
Operating Principles
Once installed, the Fel-Pro OS 6566 C-2 Oil Pan Gasket functions as a critical barrier, preventing oil leaks from the engine's oil pan. Its proprietary cork-rubber formulation and highly conformable design ensure a tight, reliable seal even on surfaces that are not perfectly flat. This maintains proper oil levels and pressure within the engine, which is vital for lubrication and overall engine health.

Image: A close-up illustration of a gasket corner, emphasizing its conformability for a superior seal.

Image: An overhead view of the gasket's full outline, highlighting its engineered design and proprietary cork-rubber formulation for optimal performance.
Maintenance
Oil pan gaskets are generally maintenance-free after correct installation. However, periodic inspection can help identify potential issues early.
- Visual Inspection: Periodically check the area around the oil pan for any signs of oil leaks or seepage.
- Prompt Action: If a leak is detected, it is recommended to address it promptly to prevent further engine damage or oil loss.
- Replacement: Gaskets should be replaced whenever the oil pan is removed for service or if a leak develops that cannot be resolved by re-torqueing.
Troubleshooting
Most issues with oil pan gaskets relate to leaks after installation. Here are common causes and potential solutions:
| Problem | Possible Cause | Solution |
|---|---|---|
| Oil Leak After Installation |
|
|
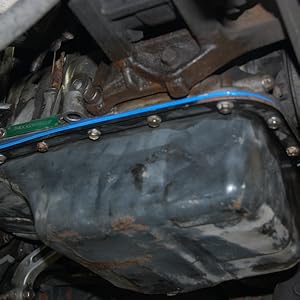
Image: A close-up view of an engine block with the oil pan removed, showing the mating surface. This highlights the importance of proper surface preparation to prevent leaks.
Specifications
Key specifications for the FEL-PRO OS 6566 C-2 Oil Pan Gasket Set:
| Attribute | Value |
|---|---|
| Manufacturer | FEL-PRO |
| Brand | Fel-Pro |
| Model | Fel-Pro |
| Item Weight | 2.4 ounces |
| Product Dimensions | 24 x 3.4 x 1.2 inches |
| Item Model Number | OS6566C-2 |
| Manufacturer Part Number | OS6566C2 |
| Exterior | Machined |
| Date First Available | November 23, 2005 |
Warranty and Support
For specific warranty information regarding your FEL-PRO OS 6566 C-2 Oil Pan Gasket Set, please refer to the official Fel-Pro website or contact their customer support directly. Warranty terms and conditions can vary and are typically provided by the manufacturer.
For technical assistance or product inquiries, please visit the official Fel-Pro website or consult an authorized Fel-Pro dealer.
Ask a question about this manual
Ask about setup, troubleshooting, compatibility, parts, safety, or missing instructions. Manuals+ will review the question and use this page’s manual context to help answer it.