1. Introduction
This manual provides detailed instructions for the installation, operation, and maintenance of your Samsung SyncMaster 740N 17-inch LCD Monitor. Please read this manual thoroughly before using your monitor to ensure proper functionality and to prevent damage. Keep this manual for future reference.
2. Safety Information
Observe the following safety precautions to ensure the safe and efficient operation of your monitor:
- Do not place the monitor in an unstable location.
- Avoid exposing the monitor to direct sunlight, heat sources, or extreme temperatures.
- Keep the monitor away from water or excessive moisture.
- Ensure proper ventilation; do not block ventilation openings.
- Use only the power cord and adapter supplied with the monitor.
- Do not attempt to service the monitor yourself. Refer all servicing to qualified personnel.
- Unplug the monitor from the power outlet during lightning storms or when unused for long periods.
3. Package Contents
Verify that all items are present in your product package:
- Samsung SyncMaster 740N LCD Monitor
- Power Cord
- VGA Cable (D-Sub)
- User Manual (this document)
- Installation CD (may include drivers and software like MagicTune)
4. Setup
4.1 Unpacking and Placement
Carefully remove the monitor and all accessories from the packaging. Place the monitor on a stable, flat surface, ensuring adequate space for ventilation around the unit.
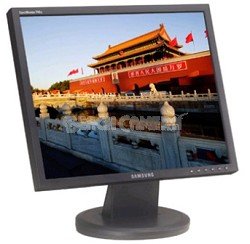
Figure 1: The Samsung SyncMaster 740N 17-inch LCD Monitor. This image shows the front view of the monitor with its stand, illustrating its compact design suitable for various desktop environments.
4.2 Connecting the Monitor
- Power Connection: Connect the power cord to the monitor's power input port, then plug the other end into a grounded electrical outlet.
- Video Connection (VGA): Connect the VGA cable (D-Sub) to the VGA port on the back of the monitor and to the VGA output port on your computer's graphics card. Tighten the screws on the VGA connector to secure the connection.
- Power On: Press the power button on the front of the monitor. Then, power on your computer. The monitor should automatically detect the input signal.
5. Operating the Monitor
5.1 Basic Controls
The control buttons are typically located on the front or bottom bezel of the monitor. These buttons allow you to access the On-Screen Display (OSD) menu to adjust various settings.
- Power Button: Turns the monitor on or off.
- Menu Button: Opens the OSD menu.
- Up/Down or Left/Right Buttons: Navigate through OSD menu options and adjust values.
- Enter/Source Button: Confirms selections or switches input sources.
5.2 OSD Menu Navigation
Press the Menu button to open the OSD. Use the navigation buttons to select categories like Picture, Color, OSD, and Setup. Press Enter to access sub-menus or confirm changes. Press Menu again to exit the OSD.
5.3 Special Features
- MagicBright II™: This feature provides various preset brightness modes (e.g., Text, Internet, Game, Sport, Movie, Custom) to optimize the display for different content types. Access it via the OSD menu.
- MagicColor™: Enhances color saturation and brightness, making images appear more vivid. This can be toggled on/off in the OSD.
- MagicTune™: A software utility that allows you to control monitor settings directly from your computer using a mouse and keyboard, providing a more convenient way to adjust brightness, contrast, and other parameters. Install from the provided CD or Samsung's website.
5.4 Optimal Resolution
For the best display quality, set your computer's display resolution to the monitor's native resolution of 1280 x 1024. This can be adjusted through your operating system's display settings.
6. Maintenance
6.1 Cleaning the Monitor
- Always unplug the monitor before cleaning.
- Use a soft, lint-free cloth slightly dampened with water or a specialized screen cleaner.
- Do not use abrasive cleaners, waxes, or solvents as they can damage the screen or casing.
- Spray cleaner onto the cloth, not directly onto the screen.
6.2 General Care
- Avoid touching the screen with sharp objects.
- Do not place heavy objects on the monitor or its cables.
- If moving the monitor, ensure it is powered off and disconnected from all cables.
7. Troubleshooting
If you encounter issues with your monitor, refer to the following common problems and solutions:
| Problem | Possible Solution |
|---|---|
| No Power |
|
| No Signal / "Check Signal Cable" Message |
|
| Image is blurry or distorted |
|
| Colors are incorrect or faded |
|
| Dead Pixels | A small number of defective pixels is inherent in LCD technology. If the number of dead pixels exceeds manufacturer specifications, contact Samsung support. |
8. Specifications
Key technical specifications for the Samsung SyncMaster 740N monitor:
| Feature | Detail |
|---|---|
| Model Name | SyncMaster 740N |
| Screen Size | 17 Inches |
| Display Type | TFT-LCD |
| Native Resolution | 1280 x 1024 |
| Aspect Ratio | 5:4 |
| Brightness (Typical) | 300 cd/m² |
| Contrast Ratio (Typical) | 600:1 |
| Viewing Angle (H/V) | 160°/160° |
| Response Time | 8ms |
| Input | Analog (VGA D-Sub) |
| Power Consumption | (Specific value not provided, typical for 17" LCDs of this era) |
| Dimensions (LxWxH) | 17.4 x 17.1 x 5 inches |
| Weight | 9.8 pounds |
9. Warranty and Support
For warranty information, technical support, or service inquiries, please refer to the warranty card included with your product or visit the official Samsung support website. You may also find updated drivers and software, including MagicTune, on their support pages.
Samsung Official Support: https://www.samsung.com/us/support/


