1. Important Safety Information
Read all instructions carefully before operating the Intermatic HA07 Wireless Master Remote Control. Failure to follow these instructions may result in product damage, property damage, or personal injury. Keep this manual for future reference.
- This device is intended for indoor use in dry locations only.
- Do not expose the device to moisture, extreme temperatures, or direct sunlight.
- Use only the specified battery type (Lithium Metal or Alkaline AA batteries).
- Do not attempt to disassemble or repair the device. Refer all servicing to qualified personnel.
- Keep out of reach of children.
2. Product Overview
The Intermatic HA07 Home Settings Wireless Master Remote Control utilizes Z-Wave technology to provide reliable control of various applications throughout your home. It is designed to control all Intermatic Home Settings devices, offering a comprehensive solution for home automation.

Figure 2.1: Intermatic HA07 Wireless Master Remote Control. This image shows the front view of the white remote control unit, featuring a large rectangular LCD screen at the top and multiple black control buttons arranged below it. The 'Intermatic Home Settings' logo is visible at the bottom.
Key Features:
- Controls up to 12 channels, with each channel managing up to 16 devices.
- Features an astronomic function that automatically adjusts timing for sunrise and sunset changes.
- Offers multiple time options: all week, 5 days, weekends, or individual days.
- Includes a random timing option for enhanced security.
- Provides 8 dimming levels for connected lighting devices.
- Equipped with a large LCD screen for clear function display.
- Designed for versatile placement: tabletop or wall-mounted.
3. Setup
3.1 Battery Installation
- Locate the battery compartment on the back of the HA07 unit.
- Open the battery compartment cover.
- Insert four (4) AA Lithium Metal or Alkaline batteries, ensuring correct polarity (+/-).
- Close the battery compartment cover securely.
- Note: The clock settings will need to be reset after battery replacement as there is no backup battery.
3.2 Placement
The HA07 can be placed on a table or mounted on a wall. For wall mounting, hardware is not included. Choose a central location within your Z-Wave network for optimal signal strength.
3.3 Initial Pairing and Synchronization
The HA07 acts as a Z-Wave master controller. To control devices, they must be paired or 'learned' into the HA07's network. Refer to the specific instructions for your Z-Wave devices for their pairing mode. The process typically involves:
- Putting the HA07 into 'Learn' or 'Inclusion' mode (consult the device's on-screen menu).
- Activating the pairing mode on the Z-Wave device you wish to control.
- Confirming successful pairing on the HA07's LCD screen.
Tip: Programming Z-Wave controllers can sometimes require multiple attempts for synchronization. Patience is key during the initial setup phase.
4. Operating Instructions
The HA07 features a large LCD screen and intuitive buttons for navigation and control.
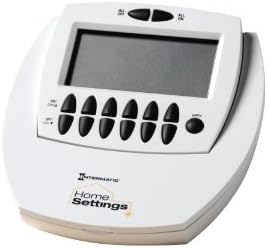
Figure 4.1: Close-up of the HA07's control panel. This image provides a detailed view of the HA07's LCD screen and the arrangement of its black control buttons, including 'ALL ON', 'ALL OFF', 'ON/TIME', 'OFF/TIME', and channel selection buttons.
4.1 Basic Control
- Use the 'ALL ON' and 'ALL OFF' buttons to control all paired devices simultaneously.
- Navigate through channels using the dedicated channel selection buttons.
- Press 'ON/TIME' to activate a device or set an 'ON' time.
- Press 'OFF/TIME' to deactivate a device or set an 'OFF' time.
4.2 Setting Timers and Schedules
The HA07 allows for flexible scheduling of your devices:
- Astronomic Feature: This feature automatically adjusts your 'ON' and 'OFF' times to align with daily sunrise and sunset changes. Set it once, and it will adapt throughout the year.
- Daylight Saving Time: The unit can automatically adjust for Daylight Saving Time if enabled in the settings.
- Multiple Time Options: Program schedules for the entire week, weekdays (5 days), weekends, or specific individual days.
- Random Timing: Activate the random timing option to vary 'ON' and 'OFF' times slightly, creating a lived-in appearance for security purposes.
4.3 Dimming Control
For compatible dimmable devices, the HA07 offers 8 dimming levels. Use the designated dimming buttons or menu options to adjust light intensity.
5. Maintenance
5.1 Battery Replacement
When the battery indicator appears on the LCD screen or the unit's performance degrades, replace the four (4) AA batteries as described in Section 3.1. Remember to reset the clock after battery replacement.
5.2 Cleaning
To clean the HA07, wipe the surface with a soft, dry cloth. Do not use abrasive cleaners, solvents, or spray directly onto the unit, as this may damage the finish or internal components.
6. Troubleshooting
This section addresses common issues you might encounter with your HA07 Wireless Master Remote Control.
| Problem | Possible Cause | Solution |
|---|---|---|
| Unit does not power on or LCD is blank. | Dead or incorrectly installed batteries. | Replace batteries with new AA Lithium Metal or Alkaline batteries, ensuring correct polarity. |
| Difficulty programming or synchronizing devices. | Incorrect pairing procedure; Z-Wave network interference; device not in 'Learn' mode. | Review Section 3.3 for pairing steps. Ensure both HA07 and the target device are in 'Learn' mode. Try repeating the process. Ensure devices are within Z-Wave range. |
| No backlighting on the display. | The HA07 model does not feature a backlit display. | This is normal operation. Ensure adequate ambient lighting to view the screen. |
| Clock resets after battery change. | No internal backup battery for the clock function. | This is normal operation. Reset the time and date after each battery replacement. |
| Cannot control a specific device. | Device not properly paired to a channel; device out of range; device malfunction. | Verify the device is correctly assigned to a channel on the HA07. Ensure the device is within the Z-Wave network's operational range. Check the device's own power and functionality. |
7. Specifications
| Feature | Detail |
|---|---|
| Manufacturer | Intermatic |
| Part Number | HA07C |
| Item Model Number | HA07C |
| Item Weight | 11 ounces |
| Product Dimensions | 12 x 12 x 12 inches |
| Color | White |
| Material | Plastic case, Soft-touch buttons |
| Pattern | Portable battery-powered Z-Wave master controller |
| Shape | Curved Rectangular |
| Thickness | 3 Inches |
| Power Source | Battery Powered |
| Batteries Required | Yes (4 x AA) |
| Battery Cell Type | Alkaline or Lithium Metal |
| Average Battery Life | 2190 Hours |
| Connectivity Technology | Z-Wave (Note: Product description mentions Z-Wave, while specifications list Wi-Fi. Z-Wave is the primary technology for this product line.) |
| Max Number of Supported Devices | 16 devices per channel, up to 12 channels |
| Usage | Indoor use in dry locations |
| Special Features | Astronomic Feature, Daylight Saving Time adjustment, Easy to Extend and Add Remotes, Wall mount ready |
8. Warranty Information
Specific warranty details for the Intermatic HA07 Wireless Master Remote Control are typically provided with the product packaging or available on the official Intermatic website. Please refer to these resources for the most accurate and up-to-date warranty terms and conditions.
9. Support and Contact Information
For technical assistance, troubleshooting beyond this manual, or to inquire about replacement parts, please contact Intermatic customer support. Visit the official Intermatic website for contact details, FAQs, and additional product resources.
Intermatic Official Website: www.intermatic.com


