
Introduction
This instruction manual provides detailed guidance for assembling the Italeri 7018 1:72 Pz.Kpfw. V Panther AUSF. A model building kit. The Panzerkampfwagen V "Panther" was a significant tank of World War II, known for its balance of protection, mobility, speed, and armament. This kit allows you to recreate this historical vehicle in 1:72 scale.

Image: A completed Italeri 1:72 Pz.Kpfw. V Panther Ausf. A model, showcasing its detailed construction and camouflage in a simulated outdoor environment.
Safety Information
Warning: Not suitable for children under 14 years.
This model kit contains small parts and requires the use of sharp tools and adhesives. Always supervise younger builders. Ensure adequate ventilation when using paints and glues. Read all safety warnings on adhesives and paints before use.
Package Contents
Your Italeri 7018 kit includes:
- Plastic kit (unassembled parts on sprues)
Required items (not included):
- Model cement/glue
- Hobby knife or sprue cutters
- Fine-grit sandpaper or file
- Paints (acrylic or enamel, as desired)
- Paintbrushes or airbrush
- Tweezers (recommended for small parts)

Image: A plastic sprue containing various main hull components and smaller details for the model kit.

Image: A plastic sprue displaying numerous road wheels, drive sprockets, and turret sections.
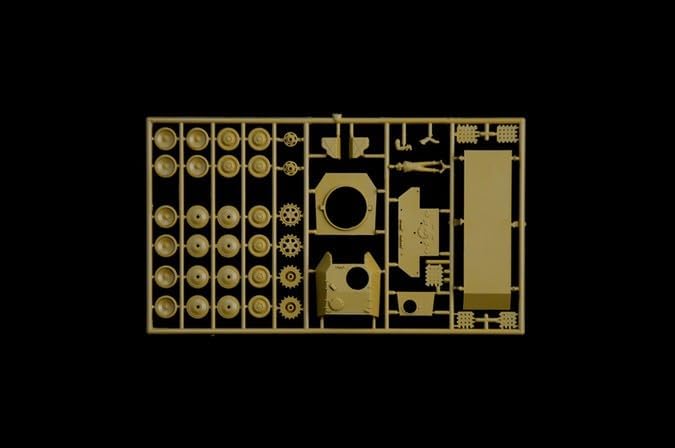
Image: A plastic sprue featuring multiple individual track links, which require careful assembly to form the tank's tracks.
Assembly Instructions
Follow the included step-by-step or illustrated assembly instructions carefully. The precise individual parts must be assembled according to the diagrams.
- Preparation: Carefully remove parts from the sprues using a hobby knife or sprue cutters. Clean any excess plastic (flash) from the parts with a hobby knife or fine-grit sandpaper. Test fit parts before applying glue.
- Hull Assembly: Begin by assembling the main hull components. Pay close attention to alignment to ensure a straight and accurate build.
- Running Gear: Assemble the road wheels, drive sprockets, and idler wheels. Attach them to the hull as indicated in the instructions.
- Tracks: Assemble the individual track links. This can be a delicate process. Ensure the tracks fit correctly around the running gear.
- Turret Assembly: Construct the turret, including the main gun and any machine guns.
- Detailing: Attach smaller detail parts such as tools, exhaust pipes, and antennae.
- Final Checks: Ensure all parts are securely attached and that the model is structurally sound before proceeding to painting.
Painting Guide
The parts can be painted according to your own ideas. The Panther tank featured various camouflage schemes depending on the unit and operational theater. Below are examples of historical camouflage patterns for the Pz.Kpfw. V Panther Ausf. A.

Image: Version A camouflage scheme for the Pz.Kpfw. V Panther Ausf. A, depicting the Wehrmacht 'Grossdeutschland' Panzer Regiment in Iasi, Romania, April 1944. This scheme features a base of Panzer Dunkelgelb 1943 with disruptive patterns of Panzer Schokobraun RAL 8017 and Panzer Olivgrün 1943.

Image: Version C camouflage scheme for the Pz.Kpfw. V Panther Ausf. A, representing Panzer Regiment 31, Wehrmacht 5th Panzer Division in Belarus, July 1944. This pattern also uses Panzer Dunkelgelb 1943 as a base, with distinct patches of Panzer Schokobraun RAL 8017 and Panzer Olivgrün 1943.

Image: Version E camouflage scheme for the Pz.Kpfw. V Panther Ausf. A, used by the 5th Elite Panzer Division 'Viking', Panzer Regiment 5, in the Vistula sector during Fall 1944. This scheme shows a more complex pattern of Panzer Dunkelgelb 1943, Panzer Schokobraun RAL 8017, and Panzer Olivgrün 1943.
Specifications
| Feature | Detail |
|---|---|
| Brand | Italeri |
| Model Name | Pz.Kpfw. V Panther AUSF. A |
| Model Number | 7018 |
| Scale | 1:72 |
| Material Type | Plastic |
| Number of Pieces | 24 |
| Item Dimensions (L x W x H) | 1.57 x 10.28 x 6.46 inches (4 x 26.1 x 16.4 cm) |
| Item Weight | 0.1 kg |
| Age Range (Description) | Adult (14+ years) |
Maintenance
Once assembled and painted, your model requires minimal maintenance:
- Cleaning: Dust your model regularly with a soft brush or compressed air to prevent dust buildup in crevices. Avoid using water or harsh cleaning agents, as these can damage paint or decals.
- Storage: Store your model in a cool, dry place away from direct sunlight to prevent fading of paint and warping of plastic. Display cases are recommended for protection.
- Handling: Handle the model carefully, especially delicate parts like antennae or machine guns, to avoid breakage.
Troubleshooting
Most issues during model building can be resolved with careful attention to the instructions and proper technique.
- Parts not fitting: Ensure all flash is removed from the parts. Lightly sand mating surfaces if necessary. Do not force parts together.
- Glue issues: Use a small amount of model cement. Too much glue can melt the plastic or create unsightly marks. Allow sufficient drying time.
- Paint issues: Ensure surfaces are clean and dry before painting. Apply thin coats of paint to avoid obscuring detail. Allow each coat to dry thoroughly before applying the next.
- Missing parts: Double-check the sprues and packaging. If a part is genuinely missing, contact Italeri customer support.
Warranty and Support
This product comes with no guarantee as per the manufacturer's warranty description. For any issues or inquiries regarding the kit, please refer to the contact information provided by Italeri or your retailer.


