1. Introduction
The Elite Screens Manual Series M84UWH is a high-quality, manually operated pull-down projector screen designed for various viewing environments, including home theaters, businesses, and educational settings. This screen features a durable construction, an auto-locking mechanism for flexible height adjustments, and a MaxWhite 2 viewing surface optimized for 4K Ultra HD and 3D projection. This manual provides essential information for the proper setup, operation, and maintenance of your projector screen.

The Elite Screens Manual Series M84UWH projector screen in its fully extended position, showcasing the viewing surface and the black casing.
2. Product Features
- MaxWhite 2 Material: 1.1 Gain, multi-layer weave, 180-degree wide viewing angle, fully black-backed front projection screen with a textured surface.
- High Definition Ready: Compatible with 4K Ultra HD, Active 3D, and HDR content.
- Auto-Locking System: Provides variable height settings, allowing the screen to be stopped at any desired position.
- Versatile Installation: Designed for dual wall and ceiling installation.
- Safety Certifications: GREEN GUARD and GREENGUARD GOLD Certified for safe indoor use (UL 2818).
- ISF Certified: Material is ISF Certified for image fidelity and accurate color reproduction in dark room environments.
- Screen Lanyard: Included for easy operation, allowing the pull-down handle to be reached from higher areas.

A detailed view of the MaxWhite 2 screen material, highlighting its features such as 1.1 gain, 180-degree wide viewing angle, and compatibility with 3D, HDR, and 4K Ultra HD content.
3. Setup and Installation
The Elite Screens Manual Series M84UWH is designed for flexible installation on either a wall or ceiling. Ensure the mounting surface is structurally sound and capable of supporting the screen's weight (approximately 9.5 lbs for the M84UWH model).
3.1 Mounting Options
- Wall Mount: Use appropriate screws and anchors (included) to secure the screen casing to a wall. Ensure the mounting points align with wall studs for maximum security.
- Ceiling Mount: The screen can also be suspended from a ceiling using appropriate hardware. Optional 6-inch and 12-inch L brackets are available separately for extended drop.

A visual guide illustrating the flexible installation options for the Manual Series screen, allowing for both wall and ceiling mounting to suit various room configurations.
3.2 Installation Steps (General)
- Measure and Mark: Determine the desired location for your screen. Measure the distance between the mounting holes on the screen casing and mark these points on your wall or ceiling.
- Drill Pilot Holes: Drill pilot holes at the marked locations. If mounting into drywall without studs, use appropriate drywall anchors.
- Secure the Screen: Carefully lift the screen and align the mounting holes with the drilled holes. Secure the screen casing using the provided screws or suitable mounting hardware. Ensure the screen is level and securely fastened.
- Attach Lanyard: If desired, attach the screen lanyard to the pull-down handle for easier access, especially if the screen is mounted high.
Note: It is recommended to have two people for installation due to the screen's length and weight. Always consult a professional if you are unsure about the structural integrity of your mounting surface.
4. Operating Instructions
The Manual Series screen features a simple pull-down and auto-locking mechanism for ease of use.
4.1 Extending the Screen
- Grasp the pull-down handle located at the center of the screen's bottom bar.
- Gently pull the screen downwards to the desired viewing height.
- Once the desired height is reached, pause for a moment. The auto-locking mechanism will engage, holding the screen in place. You may hear a slight click.
- Release the handle slowly. The screen should remain at the selected height.

Detail of the screen's auto-locking mechanism, which allows the screen to be set at various height positions, along with the included lanyard for easy operation.
4.2 Retracting the Screen
- Grasp the pull-down handle firmly.
- Pull the screen downwards slightly (approximately 1-2 inches) to disengage the auto-locking mechanism.
- Slowly guide the screen upwards. Do not release the handle abruptly, as this can cause the screen to retract too quickly and potentially damage the mechanism or screen material.
- Continue to guide the screen until it is fully retracted into its casing.
5. Maintenance
Proper maintenance ensures the longevity and optimal performance of your projector screen.
5.1 Cleaning the Screen Surface
- Use a soft, lint-free cloth or microfiber towel to gently wipe the screen surface.
- For stubborn marks, lightly dampen the cloth with mild soap and water. Do not use harsh chemicals, abrasive cleaners, or solvents, as these can damage the screen material.
- Wipe in a horizontal direction, from one side to the other, to avoid streaking.
- Allow the screen to air dry completely before retracting it.
5.2 Casing and Mechanism
- Periodically inspect the screen casing and mounting hardware for any signs of wear or loosening. Tighten screws if necessary.
- Keep the screen mechanism free from dust and debris. Do not apply lubricants to the internal mechanism unless specifically instructed by Elite Screens support.
6. Troubleshooting
This section addresses common issues you might encounter with your projector screen.
6.1 Screen Does Not Retract Fully or Smoothly
- Check for Obstructions: Ensure there are no objects blocking the screen's path or interfering with the retraction mechanism.
- Tension Adjustment: Over time, the internal spring mechanism may lose tension. Refer to the Elite Screens website or contact customer support for instructions on how to re-tension the screen. This often involves pulling the screen down slightly, rotating the screen casing, and then allowing it to retract.
- Slow Retraction: If the screen retracts very slowly, it might also indicate a need for tension adjustment.
6.2 Wrinkles or Waves on Screen Surface
- Initial Setup: Minor waves may be present initially but typically flatten out with use.
- Temperature: Extreme temperature fluctuations can sometimes affect screen flatness. Ensure the screen is used in a stable environment.
- Improper Retraction: Always guide the screen slowly during retraction to prevent uneven winding, which can cause wrinkles.
6.3 Image Quality Issues (e.g., Dimness, Poor Contrast)
- Projector Settings: Verify your projector's brightness, contrast, and color settings are optimized.
- Ambient Light: Minimize ambient light in the viewing area for optimal image quality, especially with standard throw projectors.
- Screen Cleanliness: A dirty screen surface can affect image clarity and brightness. Refer to the cleaning instructions in Section 5.1.
7. Specifications
Detailed specifications for the Elite Screens Manual Series M84UWH projector screen.
| Specification | Detail |
|---|---|
| Brand | Elite Screens |
| Model Number | M84UWH |
| Display Dimensions (Diagonal) | 84 inches |
| Aspect Ratio | 16:9 |
| View Size (H x W) | 41.3" H x 73.2" W |
| Overall Dimensions (H x W x D) | 57.6" H x 80.4" W x 2.9" D |
| Item Weight | 9.5 pounds |
| Material | MaxWhite 2 (Front Projection) |
| Gain | 1.1 |
| Viewing Angle | 180 degrees |
| Mounting Type | Inside Mount (Wall/Ceiling) |
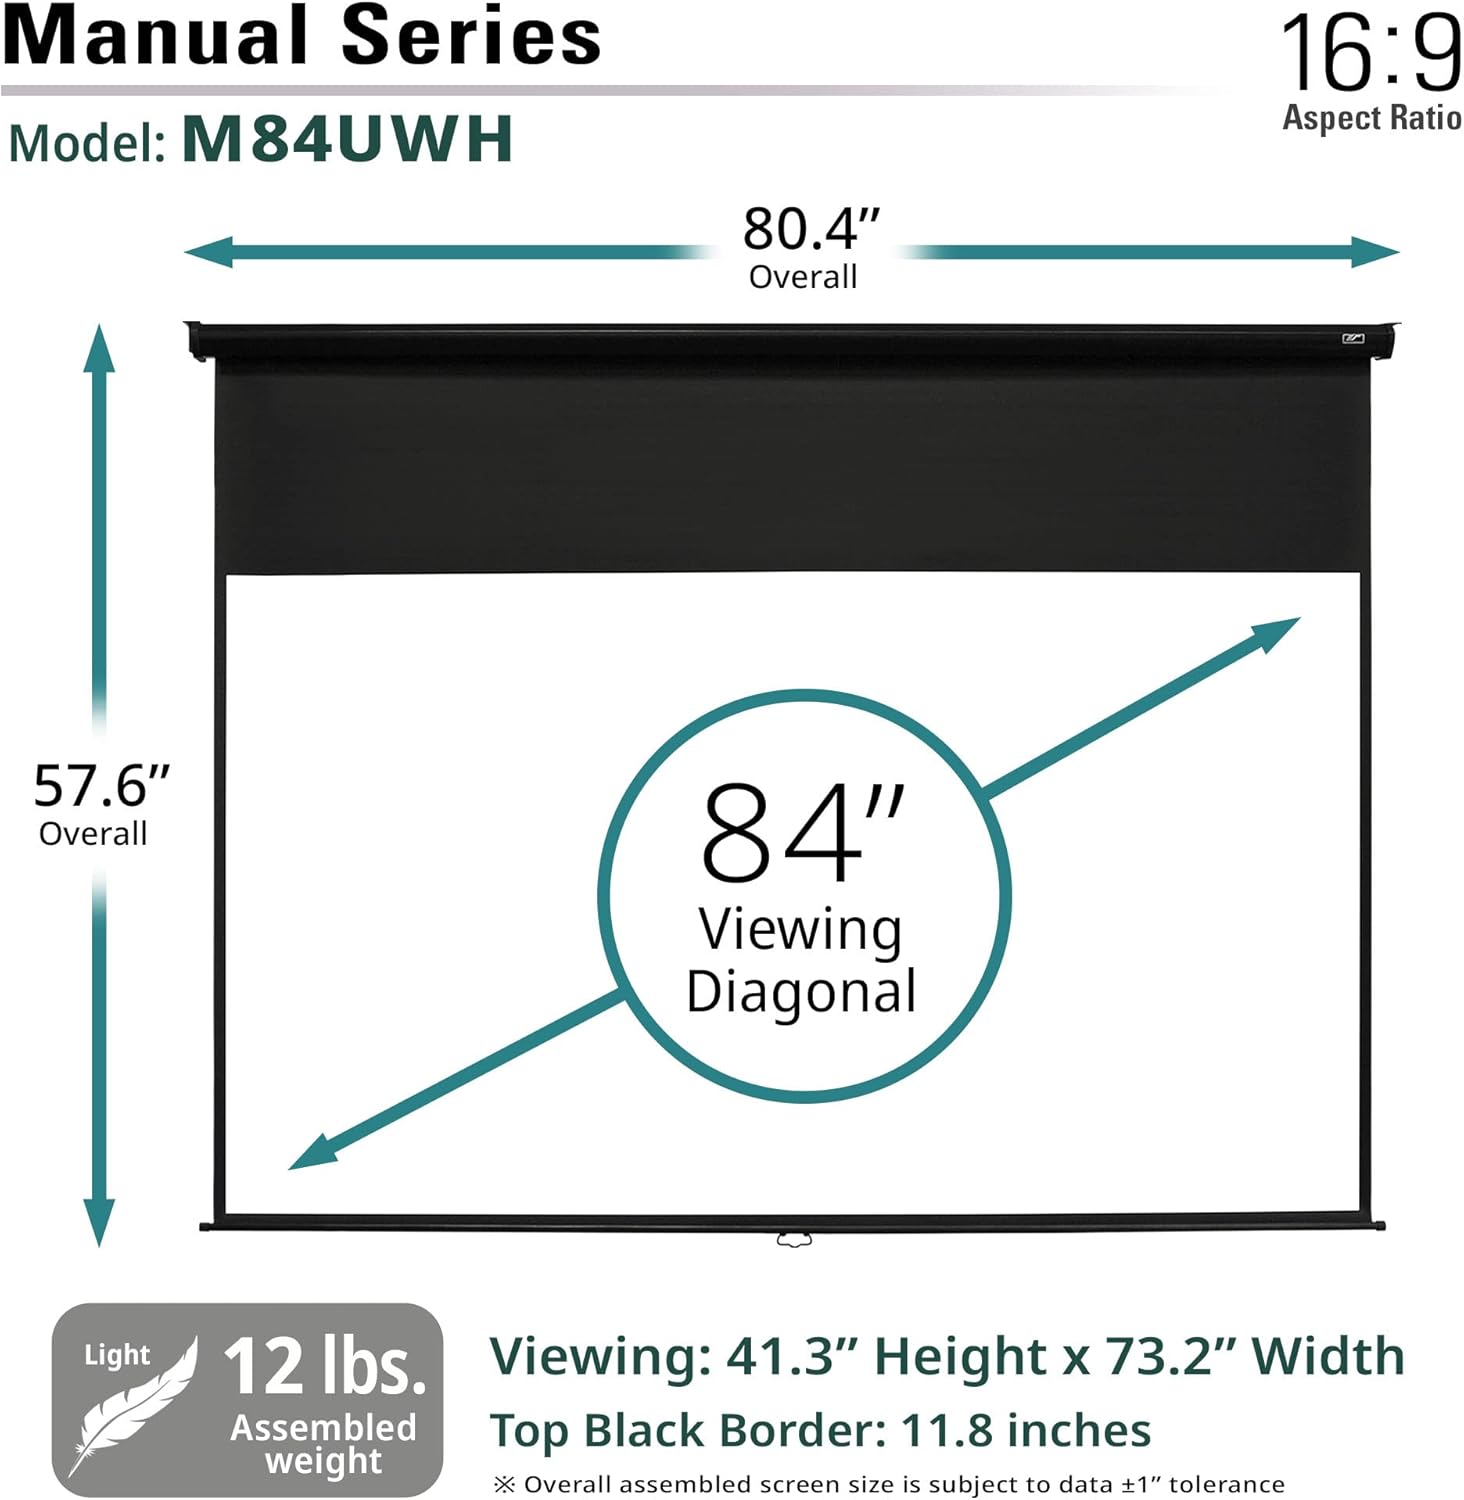
A diagram detailing the specific dimensions of the M84UWH model, including the 84-inch viewing diagonal, overall width, and height, along with the top black border measurement.
8. Warranty and Support
Elite Screens provides comprehensive support and warranty coverage for its products.
8.1 Manufacturer's Warranty
The Elite Screens Manual Series M84UWH comes with a 2-Year / 3-Year ENR-G Manufacturer's Warranty. Please refer to the official Elite Screens website or your product registration for specific terms and conditions of your warranty.
8.2 Technical Support
Elite Screens offers Lifetime Technical Support. For assistance with setup, troubleshooting, or any product-related inquiries, you can contact their professional service team via email, web chat, or toll-free phone call. Contact details can be found on the official Elite Screens website.

This image illustrates the customer support and warranty commitment from Elite Screens, including U.S.-based stock, service, and lifetime tech support.