
1. Introduction
The Shoprider Scootie is a compact travel scooter designed for ease of transport and maneuverability. It features articulating front wheels for enhanced stability and a lightweight design, making it suitable for various travel needs. This manual provides essential information for the safe and effective use of your Scootie scooter.

Figure 1: Full view of the Shoprider Scootie Compact Travel Scooter.
Key Features:
- 250 lbs weight capacity
- Tire sizes: 2 front 7 inches, 2 rear 8 inches
- Adjustable flip-up arms
- Length adjustable frame
- Removable battery pack
- Patented articulating front wheels for stability and maneuverability
2. Setup and Assembly
Before operating your Shoprider Scootie, ensure all components are correctly assembled and secured. The scooter is designed for quick setup and disassembly for transport.
2.1 Unpacking
- Carefully remove all components from the packaging.
- Inspect for any visible damage. Contact your dealer immediately if damage is found.
- Ensure all parts listed in the packing list are present.
2.2 Battery Installation
- Locate the battery pack compartment, typically under the seat or floorboard.
- Insert the removable battery pack, ensuring it clicks securely into place.
- Connect the battery terminals if they are not pre-connected. Refer to the labels for positive (+) and negative (-) connections.
2.3 Seat and Tiller Adjustment
The seat and tiller can be adjusted to provide a comfortable and safe riding position.

Figure 2: Side view illustrating adjustable seat and tiller components.
- Seat Height: Adjust the seat post to the desired height and secure it with the locking pin or lever.
- Armrests: Flip up the armrests for easier access or adjust their width if applicable.
- Tiller Angle: Use the tiller adjustment lever to set the handlebar angle for comfortable steering. Ensure it is locked before riding.
- Length Adjustment: The scooter's frame can be adjusted for length. Consult the specific mechanism for your model to extend or retract the frame and lock it securely.
3. Operating Instructions
Familiarize yourself with the controls before operating the scooter in a safe environment.
3.1 Control Panel Overview
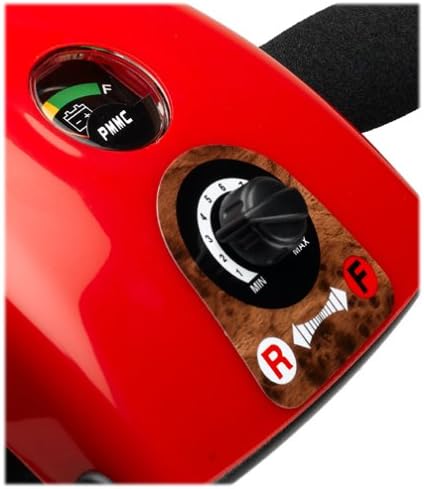
Figure 3: Close-up of the control panel, showing the speed dial and battery indicator.
- Key Switch: Insert the key and turn it to the 'ON' position to power on the scooter.
- Battery Indicator: Displays the current battery charge level. Charge the battery when the indicator shows low.
- Speed Control Dial: Adjusts the maximum speed of the scooter. Turn towards 'MIN' for slower speeds and 'MAX' for faster speeds.
- Forward/Reverse Lever: Push the lever forward to move forward, pull backward to move in reverse. Release to stop.
- Horn Button: Press to sound the horn.
3.2 Driving the Scooter
- Ensure the key is in the 'ON' position.
- Set the speed control dial to a low setting for initial operation.
- Gently press the forward/reverse lever to begin moving. Increase pressure for faster acceleration.
- Steer by turning the tiller handlebars.
- To stop, release the forward/reverse lever. The electromagnetic brake will engage automatically.
3.3 Safety Guidelines
- Always operate the scooter at a safe speed, especially in crowded areas or indoors.
- Avoid sudden stops or turns.
- Do not operate the scooter under the influence of alcohol or medication.
- Be aware of your surroundings and potential obstacles.
- Do not exceed the maximum weight capacity of 250 lbs.
4. Maintenance
Regular maintenance ensures the longevity and safe operation of your Shoprider Scootie.
4.1 Battery Care and Charging
- Charge the batteries fully after each use, even if only used for a short period.
- Use only the charger supplied with your scooter.
- Charging typically takes 8-12 hours. Do not overcharge.
- Store the scooter with fully charged batteries if not in use for an extended period.
4.2 Cleaning
- Wipe down the scooter with a damp cloth. Do not use abrasive cleaners or spray water directly onto electrical components.
- Keep the wheels and chassis free of dirt and debris.
4.3 Tire Inspection

Figure 4: Rear section of the scooter, showing the handle for transport and the rear wheels.
- The Scootie features solid tires, eliminating the need for air pressure checks.
- Regularly inspect tires for excessive wear or damage.
- Contact your dealer for tire replacement if necessary.
5. Troubleshooting
This section addresses common issues you might encounter with your Scootie scooter.
| Problem | Possible Cause | Solution |
|---|---|---|
| Scooter does not power on | Key not in 'ON' position Battery not connected or low charge Circuit breaker tripped | Turn key to 'ON' Check battery connection and charge fully Reset circuit breaker (refer to manual for location) |
| Scooter moves slowly or loses power | Low battery charge Speed control dial set too low Overload (exceeding weight capacity) | Charge batteries fully Adjust speed control dial Reduce load on scooter |
| Scooter makes unusual noises | Loose components Motor issue | Inspect for loose parts and tighten Contact authorized service center |
If you experience issues not listed here or if solutions do not resolve the problem, contact your authorized Shoprider dealer for assistance.
6. Specifications
Detailed specifications for the Shoprider Scootie Compact Travel Scooter.

Figure 5: Close-up of the rear wheel, highlighting tire size.
| Specification | Value |
|---|---|
| Model Number | Scootie |
| Weight Capacity | 250 lbs |
| Product Dimensions | 40 x 17 x 34 inches |
| Item Weight | 45 Pounds (without batteries) |
| Front Tire Size | 7 inches |
| Rear Tire Size | 8 inches |
| Color | Red/Blue |
| Material | Alloy Steel, Aluminum |
| Style | Adjustable, Compact |
7. Warranty Information
Shoprider provides a limited warranty for its products. Specific warranty terms and conditions may vary by region and purchase date. Please refer to the warranty card included with your scooter or contact your authorized dealer for detailed information regarding coverage, duration, and claims procedures.
Important: Keep your proof of purchase for warranty validation.
8. Customer Support
For technical assistance, spare parts, or service inquiries, please contact your authorized Shoprider dealer. They are equipped to provide expert support and ensure your scooter remains in optimal condition.
You may also visit the official Shoprider website for additional resources and contact information.