1. Introduction
This manual provides detailed instructions for the assembly, operation, and maintenance of your Arrow Yardsaver Compact Galvanized Steel Storage Shed, model 4' x 10'. Please read all instructions carefully before beginning assembly and retain this manual for future reference. Proper assembly and maintenance will ensure the longevity and safe use of your storage shed.

Figure 1.1: Arrow Yardsaver Compact Galvanized Steel Storage Shed (4' x 10')
2. Safety Information
Your safety and the safety of others are paramount. Failure to follow these instructions may result in serious injury or property damage.
- Anchoring: The shed must be securely anchored to the ground or a suitable foundation immediately after assembly to prevent wind damage. Anchoring kits are sold separately.
- Site Selection: Choose a level, well-drained site away from overhead power lines, trees, or other structures that could fall onto the shed.
- Assembly Safety: Wear appropriate personal protective equipment, including gloves and eye protection, during assembly. Metal edges can be sharp.
- Two-Person Assembly: Assembly typically requires two or more people for safety and ease of construction.
- Children and Pets: Keep children and pets away from the assembly area.
- Ventilation: Ensure adequate ventilation if storing items that emit fumes.
- Weight Distribution: Distribute stored items evenly to maintain stability. Do not overload shelves or walls.
- Snow Load: Clear heavy snow accumulation from the roof to prevent structural damage.
3. Package Contents
Before beginning assembly, verify that all parts listed below are present and undamaged. Refer to the detailed parts list included in your packaging for specific quantities and part numbers.
- Frame Panels
- Swing Doors (2)
- Hardware (screws, bolts, nuts, washers)
- Handles
- Instruction Manual (this document)
If any parts are missing or damaged, contact Arrow customer support before proceeding with assembly.
4. Site Preparation
Proper site preparation is crucial for the stability and longevity of your shed.
- Level Surface: The shed requires a completely level and square foundation. This can be a concrete slab, a treated wood platform, or a gravel base. An uneven base will cause panels and holes to misalign, making assembly difficult and compromising structural integrity.
- Drainage: Ensure the site has good drainage to prevent water accumulation around the shed base.
- Clearance: Allow sufficient space around the shed for assembly, maintenance, and door operation.
- Anchoring Points: Plan for anchoring the shed to the chosen foundation.
5. Setup and Assembly
Assembly of the Arrow Yardsaver shed involves multiple steps. Follow the included detailed instruction booklet for step-by-step guidance. The following are general tips and important considerations:
- Read Instructions Thoroughly: Familiarize yourself with all steps before starting. Pay close attention to diagrams and part orientations.
- Organize Parts: Lay out and identify all parts according to the parts list. This will save time and prevent errors.
- Tools Required: Common tools include a Phillips head screwdriver, wrench, pliers, measuring tape, level, and possibly a drill with a low torque setting.
- Fastener Management: Do not over-tighten screws, especially when using a power drill. Set drills to a low clutch setting (e.g., 4-6 for sheets, 2 for other parts) or hand-tighten to avoid stripping holes.
- Panel Alignment: When attaching panels, initially leave screws slightly loose to allow for minor adjustments. Tighten all fasteners once panels are correctly aligned and the structure is square.
- Door Assembly: The double swing doors can be mounted on either 4-foot end. Ensure cross members are correctly positioned for proper door function. This step may require extra care and patience.
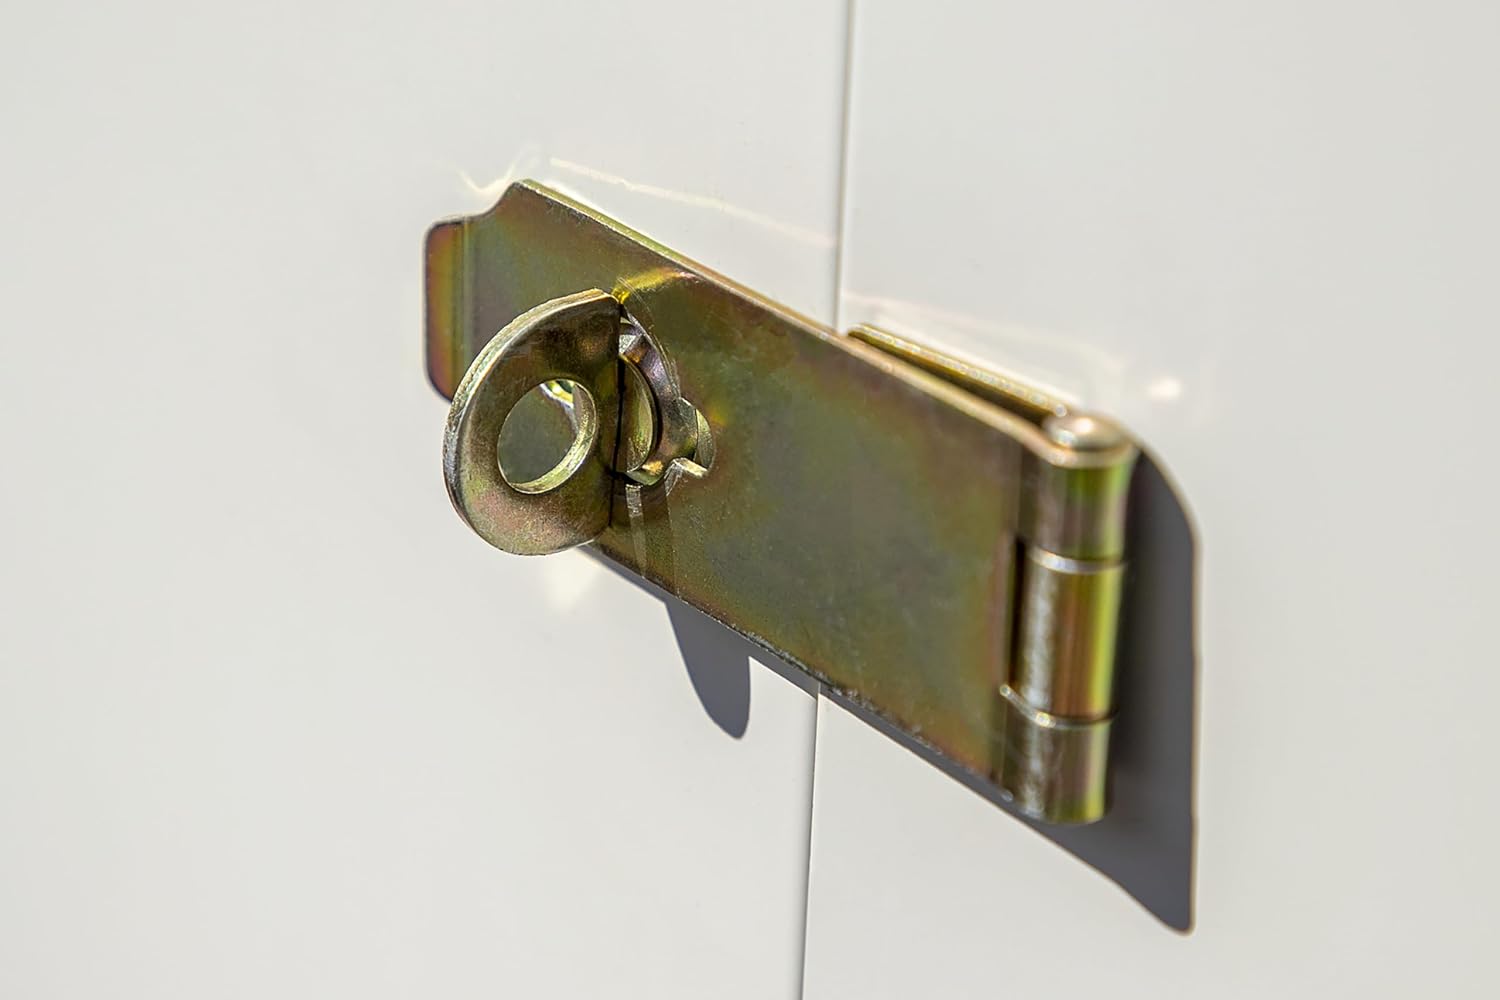
Figure 5.1: Yardsaver Shed Dimensions and Features (Model YS410)
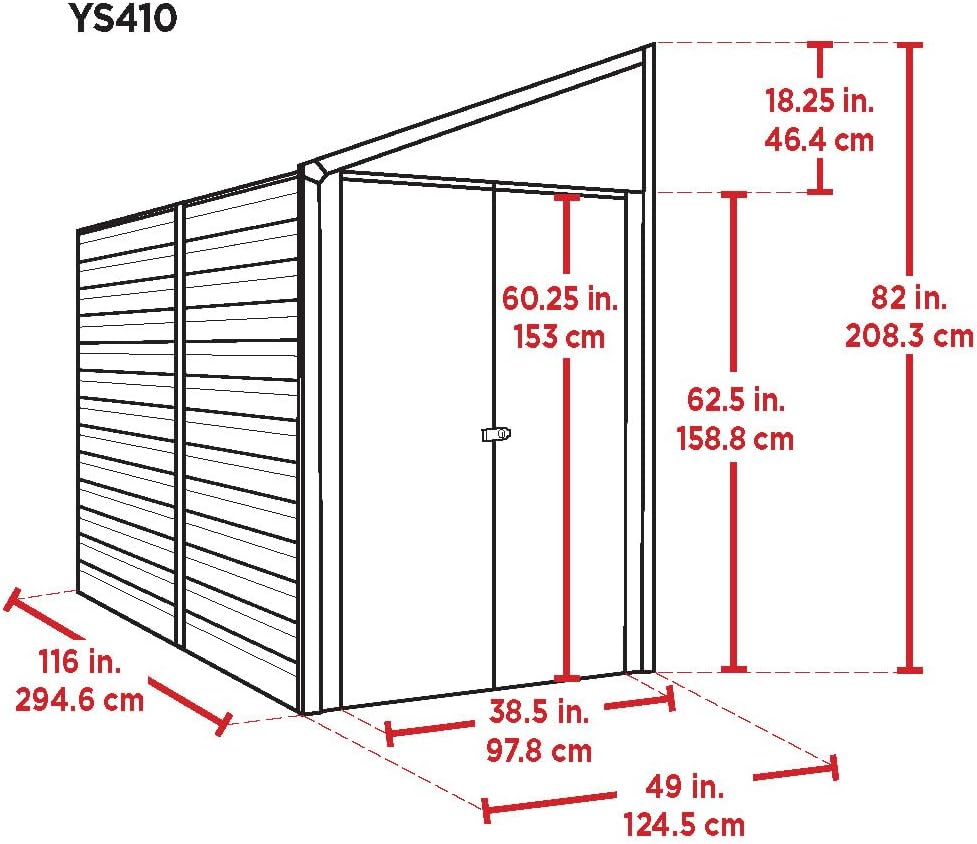
Figure 5.2: Interior Framing of the Shed
6. Operating Instructions
The Yardsaver shed is designed for straightforward operation.
- Door Operation: The shed features double swing doors for easy access. Open and close doors by pulling or pushing the handles.
- Security: The doors are pad-lockable for enhanced security (padlock not included). Ensure the doors are fully closed and the hasp is engaged before applying a padlock.

Figure 6.1: Padlock Mechanism on Shed Doors
7. Maintenance
Regular maintenance will help preserve the appearance and structural integrity of your shed.
- Cleaning: Clean the exterior panels periodically with mild soap and water. Avoid abrasive cleaners or harsh chemicals that could damage the finish.
- Fastener Check: Annually inspect all screws and bolts for tightness. Re-tighten any loose fasteners to maintain structural rigidity.
- Rust Prevention: Although constructed from galvanized steel, inspect for any signs of rust, especially in areas where the finish might be scratched. Touch up with rust-inhibiting paint if necessary.
- Door Hinges: Lubricate door hinges annually to ensure smooth operation.
- Anchoring: Periodically check the anchoring system to ensure the shed remains securely fastened to its foundation.
8. Troubleshooting
This section addresses common issues that may arise during or after assembly.
- Misaligned Holes: If holes do not align, ensure the shed base is perfectly level and square. Also, check that panels and frame components are oriented correctly as per the instruction manual. Loosen surrounding fasteners, adjust the component, and then re-tighten.
- Bent or Buckled Parts: Handle all parts carefully during unpacking and assembly. Minor bends can sometimes be gently straightened. If parts are significantly damaged, contact customer support for replacements.
- Door Scraping: If doors scrape against the frame or base, check for proper alignment of the door frame and hinges. Ensure the shed is square and level.
- Water Leaks: Verify that all panels are properly overlapped and all fasteners are tight. Ensure the roof is correctly installed and sealed. Check the foundation for proper drainage.
9. Specifications
| Feature | Detail |
|---|---|
| Model | Yardsaver |
| Exterior Dimensions (Assembled) | 4' x 10' x 7' (W x D x H) |
| Interior Dimensions (Assembled) | 4' x 9'6" x 6'9" (W x D x H) |
| Total Storage Area | 38 sq. feet |
| Wall Height | 62 inches |
| Door Style | Double Swing Doors |
| Door Dimensions | 3'2" W x 5' H |
| Material | Electro-galvanized Steel (Alloy Steel) |
| Color | Eggshell |
| Roof Type | Pent Roof |
| Assembly Required | Yes |
| Item Weight | 155 Pounds |

Figure 9.1: Front View of the Yardsaver Shed
10. Warranty and Support
Arrow stands behind the quality of its products.
- Warranty: This Arrow Yardsaver shed comes with a 12-year limited warranty, covering defects in materials and workmanship under normal use. Please refer to the warranty card included with your product for full terms and conditions.
- Customer Support: For assistance with assembly, missing parts, or warranty claims, please contact Arrow customer service. Support is available 7 days a week.

Figure 10.1: Warranty and Customer Support Information


