
1. Introduction
Thank you for purchasing the Toshiba SD-V395U DVD Player VHS VCR Combo. This unit combines the versatility of a DVD player with the functionality of a VHS VCR, allowing you to enjoy both modern digital media and classic analog videotapes. This manual provides essential information for setting up, operating, and maintaining your device to ensure optimal performance and longevity.
2. Important Safety Instructions
Please read all safety and operating instructions carefully before using this product. Keep these instructions for future reference.
- Power Source: Operate this product only from the type of power source indicated on the marking label.
- Ventilation: Do not block any ventilation openings. Ensure adequate space around the unit for proper airflow to prevent overheating.
- Water and Moisture: Do not use this product near water (e.g., bathtub, sink, wet basement). Do not expose it to dripping or splashing.
- Cleaning: Unplug this product from the wall outlet before cleaning. Use a dry cloth for cleaning. Do not use liquid cleaners or aerosol cleaners.
- Object and Liquid Entry: Never push objects of any kind into this product through openings as they may touch dangerous voltage points or short-out parts that could result in a fire or electric shock.
- Servicing: Do not attempt to service this product yourself. Refer all servicing to qualified service personnel.
3. Front Panel Controls
The front panel of your Toshiba SD-V395U provides convenient access to basic playback functions and input ports.

Figure 3.1: Front Panel Overview
- Power Button (I/O ON/STANDBY): Turns the unit on or off (standby mode).
- VCR/DVD Selector: Toggles between VCR and DVD modes.
- Play (►): Starts playback of a DVD or VHS tape.
- Stop (■): Stops playback.
- Rewind (◀◀): Rewinds the tape or searches backward on a DVD.
- Fast Forward (►►): Fast forwards the tape or searches forward on a DVD.
- Open/Close (▲): Opens or closes the DVD disc tray.
- Eject (▲): Ejects a VHS tape.
- Channel Up/Down (▲/▼): Changes TV channels in VCR tuner mode.
- REC (●): Initiates recording on a VHS tape.
- LINE IN 2 (Video, L/Mono Audio, R Audio): Front-panel input jacks for connecting external devices like camcorders for recording to VHS.
4. Rear Panel Connections
The rear panel houses all the necessary input and output connections for integrating the unit into your home entertainment system.
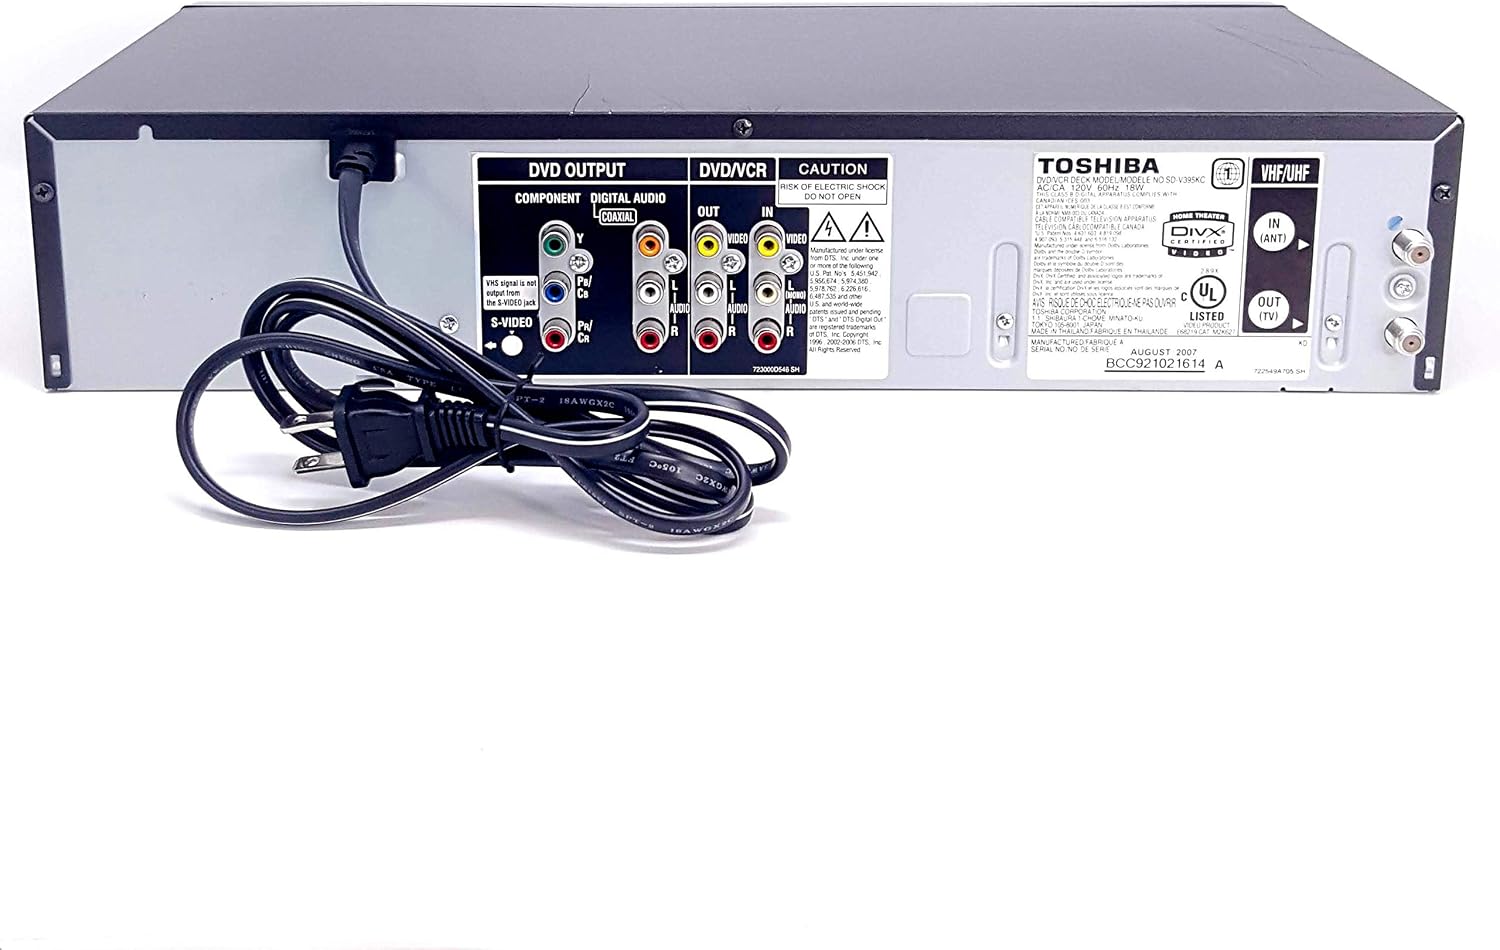
Figure 4.1: Rear Panel Overview

Figure 4.2: Detailed Rear Connections
- DVD OUTPUT:
- COMPONENT Video (Y, Pb/Cb, Pr/Cr): Provides high-quality video output for DVD playback.
- DIGITAL AUDIO (COAXIAL): For connecting to an audio receiver with a digital coaxial input for surround sound.
- S-VIDEO: Enhanced video output for DVD playback.
- DVD/VCR OUT:
- VIDEO (Yellow RCA): Standard composite video output for both DVD and VCR.
- AUDIO L (White RCA) / R (Red RCA): Stereo audio output for both DVD and VCR.
- DVD/VCR IN:
- VIDEO (Yellow RCA): Composite video input for recording to VCR.
- AUDIO L (White RCA) / R (Red RCA): Stereo audio input for recording to VCR.
- VHF/UHF IN/OUT: Coaxial connections for antenna/cable input and output to a television.
- AC Power Input: Connects to the main power supply.
5. Remote Control
The included remote control provides full functionality for both DVD and VCR operations, allowing convenient control from a distance.

Figure 5.1: Unit with Remote Control
Key functions include power, input selection, DVD/VCR mode switching, full playback controls (play, pause, stop, fast forward, rewind, skip), menu navigation, volume control (if connected to a compatible TV via specific methods), and recording functions.
6. Setup and Connections
Follow these steps to connect your Toshiba SD-V395U to your television and other audio equipment.
6.1 Connecting to a Television
- Best Quality (DVD): Component Video
Connect the Y, Pb/Cb, Pr/Cr jacks from the DVD OUTPUT on the unit to the corresponding Component Video input jacks on your TV. - Good Quality (DVD): S-Video
Connect an S-Video cable from the S-VIDEO jack on the DVD OUTPUT to the S-Video input on your TV. - Standard Quality (DVD & VCR): Composite Video
Connect a composite video cable (yellow RCA) from the VIDEO OUT jack (DVD/VCR OUT) on the unit to the VIDEO IN jack on your TV.
6.2 Connecting Audio
- Digital Audio (DVD): For surround sound, connect a digital coaxial cable from the DIGITAL AUDIO (COAXIAL) output on the unit to the digital coaxial input on your audio receiver.
- Stereo Audio (DVD & VCR): Connect RCA audio cables (white for L, red for R) from the AUDIO L/R OUT jacks (DVD/VCR OUT) on the unit to the corresponding audio input jacks on your TV or audio receiver.
6.3 Power Connection
After all audio and video connections are made, plug the AC power cord into a wall outlet.
7. Operating Instructions
7.1 DVD Playback
- Turn on the unit and your TV. Select the correct input on your TV.
- Press the VCR/DVD button on the front panel or remote to select DVD mode.
- Press the OPEN/CLOSE button to open the disc tray. Place a DVD disc with the label side up.
- Press OPEN/CLOSE again to close the tray. Playback should begin automatically or after selecting an option from the DVD menu.
- Use PLAY (►), PAUSE (▼▼), STOP (■), REWIND (◀◀), and FAST FORWARD (►►) buttons for control.
- Use the arrow keys and ENTER on the remote to navigate DVD menus.
7.2 VCR Playback
- Turn on the unit and your TV. Select the correct input on your TV.
- Press the VCR/DVD button on the front panel or remote to select VCR mode.
- Insert a VHS tape into the VCR slot. The unit will automatically load the tape.
- Press PLAY (►) to start playback.
- Use PLAY (►), PAUSE (▼▼), STOP (■), REWIND (◀◀), and FAST FORWARD (►►) buttons for control.
- Press EJECT (▲) to remove the tape.
7.3 VCR Recording
You can record from an external source connected to the LINE IN 2 (front) or DVD/VCR IN (rear) jacks, or from the unit's internal tuner (if connected to an antenna/cable source).
- Insert a recordable VHS tape into the VCR slot. Ensure the tape's erase-protection tab is intact.
- Select VCR mode using the VCR/DVD button.
- For external source recording: Select the appropriate input source on the VCR (e.g., Line 2, Line 1). Start playback on your external device.
- For TV tuner recording: Select the desired channel using the CHANNEL UP/DOWN buttons.
- Press the REC (●) button on the front panel or remote to begin recording.
- Press STOP (■) to end recording.
8. Maintenance
8.1 Cleaning the Unit
Wipe the exterior of the unit with a soft, dry cloth. Do not use abrasive cleaners, waxes, or solvents as they can damage the finish.
8.2 VCR Head Cleaning
If you experience poor picture quality during VHS playback (e.g., snowy picture, lines), the VCR heads may be dirty. Use a dry-type VCR head cleaning cassette according to its instructions. Avoid wet-type cleaners as they can cause damage.
9. Troubleshooting
Before contacting service, please check the following common issues and solutions:
| Problem | Possible Cause | Solution |
|---|---|---|
| No power | Power cord unplugged; unit in standby | Check power cord connection; press Power button |
| No picture/sound | Incorrect TV input; loose A/V cables | Select correct TV input; check all cable connections |
| DVD not playing | Disc dirty/scratched; incorrect region code; disc upside down | Clean disc; ensure disc is compatible; insert disc label-side up |
| VCR picture snowy/distorted | Dirty VCR heads; worn tape | Use a VCR head cleaner; try a different tape |
| Remote control not working | Dead batteries; obstruction; not pointed at unit | Replace batteries; remove obstruction; point remote directly at unit |
10. Specifications
| Feature | Specification |
|---|---|
| Model Name | Toshiba SD-V395U |
| Media Type | CD, DVD, VHS |
| Video Output Resolution | 720 x 480 pixels |
| Analog Video Format | NTSC |
| Connector Types | RCA (Composite Video, Audio L/R), S-Video, Component Video (Y, Pb/Cb, Pr/Cr), Digital Coaxial Audio, RF (VHF/UHF) |
| Supported Audio Formats | Dolby Digital, DTS Digital, Stereo |
| Audio Output Mode | Stereo |
| Power Consumption | 18 watts |
| Parcel Dimensions | 46.2 x 28.7 x 11.7 cm |
| Weight | 3.68 kg |
11. Warranty and Support
For warranty information, please refer to the warranty card included with your product or visit the official Toshiba support website. For technical assistance or further inquiries, please contact Toshiba customer support.
You can find more information and support resources by visiting the TOSHIBA Store on Amazon.


