
1. Introduction
This manual provides essential information for the safe and effective use of your Sony Cybershot DSCT7 digital camera. Please read it thoroughly before operating the camera and retain it for future reference.
The Sony Cybershot DSCT7 is a compact 5.1-megapixel digital camera featuring a Carl Zeiss Vario-Tessar lens with 3x optical zoom and a 2.5-inch LCD display. Its ultra-slim design makes it highly portable.
2. Setup
2.1. Charging and Installing the Battery
The camera uses a rechargeable NP-FE1 InfoLithium battery. Ensure the battery is fully charged before first use.
- Insert the battery into the supplied battery charger.
- Connect the charger to a power outlet. The charge indicator will illuminate.
- Once charging is complete, the indicator will turn off. Remove the battery.
- Open the battery compartment cover on the camera.
- Insert the charged battery into the compartment, ensuring correct orientation. Close the cover securely.
2.2. Inserting a Memory Stick Duo
The camera records images and videos onto Memory Stick Duo media.
- Open the Memory Stick compartment cover.
- Insert the Memory Stick Duo into the slot with the label facing the correct direction, until it clicks into place.
- Close the compartment cover.
2.3. Initial Power On and Date/Time Setting
Upon first power-on or after the battery has been removed for an extended period, you may need to set the date and time.
- Slide the lens cover open to power on the camera.
- Follow the on-screen prompts to set the date, time, and time zone using the control buttons.
- Confirm your settings.
3. Operating the Camera
3.1. Basic Photography
To take a still picture:
- Slide the lens cover open to power on the camera. The lens will extend.
- Frame your shot using the 2.5-inch LCD monitor.
- Press the shutter button halfway down to focus. The camera will beep when focus is achieved.
- Press the shutter button fully down to capture the image.

Figure 3.1: Front view of the Sony Cybershot DSCT7 with the lens cover open, ready for use. The Carl Zeiss Vario-Tessar lens is visible.
3.2. Zoom Function
The DSCT7 features a 3x optical zoom and a 2x Precision Digital Zoom, totaling 6x zoom. It also includes a Smart Zoom feature.
- Use the W/T (Wide/Telephoto) lever on the top of the camera to adjust the zoom.
- Optical Zoom: Provides high-quality magnification without loss of detail.
- Digital Zoom: Extends the zoom range but may result in some image degradation.
- Smart Zoom: Intelligently crops the image using the full CCD, avoiding degradation at lower resolutions.

Figure 3.2: Top view of the camera, highlighting the W/T zoom lever and other control buttons.
3.3. LCD Monitor
The camera is equipped with a 2.5-inch Hybrid Clear Photo LCD monitor. This display offers high resolution, contrast, and brightness, making it suitable for viewing in various lighting conditions, including direct sunlight.
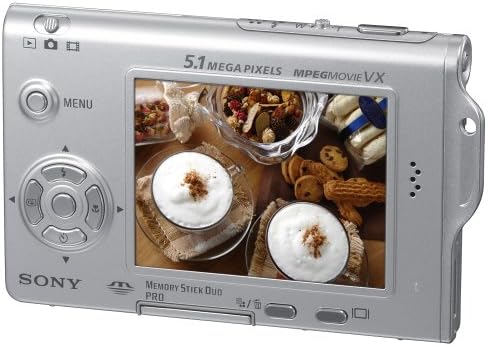
Figure 3.3: Rear view of the camera, displaying the 2.5-inch LCD monitor and navigation controls.
3.4. Shooting Modes
The DSCT7 offers 10 Scene Modes to optimize settings for different shooting conditions:
- Twilight: For low-light scenes.
- Twilight Portrait: For portraits in low light.
- Soft Snap: For softer skin tones in portraits.
- Landscape: For wide outdoor scenes.
- Beach: For bright scenes with sand or water.
- Snow: For bright scenes with snow.
- Fireworks: For capturing fireworks displays.
- High Speed Shutter: For freezing fast-moving subjects.
- Candle: For shooting in candlelight.
- Magnifying Glass: For extreme close-up photography (1 cm focus).
3.5. Movie Recording
The camera supports MPEG Movie VX Fine Modes, allowing you to capture VGA (640 x 480) audio-video clips at up to 30 frames per second. The recording length is limited only by the capacity of the Memory Stick Duo.
- Switch the camera to movie mode using the mode dial or menu.
- Press the shutter button to start and stop recording.
3.6. Flash Operation
The built-in flash features Pre-Flash Metering for accurate exposure, adjustable flash levels, and red-eye reduction.
- Auto Flash: The camera automatically determines if flash is needed.
- Fill Flash: Forces the flash to fire, useful for backlit subjects.
- Slow Sync: Combines flash with a slow shutter speed for balanced exposure in low light.
- Red-Eye Reduction: Fires a pre-flash to minimize red-eye effect.
4. Maintenance
4.1. Cleaning the Camera
- Lens: Use a soft, lint-free cloth or a lens brush to gently remove dust. For smudges, use a lens cleaning solution applied to the cloth, not directly to the lens.
- LCD Screen: Wipe gently with a soft, dry cloth. Avoid pressing hard on the screen.
- Camera Body: Wipe with a soft, dry cloth. Do not use organic solvents like alcohol or thinner.
4.2. Battery Care
- Store batteries in a cool, dry place when not in use.
- Avoid fully discharging the InfoLithium battery frequently to prolong its lifespan.
- If the camera will not be used for an extended period, remove the battery.
4.3. Memory Stick Duo Handling
- Do not bend, drop, or expose the Memory Stick Duo to strong impacts.
- Keep the Memory Stick Duo away from static electricity and electrical noise.
- Avoid touching the metal terminals of the Memory Stick Duo.
5. Troubleshooting
If you encounter issues with your camera, refer to the following common solutions:
| Problem | Possible Cause / Solution |
|---|---|
| Camera does not power on. | Battery is not charged or incorrectly inserted. Ensure the lens cover is fully open. |
| Pictures are blurry. | Insufficient light (use flash), camera shake, or subject too close (check minimum focus distance). Ensure lens is clean. |
| Flash does not fire. | Flash mode is set to 'Off' or 'Auto' in bright conditions. Check flash settings. |
| Memory Stick Duo error. | Memory Stick Duo is full, corrupted, or incorrectly inserted. Try reinserting or formatting the card (this will erase all data). |
| LCD screen is black or flickering. | Battery low. Power cycle the camera. If problem persists, contact support. |
| Camera turns off unexpectedly. | Battery low. Auto power-off setting. |
If the problem persists after attempting these solutions, please refer to the support section.
6. Specifications
| Feature | Detail |
|---|---|
| Model Name | Sony Cybershot DSCT7 |
| Photo Sensor Resolution | 5.1 MP |
| Optical Zoom | 3x |
| Digital Zoom | 2x (Precision Digital Zoom) |
| Lens Type | Carl Zeiss Vario-Tessar |
| Screen Size | 2.5 Inches |
| Sensor Type | CCD (1/2.5-inch Super HAD CCD) |
| Image Stabilization | Digital, Optical |
| Supported File Format | JPEG, RAW |
| Video Resolution | 480p (VGA 640x480) |
| Connectivity Technology | USB |
| Flash Memory Type | Memory Stick Duo / Pro Duo |
| Battery Type | InfoLithium NP-FE1 |
| Item Weight | 0.3 Pounds |
| Dimensions (Approx.) | 3/8 inches thin (narrowest), 5/8 inches thin (widest) |
7. Warranty Information
This product is covered by a limited warranty. For detailed information regarding the warranty period, terms, and conditions, please refer to the warranty card included with your purchase or visit the official Sony support website. Keep your proof of purchase for warranty claims.
8. Customer Support
For further assistance, technical support, or service inquiries, please contact Sony customer support through the following channels:
- Online Support: Visit the official Sony support website for FAQs, drivers, software updates, and service information.
- Telephone Support: Refer to your product documentation or the Sony website for regional contact numbers.
When contacting support, please have your camera model number (DSCT7) and serial number ready.