1. Introduction
This manual provides detailed instructions for the setup, operation, and maintenance of your Avion AV-DVR100 DVD Video Recorder. Please read this manual thoroughly before using the device to ensure proper functionality and to maximize your enjoyment of its features. The Avion AV-DVR100 allows you to record video to DVD+R and DVD+RW discs, play various disc formats, and connect to other audio/video equipment.
2. Safety Information
- Electrical Safety: Ensure the unit is connected to a power source with the correct voltage. Do not expose the unit to rain or moisture to prevent fire or electric shock.
- Ventilation: Do not block ventilation openings. Allow adequate space around the unit for proper airflow to prevent overheating.
- Placement: Place the unit on a stable, level surface. Avoid placing it in direct sunlight, near heat sources, or in areas with excessive dust or vibration.
- Servicing: Do not attempt to service this product yourself. Refer all servicing to qualified service personnel.
- DTV Transition Notice: The built-in NTSC TV tuner cannot receive over-the-air television broadcasts in the United States after June 12, 2009, without a separate DTV converter box. This does not affect connections to cable, satellite, or other video sources.
3. Package Contents
Please check that your package contains the following items:
- Avion AV-DVR100 DVD Video Recorder Unit
- Remote Control
- User Manual (this document)
- Power Cord
- Audio/Video Cables (RCA type)

4. Product Overview
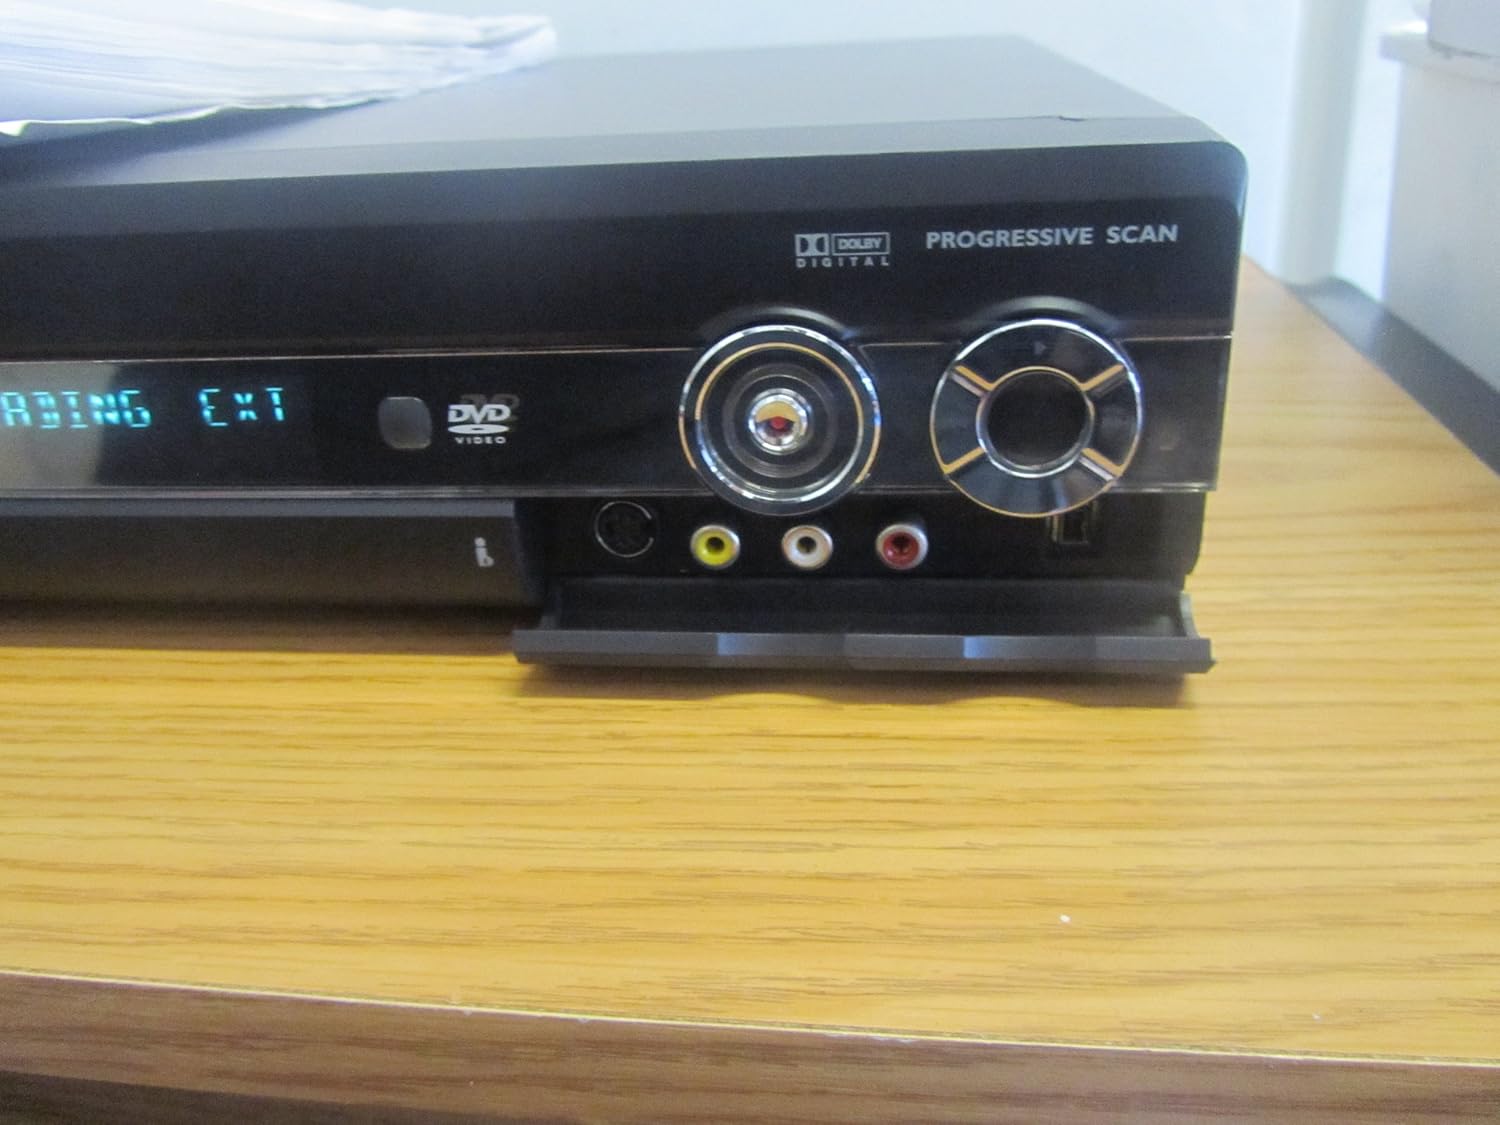
4.1 Front Panel


The front panel of the AV-DVR100 features the following:
- STANDBY-ON Button: Powers the unit on or off (to standby mode).
- Disc Tray: For inserting DVD or CD discs.
- OPEN/CLOSE Button: Opens and closes the disc tray.
- Display Panel: Shows current status, time, track number, and other information.
- Navigation/Control Buttons: Play, Stop, Pause, Fast Forward, Rewind, and Menu navigation.
- Front Panel Inputs (under a flap): i.Link FireWire, S-Video, and Composite Video (RCA) inputs for connecting camcorders or other portable devices.
4.2 Rear Panel
The rear panel contains various connection ports for integrating the DVR with your television, audio system, and other video sources. Refer to the connection diagrams in the Setup section for detailed instructions.
4.3 Remote Control
The remote control provides full functionality for operating the AV-DVR100 from a distance. It includes buttons for power, disc playback, recording, menu navigation, and VCR Plus+ programming.
5. Setup
5.1 Connecting to a Television
To connect the AV-DVR100 to your television, use one of the following methods:
- Composite Video (Good Quality): Connect the yellow RCA video cable from the DVR's 'VIDEO OUT' to your TV's 'VIDEO IN'. Connect the red and white RCA audio cables from the DVR's 'AUDIO OUT' to your TV's 'AUDIO IN'.
- S-Video (Better Quality): Connect an S-Video cable from the DVR's 'S-VIDEO OUT' to your TV's 'S-VIDEO IN'. Connect the red and white RCA audio cables from the DVR's 'AUDIO OUT' to your TV's 'AUDIO IN'.
- Component Video (Best Quality): Connect component video cables (Red, Green, Blue) from the DVR's 'COMPONENT VIDEO OUT' to your TV's 'COMPONENT VIDEO IN'. Connect the red and white RCA audio cables from the DVR's 'AUDIO OUT' to your TV's 'AUDIO IN'.
5.2 Connecting to an Audio System
For enhanced audio, connect the DVR to an external audio receiver or amplifier:
- Analog Audio: Connect the red and white RCA audio cables from the DVR's 'AUDIO OUT' to an available analog audio input on your receiver.
- Digital Audio (Dolby Digital 5.1-channel): Connect a digital coaxial cable from the DVR's 'DIGITAL AUDIO OUT (COAXIAL)' or an optical cable from the 'DIGITAL AUDIO OUT (OPTICAL)' to the corresponding input on your receiver.
5.3 Connecting External Devices (Camcorder, VCR)
To record from external sources, use the front or rear panel inputs:
- Front Panel Inputs: For temporary connections like camcorders, use the i.Link (FireWire), S-Video, or Composite Video inputs located under the front flap.
- Rear Panel Inputs: For permanent connections like a VCR or set-top box, use the corresponding S-Video or Composite Video inputs on the rear panel.
5.4 Initial Setup
After connecting the unit and powering it on for the first time, follow the on-screen prompts to configure basic settings:
- Language Selection: Choose your preferred language for the on-screen menus.
- Time Zone and Clock: Set the correct time zone and current time.
- Tuner Setup: If using the built-in NTSC tuner (requires a DTV converter box for over-the-air broadcasts after 2009), perform a channel scan to find available channels.
6. Operating Instructions
6.1 Basic Disc Playback
- Press the STANDBY-ON button to power on the unit.
- Press the OPEN/CLOSE button to open the disc tray.
- Place a DVD, VCD, SVCD, Audio CD, or MP3 disc onto the tray with the label side facing up.
- Press the OPEN/CLOSE button again to close the tray.
- The unit will automatically begin playback or display a disc menu. Use the remote control's navigation buttons to select options.
- Use the PLAY, PAUSE, STOP, FF (Fast Forward), and REW (Rewind) buttons for playback control.

6.2 Recording to DVD+R/RW Discs
The AV-DVR100 records to DVD+R (write-once) and DVD+RW (rewritable) discs. Ensure you are using the correct disc type for your recording needs.
- Insert a blank DVD+R or DVD+RW disc into the disc tray.
- Select the input source you wish to record (e.g., TV tuner, AV1, S-Video, i.Link) using the INPUT button on the remote.
- Press the RECORD button on the remote control or front panel to begin recording.
- Press the STOP button to end the recording.
- For DVD+RW discs, after recording, you may need to finalize the disc for playback on other DVD players. Refer to the on-screen menu for disc finalization options.
6.3 VCR Plus+ Programming
VCR Plus+ allows for easy timer recording by entering a PlusCode number found in most TV guides.
- Ensure the unit's clock is set correctly.
- Press the VCR Plus+ button on the remote control.
- Enter the PlusCode number for the program you wish to record using the numeric keypad on the remote.
- Confirm the recording details (channel, date, start/end time) on the screen.
- Insert a blank recordable DVD+R or DVD+RW disc. The recorder will automatically begin recording at the scheduled time.
7. Maintenance
7.1 Cleaning the Unit
- Wipe the exterior of the unit with a soft, dry cloth. Do not use liquid or aerosol cleaners.
- Keep the ventilation openings clear of dust and debris.
7.2 Disc Handling and Care
- Handle discs by their edges to avoid fingerprints on the recording surface.
- Store discs in their cases to protect them from scratches and dust.
- Clean dirty discs with a soft, lint-free cloth, wiping from the center outwards.
8. Troubleshooting
If you encounter issues with your AV-DVR100, refer to the following common problems and solutions:
| Problem | Possible Cause / Solution |
|---|---|
| No power | Ensure the power cord is securely connected to both the unit and a working electrical outlet. |
| No picture or sound | Check all audio/video cable connections between the DVR and your TV/audio system. Ensure the correct input source is selected on your TV. If using Progressive Scan, ensure your TV supports it. |
| "Disc Error" message | The disc may be dirty, scratched, or incompatible. Try a different disc. Ensure the disc type (+R or +RW) is supported. |
| Cannot record | Ensure a blank, recordable DVD+R or DVD+RW disc is inserted. Check that the disc is not full or write-protected. Verify the input source is correctly selected. |
| Remote control not working | Check and replace batteries if necessary. Ensure there are no obstructions between the remote and the unit's IR sensor. |
9. Specifications
- Model: AV-DVR100
- Media Type: DVD, SVCD, VCD, Audio CD, MP3 CD
- Recordable Media: DVD+R, DVD+RW
- Video Output: Composite Video, S-Video, Component Video, Progressive Scan
- Audio Output: Analog Stereo (RCA), Digital Coaxial, Digital Optical (Dolby Digital, PCM, MP3)
- Video Input: Composite Video (RCA), S-Video, i.Link (FireWire)
- TV Tuner: NTSC (Analog, requires DTV converter box for over-the-air broadcasts after June 12, 2009)
- Dimensions (approx.): 13 x 12.1 x 22 inches
- Weight (approx.): 3 pounds
10. Warranty and Support
For warranty information and technical support, please refer to the documentation provided at the time of purchase or contact Avion customer service. Keep your proof of purchase for warranty claims.


