
Introduction
This manual provides comprehensive instructions for the setup, operation, and maintenance of your X-10 UR73A 5-in-1 RF/IR Non-Learning Remote Control. This universal remote is designed to consolidate control of up to five audio/video components and X10 home automation devices into a single unit, simplifying your home entertainment and control experience.
Product Overview
The X-10 UR73A remote combines Infrared (IR) technology for standard audio/video equipment with Radio Frequency (RF) technology for X10 home automation. It is a non-learning remote, meaning it operates using pre-programmed codes for various devices.
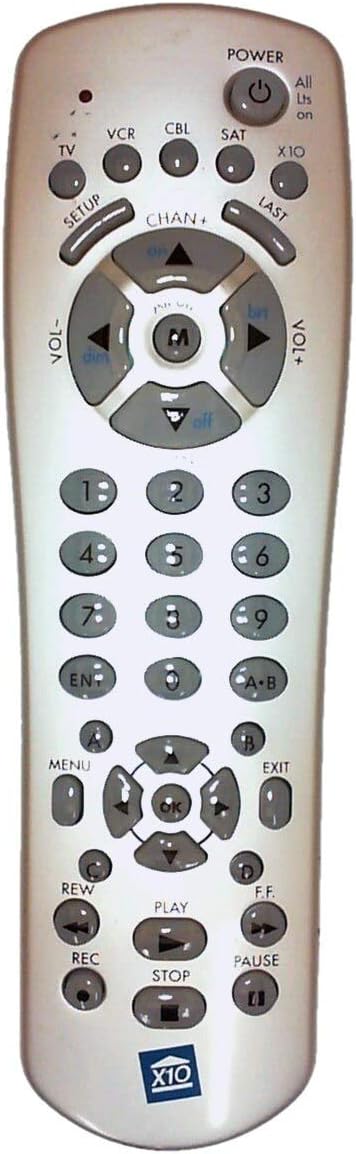
Figure 1: X-10 UR73A Remote Control Layout
This image displays the X-10 UR73A remote control. It is a light-colored, elongated device with numerous gray buttons.
Top Section:
- POWER: Large circular button at the top right with a power symbol.
- Device Select Buttons: Small circular buttons labeled TV, VCR, CBL (Cable), SAT (Satellite), and X10.
- SETUP: Button below TV.
- LAST: Button below X10.
Middle Section (Navigation and Volume):
- CHAN+ / CHAN-: Channel up/down buttons.
- VOL+ / VOL-: Volume up/down buttons.
- Directional Pad: A central circular pad with up, down, left, right arrows, and an 'M' button in the center (likely for Mute). The arrows also have labels like 'on', 'dim', 'brt', 'off' for X10 control.
Number Pad:
- Standard numeric keypad (0-9).
- ENT: Enter button.
- A-B: Button for A-B repeat or similar function.
Lower Section (Menu and Playback):
- MENU: Button on the left.
- EXIT: Button on the right.
- OK: Central button within a second directional pad.
- Colored Buttons: Four small circular buttons labeled A, B, C, D (likely for specific functions or teletext).
- Playback Controls: REW (Rewind), PLAY, F.F. (Fast Forward), REC (Record), STOP, PAUSE.
- X10 Logo: A blue X10 logo is present at the bottom of the remote.
Setup
1. Battery Installation
- Locate the battery compartment on the back of the remote control.
- Slide the battery cover off.
- Insert four (4) AAA batteries, ensuring correct polarity (+ and -) as indicated inside the compartment.
- Replace the battery cover securely.
Note: Batteries are not included and must be purchased separately.
2. Programming IR Devices (TV, VCR, CBL, SAT)
The X-10 UR73A uses a library of pre-programmed codes to control your audio/video equipment. You will need to find the correct code for each device you wish to control.
- Turn on the device you wish to program (e.g., your TV).
- Press and hold the SETUP button until the indicator light on the remote illuminates.
- Press the device button you want to program (e.g., TV). The indicator light will blink once and remain lit.
- Enter the 3 or 4-digit code for your device's brand using the number pad. Refer to the code list provided with your remote (if available) or search online for "X-10 UR73A codes" for your specific device brand.
- After entering the code, the indicator light should turn off.
- Test the remote by pressing the POWER button. If the device turns off, the code is correct. If not, repeat the process with the next code for your brand.
- Repeat this process for your VCR, Cable Box, and Satellite Receiver using their respective device buttons.
If you cannot find a working code, the remote may not be compatible with your specific device model.
3. Setting Up X10 RF Control
The X-10 UR73A can control X10 home automation modules (lights, appliances) via Radio Frequency (RF). This requires an X10 wireless transceiver (e.g., TM751, RR501), which is sold separately and acts as a bridge between the remote and your X10 modules.
- Ensure your X10 modules are installed and set to the desired House Code and Unit Code.
- Ensure your X10 wireless transceiver is plugged in and operating correctly.
- Press the X10 device button on the remote.
- Use the directional pad's 'on', 'off', 'dim', 'brt' (brighten) functions to control your X10 modules. The 'M' button in the center may also function as a master ON/OFF for X10 devices depending on the transceiver setup.
Refer to your X10 transceiver and module manuals for specific setup and addressing instructions.
Operating Instructions
1. Controlling IR Devices (TV, VCR, CBL, SAT)
Once programmed, select the desired device by pressing its corresponding button (TV, VCR, CBL, or SAT). The remote will then send IR commands for that device.
- Power: Press POWER to turn the selected device on or off.
- Channel: Use CHAN+ and CHAN- to change channels.
- Volume: Use VOL+ and VOL- to adjust volume.
- Mute: The central 'M' button in the directional pad typically functions as Mute for IR devices.
- Number Pad: Use the numeric buttons (0-9) to directly enter channel numbers. Press ENT after entering multi-digit channels if required by your device.
- Menu/Navigation: Use MENU, EXIT, and the directional arrows (around the OK button) to navigate device menus. Press OK to confirm selections.
- Playback Controls: For VCR or similar devices, use PLAY, STOP, PAUSE, REW, F.F., and REC.
- LAST: Recalls the previous channel.
2. Controlling X10 RF Devices
To control X10 modules, first press the X10 device button. The remote will then send RF commands.
- On/Off: Use the 'on' and 'off' labels on the directional pad to turn X10 modules on or off.
- Dim/Brighten: Use the 'dim' and 'brt' labels on the directional pad to adjust the brightness of X10 dimmer modules.
- All Lights On: The "All Lts on" label near the POWER button suggests a function to turn all X10 lights on. This typically requires specific X10 transceiver configuration.
Maintenance
- Cleaning: Wipe the remote with a soft, dry cloth. Do not use liquid cleaners or abrasive materials.
- Battery Replacement: Replace batteries when the remote's indicator light becomes dim or the remote stops responding. Always replace all four AAA batteries at the same time.
- Storage: If storing the remote for an extended period, remove the batteries to prevent leakage.
Troubleshooting
- Remote not responding:
- Check battery installation and replace if necessary.
- Ensure there are no obstructions between the remote and the device (for IR control).
- Verify that the correct device button (TV, VCR, CBL, SAT, X10) is selected.
- Device not responding to IR commands:
- Re-program the device with a different code from the code list.
- Ensure the remote is pointed directly at the device's IR receiver.
- X10 devices not responding:
- Ensure the X10 button is pressed.
- Verify that your X10 wireless transceiver is properly installed and powered on.
- Check the House Code and Unit Code settings on your X10 modules and ensure they match the commands being sent.
- Ensure the remote is within range of the X10 transceiver.
Specifications
| Model Number | UR73A |
| Brand | X10 |
| Connectivity Technology | Infrared (IR), Radio Frequency (RF) |
| Controller Type | Button Control |
| Compatible Devices | TV, VCR, Cable Box, Satellite Receiver, X10 Home Automation Modules (via transceiver) |
| Power Source | 4 x AAA Batteries (not included) |
| Item Weight | 4 ounces |
| Manufacturer | X-10 (USA) Inc. |
Warranty and Support
For specific warranty information and technical support, please refer to the documentation included with your purchase or visit the official X10 website. Keep your proof of purchase for warranty claims.

