
1. Introduction
The Toysmith Crystal Growing Kit provides an engaging hands-on experience for observing crystal formation. This kit contains all necessary components to grow crystals over several days, offering an educational insight into scientific principles. Please read this manual thoroughly before beginning the crystal growing process to ensure proper setup and optimal results.
2. Safety Information
WARNING: CHOKING HAZARD
This kit contains small parts. Not suitable for children under 3 years of age.
This set contains chemicals and apparatus that may be harmful if misused. Read cautions on individual containers carefully. Not to be used by children except under adult supervision.
Always ensure proper ventilation when working with the crystal formula. Avoid contact with eyes and skin. In case of contact, rinse thoroughly with water. If irritation persists, seek medical attention.
3. Kit Contents
Before starting, verify that all components listed below are present in your kit:
- Crystal formula (powder)
- Base rock
- Growing tray
- Magnifying glass
- Spatula
- Detailed instructions (this manual)

Image 1: All components included in the Toysmith Crystal Growing Kit, laid out on a gray surface. Visible items include a packet of crystal formula, a base rock, a growing tray, a magnifying glass, a spatula, and an instruction booklet.
4. Setup
Follow these steps to prepare your crystal growing environment:
- Prepare the Workspace: Choose a stable, level surface away from direct sunlight, drafts, or vibrations. Place a protective layer, such as newspaper or paper plates, underneath the growing tray to catch any spills.
- Heat Water: Carefully heat water (not included) to a warm temperature. The water should be warm enough to aid in dissolving the crystal formula but not boiling. Approximately 100-120°F (38-49°C) is ideal.
- Add Crystal Formula: Pour the entire packet of crystal formula into the growing tray.
- Add Water: Slowly add the warm water to the growing tray, following the specific measurements provided in the detailed instructions included in your kit. Do not overfill.
- Stir the Solution: Use the provided spatula to stir the solution continuously for an extended period, typically 15-30 minutes, until most of the crystal formula powder has dissolved. Some undissolved powder at the bottom is normal. Thorough stirring is crucial for successful crystal growth.
- Place Base Rock: Carefully place the base rock into the center of the growing tray, ensuring it is fully submerged in the solution.
5. Operating Instructions (Crystal Growing Process)
Once the setup is complete, the crystal growing process begins. Patience is key during this stage.
- Initial Observation: Within the first 24-48 hours, you may begin to observe small crystal formations on the base rock and along the bottom of the tray.
- Continued Growth: Crystals will continue to grow and develop over the course of several days. Avoid disturbing the tray during this period.
- Monitoring: Use the magnifying glass to observe the intricate details of the growing crystals without touching them.
- Completion: Crystal growth typically completes within 7-14 days, or once all the solution has evaporated and the crystal is fully formed. The exact time may vary depending on environmental conditions such as temperature and humidity.
- Displaying Crystals: Once fully grown and dry, the crystals can be carefully removed from the tray for display. Note that some crystals may adhere firmly to the tray.
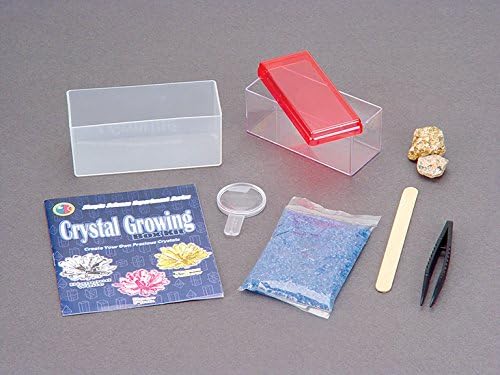
Image 2: A close-up view of a yellow crystal, showcasing its crystalline structure. This illustrates a potential outcome of the crystal growing process.

Image 3: A white crystal formation growing on a small base rock, demonstrating how crystals can form around a nucleation point.
6. Maintenance
Once your crystals have grown, minimal maintenance is required:
- Handling: Handle grown crystals carefully as they can be fragile.
- Cleaning: If dust accumulates, gently brush it off with a soft, dry brush. Avoid using water or cleaning solutions, as these can dissolve or damage the crystals.
- Storage: Store crystals in a dry environment away from extreme temperatures or humidity to preserve their structure.
7. Troubleshooting
If you encounter issues during the crystal growing process, consider the following:
- No Crystal Growth:
- Ensure the water was sufficiently warm when mixing the solution.
- Verify that the solution was stirred thoroughly for the recommended duration (15-30 minutes). Incomplete dissolution of the formula can hinder growth.
- Check for drafts or temperature fluctuations in the growing area, which can disrupt crystal formation.
- Crystals are Smaller Than Expected:
- Crystal size can vary. Ensure the correct amount of water was used as per instructions.
- Patience is important; some crystals take longer to reach their full potential.
- Solution Spilled and Formed Crystals Elsewhere:
- This indicates the solution is supersaturated. Always use a protective layer (e.g., paper plates) under the growing tray to contain any accidental drips.
8. Specifications
| Brand Name | Toysmith |
| Model Number | 6072 |
| Item Part Number | 6072 |
| UPC | 085761060722 |
| ASIN | B0007KK0VC |
| Recommended Age | 10 - 15 years |
| Educational Objective | STEM |
| Material Type | Glass (for some components) |
| Item Dimensions (L x W x H) | 4.5 x 2 x 5 inches |
| Item Weight | 8 ounces |
9. Warranty & Support
This Toysmith product comes with a 1-year replacement warranty from the manufacturer. For warranty claims or product support, please contact Toysmith customer service directly. Refer to the packaging for specific contact information or visit the official Toysmith website.