Introduction
This instruction manual provides guidance for the assembly and finishing of your Tamiya 1/35 scale Leopard 2 A6 Main Battle Tank model kit. The Leopard 2 A6 is a highly detailed replica of the German Army's main battle tank, featuring a long 55 caliber 120mm smoothbore main gun. This kit is designed for model enthusiasts aged 10 and older and requires precision assembly, painting, and the application of decals to achieve a realistic representation.
Safety Information
- This model kit contains small parts and is not suitable for children under 10 years of age. To avoid choking or injury, keep all model kit parts away from small children.
- Always use modeling tools (e.g., hobby knives, nippers) with caution. Ensure proper ventilation when using glues, paints, and thinners, as these products may contain hazardous fumes.
- Wear appropriate personal protective equipment, such as safety glasses and gloves, when handling tools and chemicals.
- Dispose of waste materials, including empty paint and glue containers, according to local regulations.
Kit Contents
Your Tamiya Leopard 2 A6 model kit (Item #35271) typically includes:
- Plastic parts molded on sprue trees for the tank body, turret, tracks, and various details.
- Transparent parts for goggles, headlights, and taillights.
- Decal sheet for various markings, including NATO versions used in Kosovo.
- Two half-body figures (commander and loader).
- Instruction booklet (physical copy).
- Extra road signs for diorama reproduction.
Note: Glue, paint, and modeling tools are required for assembly and finishing and are not included in this kit.
Assembly Instructions
Follow the detailed step-by-step diagrams provided in the physical instruction booklet included with your kit. The general assembly process involves:
- Part Preparation: Carefully cut parts from the sprue trees using a hobby nipper or sharp hobby knife. Smooth any rough edges with sandpaper or a file.
- Dry Fitting: Before applying glue, dry-fit parts to ensure proper alignment and fit. This helps identify any potential issues.
- Gluing: Use plastic cement sparingly to join parts. Hold parts firmly together until the glue sets.
- Sub-Assemblies: Assemble major components (e.g., hull, turret, tracks, road wheels) separately before combining them into the final model.
- Detailing: Attach smaller detail parts, such as antennas, tools, and figures, after the main structure is complete or during painting stages as indicated in the manual.
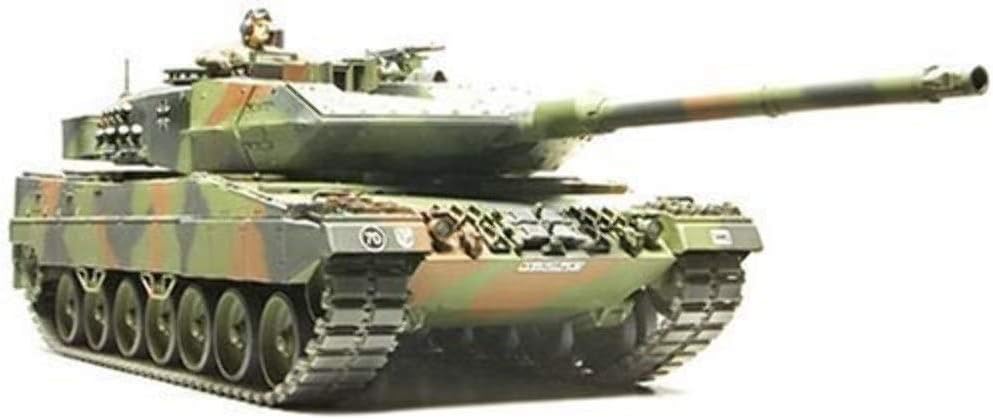
Figure 1: Fully assembled Tamiya 1/35 Leopard 2 A6 Main Battle Tank model. This image displays the fully assembled Tamiya 1/35 Leopard 2 A6 Main Battle Tank model, showcasing its camouflage paint scheme and detailed features, including the long 120mm smoothbore main gun and track system.
Painting Guide
The physical instruction manual provides specific color recommendations and painting diagrams for the Leopard 2 A6. General painting steps include:
- Preparation: Ensure the model surface is clean and free of dust or grease. A primer coat is recommended for better paint adhesion and a uniform finish.
- Base Coat: Apply the primary camouflage colors as indicated in the manual. Multiple thin coats are preferable to one thick coat to avoid obscuring details.
- Detail Painting: Paint smaller details such as tools, machine guns, and figures using fine brushes.
- Weathering (Optional): Advanced modelers may apply weathering techniques (e.g., washes, dry-brushing, pigments) to enhance realism.
Decal Application
The kit includes decals for various markings. Follow these steps for proper application:
- Surface Preparation: Apply a gloss clear coat to the area where the decal will be placed. This provides a smooth surface and prevents "silvering."
- Cutting Decals: Carefully cut out each decal from the sheet using a sharp hobby knife or scissors.
- Soaking: Dip the decal in lukewarm water for a few seconds until it can slide freely from the backing paper.
- Placement: Slide the decal onto the model surface. Use a wet brush or cotton swab to gently position it.
- Setting: Use a decal setting solution to help the decal conform to surface details and eliminate air bubbles.
- Sealing: Once dry, apply a final clear coat (gloss or matte, depending on desired finish) to protect the decals.
Specifications
| Feature | Detail |
|---|---|
| Product Dimensions | 15.2 x 9.69 x 2.72 inches |
| Item Weight | 1.3 pounds |
| ASIN | B00061H5FQ |
| Item Model Number | 35271 |
| Manufacturer | Tamiya |
| Scale | 1/35 |
| Main Gun | 120mm L55 smoothbore |
Maintenance
Once assembled and painted, your model requires minimal maintenance. To preserve its appearance:
- Cleaning: Gently dust the model regularly with a soft brush or compressed air. Avoid using harsh chemicals or abrasive materials.
- Display: Display your model in a cool, dry place away from direct sunlight to prevent fading of paints and decals.
- Handling: Handle the model carefully, grasping it by sturdy sections to avoid breaking delicate parts.
Troubleshooting
While building model kits, you might encounter common issues:
- Parts Not Fitting: Ensure all sprue gates are completely removed and check for excess plastic (flash). Dry-fit parts before gluing. If necessary, gently sand or trim for a better fit.
- Paint Problems:
- Uneven Coat: Apply paint in thin layers. Ensure proper mixing and thinning of paints.
- Rough Texture: Ensure the surface is clean before painting. Paint in a dust-free environment.
- Decal Silvering: This occurs when air is trapped under the decal. Apply a gloss coat before decals and use decal setting solutions to help them conform.
- Broken Parts: Small parts can be delicate. Use plastic cement or super glue for repairs. For structural breaks, consider reinforcing with a small piece of plastic or metal pin.
Warranty and Support
For specific warranty information regarding your Tamiya model kit, please refer to the documentation included in the physical kit packaging or visit the official Tamiya website. Tamiya is known for its quality products, and any concerns regarding manufacturing defects should be directed to their customer support.
For additional support, tips, and community resources, you may visit the official Tamiya website.


