This manual provides comprehensive instructions for the safe and effective use of your Sony Cyber-shot DSC-P150 digital camera. Please read this manual thoroughly before operating the camera and retain it for future reference.
Important Safety Information
- Battery Safety: Use only the specified InfoLithium battery (NP-FR1) and charger. Do not expose batteries to excessive heat or dispose of them in fire.
- Water Exposure: This camera is not water-resistant. Avoid exposure to water or high humidity unless using an optional marine pack.
- Handling: Avoid dropping the camera or subjecting it to strong impacts. Keep the lens clean and free from dust.
- Disassembly: Do not attempt to disassemble or modify the camera. Refer all servicing to qualified personnel.
Package Contents
Verify that all items are present in your camera package:
- Sony Cyber-shot DSC-P150 Digital Camera
- InfoLithium Battery (NP-FR1)
- AC Adapter/Charger
- USB Cable
- Instruction Manual (this document)
- 32MB Memory Stick Media
Camera Components
Familiarize yourself with the various parts of your DSC-P150 camera.

Figure 1: Front View of the Sony DSC-P150. This image displays the camera's front, featuring the Carl Zeiss Vario-Tessar lens, built-in flash, and the "Cyber-shot 7.2 MEGA PIXELS" branding.
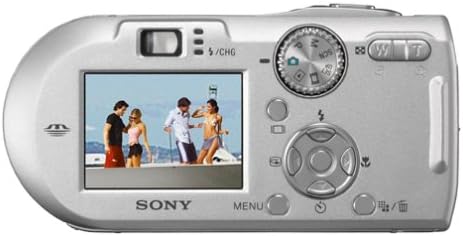
Figure 2: Angled View of the Sony DSC-P150. This perspective shows the camera from the front-top-right, highlighting its compact design and the lens barrel extended slightly.

Figure 3: Rear View of the Sony DSC-P150. The back of the camera is shown with the 1.8-inch LCD screen displaying an image, along with the control dial, directional pad, and various function buttons.
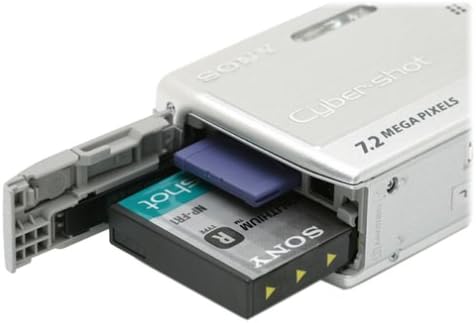
Figure 4: Battery and Memory Stick Compartment. This image illustrates the open compartment on the side of the camera, revealing the slot for the InfoLithium battery and the Memory Stick.

Figure 5: Close-up of the Carl Zeiss Vario-Tessar Lens. A detailed view of the camera's lens, showing the Carl Zeiss branding and lens specifications.
Setup Guide
1. Installing the Battery
- Open the battery/Memory Stick compartment cover (refer to Figure 4).
- Insert the InfoLithium battery (NP-FR1) into the compartment with the correct orientation, ensuring it clicks into place.
- Close the compartment cover securely.
2. Charging the Battery
Connect the supplied AC adapter/charger to the camera and a power outlet. The charge indicator will illuminate during charging and turn off when complete. A full charge provides approximately 310 shots.
3. Inserting a Memory Stick
- Open the battery/Memory Stick compartment cover.
- Insert the Memory Stick (or Memory Stick PRO) into the designated slot with the label facing the correct direction until it clicks.
- Close the compartment cover securely.
Basic Operation
1. Powering On/Off
Slide the power switch to turn the camera on or off. The lens will extend when powered on.
2. Taking Still Photos
- Turn the mode dial to the desired shooting mode (e.g., Auto, Program AE).
- Frame your shot using the LCD monitor or optical viewfinder.
- Press the shutter button halfway down to focus. The camera uses 5-area multi-point autofocus and AF Illuminator in low light.
- Press the shutter button fully to capture the image.
3. Using the Zoom
Use the zoom lever (W/T) to adjust the focal length. The camera features 3x optical zoom and 2x precision digital zoom, totaling 6x zoom. Smart Zoom is also available at VGA resolution.
4. Flash Settings
Press the flash button to cycle through flash modes (Auto, Fill-flash, Slow Sync, Flash Off). The camera uses pre-flash metering for accurate exposure and includes red-eye reduction.
5. Scene Selection Modes
Rotate the mode dial to 'SCN' and select from 9 scene modes to optimize settings for specific conditions:
- Twilight
- Twilight Portrait
- Landscape
- Soft Snap
- Candle
- Snow
- Beach
- Fireworks
- High Speed Shutter
6. Recording Videos (MPEG Movie VX Fine Mode)
Turn the mode dial to the movie camera icon. Press the shutter button to start and stop recording. The camera captures VGA (640 x 480) video at up to 30 frames per second with audio, limited only by Memory Stick capacity.
Connecting to Computers and Printers
1. USB Connection to Computer
Use the supplied USB cable to connect the camera to your computer. The camera will appear as a removable drive, allowing you to transfer photos and videos. Ensure the camera is powered on.
2. Direct Printing (PictBridge)
The DSC-P150 is PictBridge compatible. Connect the camera directly to a PictBridge-compatible printer using the USB cable to print images without a computer.
3. Cyber-shot Station (Optional)
For convenient image transfer and battery charging, the camera is compatible with the optional CSS-PHA Cyber-shot Station. Simply place the camera on the cradle.
Care and Maintenance
- Cleaning the Lens: Use a soft, dry cloth or a lens brush to gently remove dust and smudges. Avoid using harsh chemicals.
- Cleaning the Body: Wipe the camera body with a soft, slightly damp cloth. Do not use solvents.
- Battery Storage: If storing the camera for an extended period, remove the battery. Store batteries in a cool, dry place.
- Memory Stick Care: Handle Memory Sticks carefully. Avoid bending or exposing them to static electricity.
Troubleshooting
| Problem | Solution |
|---|---|
| Camera does not power on. | Ensure the battery is correctly inserted and fully charged. Check if the battery compartment cover is securely closed. |
| "C:13:01" Memory Stick error. | Remove and reinsert the Memory Stick. If the error persists, try a different Memory Stick. Ensure the Memory Stick is not damaged. |
| Images are blurry. | Ensure the lens is clean. Hold the camera steady when shooting. Use a higher shutter speed (e.g., in "High Speed Shutter" scene mode) for moving subjects. Check focus before fully pressing the shutter button. |
| Flash does not fire. | Check flash settings to ensure it's not set to "Flash Off". Ensure the subject is within the effective flash range. |
| Cannot transfer images to computer. | Verify the USB cable is securely connected to both the camera and the computer. Ensure the camera is powered on. Try restarting both devices. |
Technical Specifications
- Model Name: DSC-P150
- Image Sensor: 1/1.8-inch 7.2 Megapixel Super HAD CCD
- Lens: Carl Zeiss Vario-Tessar, 3x Optical Zoom (38-114mm equivalent)
- Digital Zoom: 2x Precision Digital Zoom, Smart Zoom (at VGA)
- Display: 1.8-inch LCD (134,000 dots)
- Storage Media: Memory Stick, Memory Stick PRO (32MB included)
- Still Image Resolution: Up to 3072 x 2304 pixels (7.2 MP)
- Video Recording: MPEG Movie VX Fine (640 x 480, 30 fps with audio)
- Battery: InfoLithium NP-FR1 (approx. 310 shots per charge)
- Connectivity: USB 2.0, PictBridge compatible
- Dimensions (approx.): 108 x 54 x 26.6 mm (W x H x D)
- Weight (approx.): 6.4 ounces (excluding battery and media)
- Special Features: 5 Area Multi-Point Auto Focus, AF Illuminator, Multi-Pattern Measuring, 9 Scene Modes, 5 Shot Burst Mode, Multi-Burst Mode, Live Histogram Display.
Warranty and Customer Support
This Sony DSC-P150 camera is covered by a 30-day limited warranty from the date of purchase. This warranty covers manufacturing defects under normal use. For warranty claims or technical assistance, please refer to the contact information provided with your purchase documentation or visit the official Sony support website.
For additional resources and support, you may visit the Sony Store on Amazon.