
Plantronics CT11
Plantronics CT11 2.4 GHz DSS Cordless Phone with MX150 Headset User Manual
Model: CT11 | Brand: Plantronics
1. Introduction
This manual provides comprehensive instructions for the setup, operation, and maintenance of your Plantronics CT11 2.4 GHz DSS Cordless Phone with MX150 Headset. Designed for home or small office use, the CT11 offers hands-free communication with exceptional clarity and mobility.
The system includes a cordless headset telephone, an MX150 headset for comfort and stability, and a remote unit with a belt clip for convenient hands-free operation. Its 2.4 GHz Digital Spread Spectrum (DSS) technology ensures extended range and clear communication.
2. Package Contents
Verify that all items listed below are present in your product package:
- Telephone base with charger
- Remote dialing pad with rechargeable battery pack and belt clip
- MX150 headset
- Warranty card
- AC adapter
- User's guide (this manual)

Figure 2.1: Overview of the Plantronics CT11 Cordless Phone System components.
3. Setup
3.1. Connecting the Base Unit
- Connect the AC adapter to the "POWER" jack on the back of the telephone base unit.
- Plug the other end of the AC adapter into a standard electrical outlet.
- Connect the telephone line cord to the "LINE" jack on the back of the base unit.
- Plug the other end of the telephone line cord into a wall telephone jack.
3.2. Installing and Charging the Battery
- Open the battery compartment cover on the back of the remote dialing pad.
- Insert the rechargeable Ni-MH battery pack, ensuring correct polarity.
- Replace the battery compartment cover.
- Place the remote dialing pad into the charging cradle on the telephone base unit. Ensure the "CHARGE" indicator light on the base unit illuminates.
- Allow the battery to charge for a minimum of 15 hours before initial use to ensure optimal battery life and performance.
3.3. Attaching the MX150 Headset
Connect the MX150 headset cable to the headset jack located on the top of the remote dialing pad. Adjust the microphone boom for optimal voice pickup, positioning it approximately two finger-widths from your mouth.
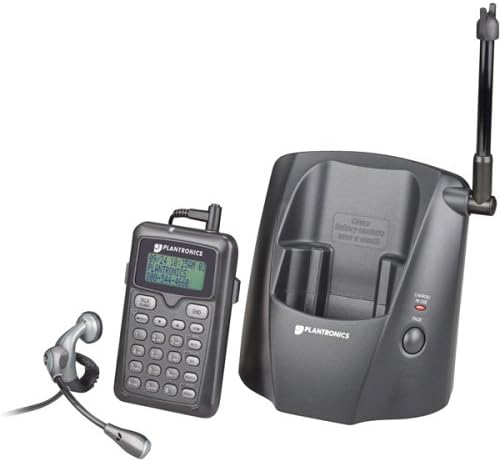
Figure 3.1: Remote dialing pad and MX150 headset.
4. Operating Instructions
4.1. Making and Receiving Calls
- To Make a Call: Press the "TALK" button, then dial the desired number using the keypad.
- To Receive a Call: When the phone rings, press the "TALK" button.
- To End a Call: Press the "END" button or place the remote dialing pad back into the charging cradle.
4.2. Volume Control
Adjust the receiver and headset volume levels using the dedicated volume buttons on the remote dialing pad.
4.3. Mute Function
During a call, press the "MUTE" button to temporarily silence your microphone. Press it again to unmute.
4.4. Hold Function
To place a call on hold, press the "HOLD" button. Press it again to resume the conversation.
4.5. Speed Dial and Phone Directory
The CT11 features 10 speed dial locations for quick access to frequently called numbers. It also shares 100 memory locations between its Caller ID log and a built-in phone directory. Refer to the on-screen menu on the three-line LCD for programming and accessing these features.
4.6. Redial
To redial one of the last three outgoing numbers, press the "REDIAL" button and select the desired number from the list.
4.7. Caller ID and Call Waiting
The CT11 is compatible with Caller ID and Call Waiting services. Ensure these services are subscribed through your telephone service provider. Incoming call information will be displayed on the remote unit's LCD.
4.8. Paging Function
If the remote dialing pad is misplaced, press the "PAGE" button on the base unit to make the remote unit ring.
5. Maintenance
5.1. Battery Care
- Always charge the battery for the recommended initial period (15 hours).
- When the low-battery indicator appears, return the remote unit to the base for recharging.
- The Ni-MH battery has a talk time of approximately 5.5 hours and a standby time of up to 10 days.
- Replace the battery when its performance significantly degrades. Use only approved replacement batteries.
5.2. Cleaning
Wipe the telephone base and remote unit with a soft, damp cloth. Do not use abrasive cleaners or solvents. Ensure the unit is unplugged from the power source before cleaning.
6. Troubleshooting
| Problem | Possible Cause | Solution |
|---|---|---|
| No dial tone. | Telephone line cord is not connected properly. | Ensure the telephone line cord is securely plugged into both the base unit and the wall jack. |
| Remote unit not charging. | Remote unit not properly seated in cradle; AC adapter not connected. | Ensure the remote unit is correctly placed in the charging cradle and the "CHARGE" light is on. Verify the AC adapter is plugged in. |
| Poor sound quality / Static. | Out of range; interference from other devices. | Move closer to the base unit. Avoid placing the base unit near other electronic devices (e.g., Wi-Fi routers, microwaves). |
| Short battery life. | Battery not fully charged; old battery. | Ensure initial 15-hour charge. If battery is old, consider replacing it. |
| Cannot hear caller / Caller cannot hear me. | Volume too low; mute function active; headset not connected. | Adjust volume. Check if mute is active. Ensure headset is securely plugged in. |
7. Specifications
- Model: CT11
- Brand: Plantronics
- Frequency: 2.4 GHz DSS (Digital Spread Spectrum)
- Headset: MX150
- Battery Type: Ni-MH rechargeable battery (1 AA battery required)
- Talk Time: Up to 5.5 hours
- Standby Time: Up to 10 days
- Caller ID/Phone Directory Memory: 100 locations (shared)
- Speed Dial: 10 locations
- Dimensions (Product): 9 x 5 x 6 inches
- Weight (Item): 3 pounds
- Power Source: Battery Powered (AC adapter for base)
- Compatible Devices: Landline Networks
8. Warranty and Support
8.1. Limited Warranty
The Plantronics CT11 is covered by a one-year limited warranty from the date of purchase. This warranty covers defects in materials and workmanship under normal use. Please retain your proof of purchase for warranty claims.
8.2. Customer Support
For technical assistance, troubleshooting, or warranty inquiries, please refer to the official Plantronics support resources. An electronic version of this user manual is available for download:
Related documentsCT11


Ask a question about this manual
Ask about setup, troubleshooting, compatibility, parts, safety, or missing instructions. Manuals+ will review the question and use this page’s manual context to help answer it.