1. Introduction
This manual provides instructions for the proper setup, operation, and maintenance of your Magnavox MPD720 7-Inch Portable DVD Player. Please read this manual thoroughly before using the device to ensure optimal performance and safety.
The Magnavox MPD720 is a portable multimedia player designed for on-the-go entertainment. It features a 7-inch widescreen LCD display and supports various media formats, including DVD, CD, MP3, and JPEG.
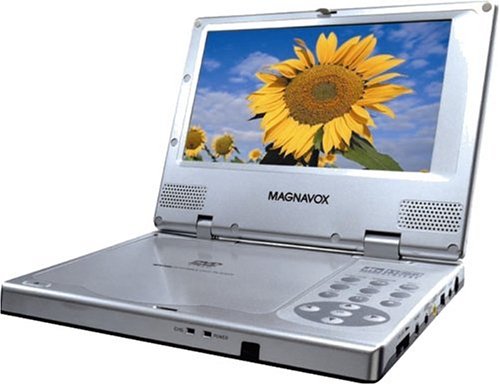
Front view of the Magnavox MPD720 portable DVD player, showing the 7-inch screen and control buttons.
2. What's in the Box
Verify that all the following items are included in your package:
- Portable DVD player
- Remote control
- AC/DC power adapter
- Car power adapter
- Rechargeable battery pack and charger
- Audio/video cable
- Storage bag
- Owner's manual (this document)
3. Product Features
- 7-inch Widescreen LCD Screen: Provides a clear viewing experience with a 16:9 aspect ratio.
- Multi-format Playback: Compatible with DVD, DVD-R, DVD-RW, CD, CD-R, CD-RW, VCD, MP3, and JPEG formats.
- Rechargeable Battery: Offers up to 3 hours of continuous playback on a full charge.
- Integrated Audio: Features built-in stereo speakers and a 3.5mm headphone jack for private listening.
- Versatile Connectivity: Includes composite, S-video, and digital optical audio outputs for connecting to external displays or audio systems.
- Power Options: Operates via AC/DC power adapter for home use or car power adapter for in-vehicle use.
4. Setup
4.1 Connecting Power
AC Power: Connect the AC/DC power adapter to the DC IN jack on the player and then plug the adapter into a standard wall outlet.
Car Power: For in-vehicle use, connect the car power adapter to the DC IN jack on the player and plug the other end into your vehicle's 12V accessory socket (cigarette lighter).
4.2 Charging the Battery
The included rechargeable battery pack provides portable power. Before first use, fully charge the battery. Connect the player to AC power as described above. The charging indicator light will illuminate. Charging typically takes several hours. The player can be used while charging.
4.3 Connecting to a Television
To view content on a larger screen, connect the portable DVD player to a television using the appropriate cables:
- Composite Video: Use the supplied audio/video cable. Connect the yellow plug to the video input (usually yellow) on your TV, and the red and white plugs to the corresponding audio inputs (red for right, white for left).
- S-Video: If your TV has an S-video input, use an S-video cable (not included) for improved picture quality. Connect the S-video cable to the S-VIDEO OUT jack on the player and the S-video input on your TV. You will still need to connect the audio cables (red and white) for sound.
- Digital Optical Audio: For surround sound, connect a digital optical cable (not included) from the DIGITAL OPTICAL OUT jack on the player to a compatible audio receiver.
Select the correct input source on your television (e.g., AV1, Video 1, S-Video) to display the player's output.
5. Operating Instructions
5.1 Basic Playback (DVD/CD/MP3/JPEG)
- Power On: Press the POWER button on the player or remote control.
- Insert Disc: Gently open the disc compartment cover and place a disc (DVD, CD, etc.) onto the spindle with the label side facing up. Close the cover securely.
- Automatic Playback: The player will typically detect the disc type and begin playback automatically. For DVDs, a menu may appear.
- Navigation: Use the directional buttons (Up, Down, Left, Right) and the ENTER/PLAY button on the player or remote to navigate menus and select options.
- Playback Controls: Use the PLAY/PAUSE, STOP, FAST FORWARD, REWIND, and SKIP buttons for media control.
- Volume Adjustment: Adjust the volume using the VOL +/- buttons on the player or remote.
- Headphones: Plug headphones into the HEADPHONE jack for private listening. This will mute the built-in speakers.
5.2 Using the Remote Control
The remote control provides full functionality for the player. Ensure there are fresh batteries installed. Point the remote control directly at the infrared sensor on the front of the DVD player for optimal response.
5.3 Adjusting Settings
Access the system setup menu by pressing the SETUP button on the remote control. From this menu, you can adjust various settings such as display options, audio preferences, language, and parental controls. Use the directional buttons to navigate and ENTER to confirm selections.
6. Maintenance
6.1 Cleaning
- Screen: Use a soft, lint-free cloth to gently wipe the LCD screen. For stubborn smudges, slightly dampen the cloth with water or a screen-cleaning solution. Avoid harsh chemicals.
- Player Body: Wipe the exterior of the player with a soft, dry cloth.
- Disc Tray: Keep the disc compartment clean and free of dust. Do not use compressed air directly into the disc mechanism.
6.2 Battery Care
- To prolong battery life, avoid fully discharging the battery frequently.
- Store the player in a cool, dry place when not in use for extended periods.
- If the player will not be used for a long time, charge the battery periodically (e.g., every 3-6 months) to maintain its capacity.
7. Troubleshooting
If you encounter issues with your Magnavox MPD720, refer to the following common problems and solutions:
| Problem | Possible Cause / Solution |
|---|---|
| No power |
|
| Disc does not play / Disc error |
|
| No picture on screen |
|
| No sound |
|
| Remote control not working |
|
8. Specifications
| Feature | Detail |
|---|---|
| Model Number | MPD720 |
| Screen Size | 7 Inches |
| Display Type | LCD |
| Supported Media Types | DVD, DVD-R, DVD-RW, CD, CD-R, CD-RW, VCD, MP3, JPEG |
| Battery Life | Up to 3 hours (rechargeable battery) |
| Connectivity | Composite Video Out, S-Video Out, Digital Optical Audio Out, Headphone Jack |
| Power Source | AC/DC Adapter, Car Power Adapter |
| Item Weight | Approximately 5 pounds |
| Package Dimensions | Approximately 14.9 x 10.3 x 5.9 inches |
9. Warranty and Support
For warranty information, please refer to the documentation provided at the time of purchase or contact Magnavox customer support. Warranty terms typically cover manufacturing defects for a specified period.
If you require further assistance or technical support beyond the troubleshooting steps provided in this manual, please visit the official Magnavox website or contact their customer service department. Keep your purchase receipt and product model number (MPD720) readily available when seeking support.


