
Thomson DTH 212 E
Thomson DTH 212 E DVD Player User Manual
Model: DTH 212 E
Introduction
This manual provides essential information for the safe and efficient operation of your Thomson DTH 212 E DVD Player. Please read it thoroughly before using the device and retain it for future reference.
The Thomson DTH 212 E is a versatile DVD player capable of playing various disc formats, including DVD, DVD-R/-RW/+R/+RW, VCD, SVCD, Audio-CD, CD-R, CD-RW, MP3-CD, and JPEG-CD. It features a coaxial digital output and comes with a 3-in-1 remote control for convenient operation.
Product Overview
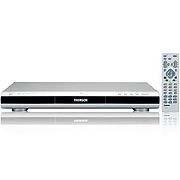
Figure 1: Thomson DTH 212 E DVD Player and Remote Control.
This image displays the Thomson DTH 212 E DVD player, a sleek silver unit with a prominent black front panel, positioned next to its accompanying silver remote control, which is equipped with numerous function buttons.
Key Features:
- Playback of DVD, DVD-R/-RW/+R/+RW, VCD, SVCD, Audio-CD, CD-R, CD-RW.
- Support for MP3 and JPEG CD formats.
- Coaxial digital audio output.
- Included 3-in-1 remote control.
Safety Information
Always observe the following safety precautions to prevent electric shock, fire, or damage to the unit:
- Do not expose the unit to rain or moisture.
- Do not block ventilation openings.
- Do not place the unit on an unstable cart, stand, tripod, bracket, or table.
- Unplug the unit during lightning storms or when unused for long periods.
- Refer all servicing to qualified service personnel.
Setup
1. Unpacking:
Carefully remove the DVD player and all accessories from the packaging. Ensure all components are present:
- Thomson DTH 212 E DVD Player
- Remote Control
- Audio/Video Cables
- User Manual (this document)
2. Placement:
Place the DVD player on a flat, stable surface. Ensure adequate ventilation around the unit to prevent overheating. Avoid placing it near heat sources or in direct sunlight.
3. Connecting to a TV:
Use the supplied audio/video cables to connect the DVD player to your television.
- Connect the yellow video cable from the "VIDEO OUT" port on the DVD player to the "VIDEO IN" port on your TV.
- Connect the red and white audio cables from the "AUDIO OUT (R/L)" ports on the DVD player to the "AUDIO IN (R/L)" ports on your TV.
- For digital audio, connect a coaxial digital cable (not supplied) from the "COAXIAL OUT" port on the DVD player to a compatible digital audio input on your amplifier or home theater system.
4. Power Connection:
Plug the power cord of the DVD player into a standard AC power outlet.
Operating Instructions
1. Basic Playback:
- Press the POWER button on the front panel or remote control to turn on the player.
- Press the OPEN/CLOSE button to open the disc tray.
- Place a disc (DVD, CD, etc.) gently onto the disc tray with the label side facing up.
- Press the OPEN/CLOSE button again to close the tray.
- The player will automatically begin playback or display the disc menu.
- Use the PLAY/PAUSE, STOP, SKIP, and FAST FORWARD/REWIND buttons on the remote control to manage playback.
2. Remote Control Functions:
The included 3-in-1 remote control allows you to operate the DVD player and potentially other compatible devices. Refer to the remote control section in this manual for detailed button descriptions and programming instructions (if applicable).
3. MP3/JPEG Playback:
When an MP3 or JPEG CD is inserted, the player will display a file browser. Use the navigation buttons (UP/DOWN/LEFT/RIGHT) and ENTER button on the remote to select and play files or view images.
Maintenance
Cleaning the Unit:
- Before cleaning, ensure the unit is unplugged from the power outlet.
- Use a soft, dry cloth to wipe the exterior of the player.
- For stubborn stains, dampen the cloth slightly with water and a mild detergent, then wipe dry immediately.
- Do not use abrasive cleaners, waxes, or solvents as they may damage the finish.
Disc Care:
- Handle discs by their edges to avoid fingerprints.
- Keep discs clean and free from scratches. Wipe discs from the center outwards with a soft, lint-free cloth if necessary.
- Store discs in their cases when not in use.
Troubleshooting
| Problem | Possible Cause | Solution |
|---|---|---|
| No power | Power cord not connected; Power outlet faulty. | Ensure power cord is securely plugged in; Try a different outlet. |
| No picture | Video cable not connected properly; Incorrect TV input selected. | Check video cable connections; Select the correct AV input on your TV. |
| No sound | Audio cables not connected properly; TV/amplifier volume too low or muted. | Check audio cable connections; Adjust volume on TV/amplifier; Unmute. |
| Disc not playing | Disc is dirty or scratched; Disc format not supported. | Clean the disc; Try a different disc; Refer to specifications for supported formats. |
| Remote control not working | Batteries are dead or inserted incorrectly; Obstruction between remote and player. | Replace batteries; Ensure correct polarity; Remove obstructions; Point remote directly at player. |
Specifications
| Feature | Detail |
|---|---|
| Model | DTH 212 E |
| Brand | Thomson |
| Supported Media Types | DVD, DVD-R/-RW/+R/+RW, VCD, SVCD, Audio-CD, CD-R, CD-RW, MP3-CD, JPEG-CD |
| Audio Output | Analog Stereo (RCA), Coaxial Digital |
| Video Output | Composite Video (RCA) |
| Remote Control | 3-in-1 Universal Remote |
| Power Supply | AC 230V, 50Hz (Typical for EU models) |
Warranty and Support
Thomson products are designed and manufactured to the highest quality standards. For information regarding warranty coverage, please refer to the warranty card included with your product or visit the official Thomson support website.
For technical assistance, troubleshooting beyond this manual, or to inquire about service, please contact Thomson customer support. Contact details can typically be found on the official Thomson website or on your product's packaging.
Related documentsDTH 212 E


Ask a question about this manual
Ask about setup, troubleshooting, compatibility, parts, safety, or missing instructions. Manuals+ will review the question and use this page’s manual context to help answer it.