
1. Introduction
This manual provides detailed instructions for the operation and maintenance of your Sony RCD-W500C CD Player / Recorder. This unit features a 5-CD/Dual Deck design, offering capabilities for 4x High Speed Dubbing, and playback of CD, CD-R, CD-RW, and MP3 formats. It supports recording onto CD-Recordable and CD-ReWritable Discs, incorporates Super Bit Mapping® Recording, High Speed Finalizing, and CD Text Entry. Additional functionalities include 24-Step Program Play, One-Touch Synchro Start/Record, and control via the supplied Remote Commander® Remote Control. Please note that CD-R/RW Playback compatibility may vary depending on recording conditions.
2. Safety Information
For safe operation, always adhere to the following guidelines:
- Ensure proper ventilation around the unit to prevent overheating.
- Do not expose the unit to rain or moisture to reduce the risk of fire or electric shock.
- Avoid placing objects filled with liquids, such as vases, on the unit.
- Do not open the cabinet. Refer servicing to qualified personnel only.
- Use only the specified power supply.
3. Package Contents
Upon unpacking, verify that all items listed below are present:
- Sony RCD-W500C CD Player / Recorder Unit
- Remote Commander® Remote Control
- User Manual (this document)
- 2 AA batteries (for remote control)
4. Product Features
The Sony RCD-W500C offers a range of advanced features for an enhanced audio experience:
- 5-CD/Dual Deck: Conveniently manage and play multiple compact discs.
- 4x High Speed Dubbing: Quickly duplicate audio from one CD to another.
- Versatile Playback: Supports CD, CD-R, CD-RW, and MP3 formats.
- CD-R/RW Recording: Create your own audio CDs.
- SBM - Super Bit Mapping® Recording: Enhances recording quality.
- High Speed Finalizing: Finalize recorded discs efficiently.
- CD Text Entry: Add track and album information to your recordings.
- 24-Step Program Play: Customize your playback order.
- One-Touch Synchro Start/Record: Simplifies recording from external sources.
- Connectivity: Includes Analog RCA, Digital Optical inputs and Analog RCA, Digital Optical outputs.
5. Setup Guide
Follow these steps to set up your CD Player / Recorder:
5.1. Unpacking and Placement
- Carefully remove the unit and all accessories from the packaging.
- Place the unit on a stable, level surface away from direct sunlight, heat sources, and excessive dust or moisture.
- Ensure adequate space around the unit for proper ventilation.
5.2. Connecting to Power
- Connect the power cord to the AC IN jack on the rear of the unit.
- Plug the other end of the power cord into a standard AC wall outlet.
5.3. Audio Connections
Connect the RCD-W500C to your audio system using the appropriate cables:
- Analog Connection: Use RCA audio cables to connect the ANALOG OUT jacks (L/R) on the RCD-W500C to the corresponding audio input jacks on your amplifier or receiver.
- Digital Optical Connection: For digital audio output, connect an optical cable from the DIGITAL OPTICAL OUT jack on the RCD-W500C to a digital optical input on your amplifier or receiver.
- Recording Input: To record from an external source, connect the source's audio output to the ANALOG IN or DIGITAL OPTICAL IN jacks on the RCD-W500C.
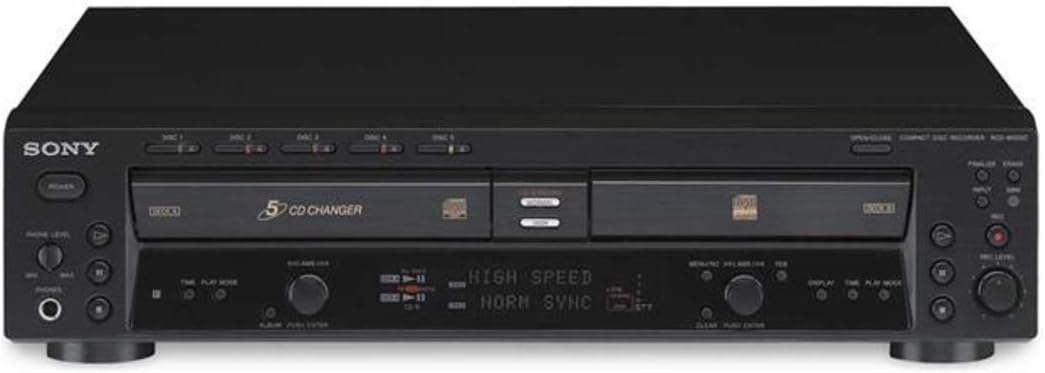
Figure 1: Front view of the Sony RCD-W500C CD Player / Recorder, showing the 5-CD changer tray and dual deck design.

Figure 2: Rear panel of the Sony RCD-W500C, illustrating the various audio input and output connections including Analog RCA and Digital Optical ports.
6. Operating Instructions
6.1. Loading and Ejecting Discs
- Press the OPEN/CLOSE button to open the disc tray.
- Place up to five CDs onto the disc tray, ensuring they are seated correctly with the label side up.
- Press the OPEN/CLOSE button again to close the tray.
- To eject a single disc, press the corresponding DISC SELECT button (1-5) and then the OPEN/CLOSE button.
6.2. Basic Playback
- Press the POWER button to turn on the unit.
- Select the desired disc using the DISC SELECT buttons (1-5).
- Press the PLAY button (►) to start playback.
- Use the SKIP buttons (◀◀ / ►►) to navigate between tracks.
- Press the PAUSE button (▐▐) to temporarily stop playback, and PLAY to resume.
- Press the STOP button (■) to end playback.
6.3. Recording CDs (Dubbing)
The RCD-W500C allows you to record audio from one CD to another (dubbing) or from an external source.
- Insert the source CD into Deck A and a blank recordable CD-R or CD-RW into Deck B.
- Select the desired recording mode (e.g., 4x High Speed Dubbing, Normal).
- For CD-to-CD dubbing, press the CD SYNCHRO button, then press PLAY on Deck A. Recording will start automatically.
- For recording from an external source, select the appropriate input (Analog or Digital Optical), then press RECORD on Deck B and PLAY on your external source.
- After recording, finalize the disc by pressing the FINALIZE button. This makes the disc playable on other CD players.
6.4. CD Text Entry
You can add text information (album title, track names) to your recorded CDs:
- During recording or after finalizing, enter CD Text mode (refer to the full user manual for specific button presses).
- Use the control knob and buttons to input characters for album and track titles.
- Save the entered text.
Video 1: A demonstration of the Sony RCD-W500C CD Player / Recorder in operation, showcasing disc loading, playback, and basic controls.
7. Maintenance
To ensure the longevity and optimal performance of your Sony RCD-W500C, follow these maintenance tips:
- Cleaning the Unit: Wipe the exterior with a soft, dry cloth. Avoid using abrasive cleaners or solvents.
- Disc Handling: Always handle CDs by their edges. Keep them free from dust, fingerprints, and scratches. Store discs in their cases when not in use.
- Lens Cleaning: If playback issues occur due to a dirty lens, use a commercially available CD lens cleaner disc.
- Ventilation: Ensure that the ventilation openings on the unit are not blocked to prevent internal heat buildup.
8. Troubleshooting
If you encounter issues with your RCD-W500C, refer to the following common problems and solutions:
| Problem | Possible Cause | Solution |
|---|---|---|
| No power | Power cord disconnected; unit off. | Ensure power cord is securely plugged in. Press the POWER button. |
| Disc not playing / "NO DISC" displayed | Disc inserted incorrectly; disc dirty or scratched; incompatible disc format. | Reinsert disc correctly. Clean disc with a soft cloth. Ensure disc is CD, CD-R, CD-RW, or MP3 CD. |
| Recording errors / "TOC Error" / "Unable to Finalize" | Blank disc is not recordable; disc is full; recording conditions. | Use a new, compatible CD-R/RW disc. Ensure sufficient space on the disc. Follow recording instructions carefully, especially regarding finalizing. Some discs may have compatibility issues. |
| Remote control not working | Batteries depleted or inserted incorrectly; obstruction between remote and unit. | Replace batteries. Ensure correct polarity. Remove any obstructions. |
9. Specifications
| Feature | Detail |
|---|---|
| Model Number | RCDW500C |
| Product Dimensions | 23 x 23 x 13 inches |
| Item Weight | 17.7 pounds |
| Manufacturer | Sony |
| Color | Black |
| Connectivity Technology | RCA |
| Special Feature | Compact |
| Batteries | 2 AA batteries required (included for remote) |
| Date First Available | July 30, 2003 |
10. Warranty and Support
10.1. Warranty Information
This Sony CD recorder/player is sold with a one-year replacement or refund warranty. If you are not completely satisfied with the quality of this Sony product, you may return it for a refund of your purchase price.
10.2. Customer Support
For further assistance, technical support, or warranty claims, please contact Sony customer service through their official website or the contact information provided with your purchase documentation.