
1. Introduction
This manual provides detailed instructions for the proper setup, operation, and maintenance of your Panasonic DVD-RP56 Progressive-Scan DVD Player. Please read this manual thoroughly before using the unit to ensure optimal performance and to prevent damage. Keep this manual for future reference.
The Panasonic DVD-RP56 is designed to deliver high-quality video and audio playback from various disc formats, including DVD-Video, Video CD, audio CD, CD-R, and CD-RW discs with MP3 files. Its progressive-scan output enhances picture quality on compatible televisions, providing a clear and detailed viewing experience.

Figure 1.1: Front view of the Panasonic DVD-RP56 Progressive-Scan DVD Player, showing the disc tray, display, and control buttons.
2. Key Features
The Panasonic DVD-RP56 DVD Player incorporates several advanced features for an enhanced home entertainment experience:
- Disc Compatibility: Plays DVD-video, Video CD, CD, CD-R, and CD-RW media, including MP3 files.
- Progressive-Scan Output: Renders a flicker-free, film-like image on High-Definition (HD) and HD-ready televisions via component video output.
- Advanced Virtual Surround Sound (V.S.S.): Simulates a multi-channel surround sound experience from two speakers.
- Bass Plus Audio Enhancement: Provides an enhanced bass response for a more impactful audio experience.
- Dialogue Enhancer: Improves the audibility of dialogue in certain scenes.
- 5-Speed Smooth-Motion Scan: Allows fast forward or reverse scanning at varying speeds (up to 100x) while maintaining clear images.
- Optical Digital-Audio Output: For optimal connection with multi-channel digital surround receivers, supporting Dolby Digital and DTS signals.
- Cinema Mode: Improves visibility of details in dark scenes and provides a more cinema-like luminance and color.
- Disc Stabilizer: Increases playability and reduces the chances of disc warping.
- Picture Controls: Adjustable color, brightness, contrast, and sharpness.
3. Setup
3.1 Unpacking
Carefully remove the DVD player and all accessories from the packaging. Ensure all components are present:
- Panasonic DVD-RP56 DVD Player
- Remote Control (if included)
- Audio/Video Cables
- Power Cord
3.2 Connecting to a Television
Choose the best available connection type for your television. For optimal picture quality, use the component video output if your TV supports it.

Figure 3.1: Rear panel of the DVD-RP56, illustrating the various video and audio output ports.

Figure 3.2: Detailed view of the rear panel connections, including Audio Out (L/R, Subwoofer), Video Out, S-Video Out, and Component Video Out (Y, Pb, Pr).
3.2.1 Component Video Connection (Recommended for Progressive Scan)
- Connect the Y (green), Pb (blue), and Pr (red) component video output jacks on the DVD player to the corresponding component video input jacks on your television using component video cables.
- Ensure the cables are securely connected to the correct color-coded jacks.
3.2.2 S-Video Connection
- Connect the S-VIDEO OUT jack on the DVD player to the S-Video input jack on your television using an S-Video cable.
3.2.3 Composite Video Connection
- Connect the VIDEO OUT (yellow) jack on the DVD player to the video input jack on your television using a composite video cable.
3.3 Connecting Audio
For surround sound, connect to an audio receiver. For basic stereo, connect directly to your TV or stereo system.
3.3.1 Digital Optical Audio Connection (for Surround Sound)
- Connect the DIGITAL AUDIO OUT (OPTICAL) jack on the DVD player to the digital optical input jack on your Dolby Digital/DTS compatible audio receiver using an optical cable.
3.3.2 Analog Stereo Audio Connection
- Connect the AUDIO OUT L (white) and R (red) jacks on the DVD player to the corresponding audio input jacks on your television or stereo receiver using RCA audio cables.
- If you have a subwoofer, connect the SUBWOOFER output to your subwoofer's input.
3.4 Power Connection
- Plug the power cord into the AC IN socket on the rear of the DVD player.
- Plug the other end of the power cord into a wall outlet.
3.5 Initial Setup
- Turn on your television and select the correct video input source (e.g., Component, S-Video, Video 1).
- Press the POWER button on the DVD player or remote control to turn on the unit.
- Follow the on-screen instructions to configure initial settings such as language, aspect ratio, and progressive scan output.
4. Operating Instructions
4.1 Basic Disc Playback
- Press the OPEN/CLOSE button on the front panel or remote control to open the disc tray.
- Place a disc (DVD, CD, MP3 CD) onto the disc tray with the label side facing up.
- Press the OPEN/CLOSE button again to close the disc tray. The player will automatically begin playback or display the disc menu.
- Use the PLAY, PAUSE, STOP, SKIP, and SEARCH buttons on the front panel or remote control to manage playback.

Figure 4.1: Left side of the front panel, featuring the Power button and disc tray controls.
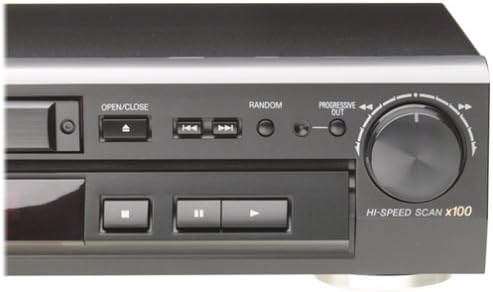
Figure 4.2: Right side of the front panel, featuring playback controls (Open/Close, Play, Pause, Stop) and the Hi-Speed Scan dial.
4.2 Progressive Scan Output
If connected via component video to a compatible TV, the DVD-RP56 can output a progressive scan signal (480p). This provides a smoother, more detailed picture than interlaced video.
- To activate progressive scan, ensure your TV is set to the correct input and progressive scan mode.
- Access the player's setup menu to enable progressive scan output if it does not activate automatically.
4.3 Smooth Motion Scan
Use the HI-SPEED SCAN x100 dial on the front panel or the corresponding buttons on the remote to quickly scan through content. This feature allows you to preview content at various speeds (up to 100 times normal playback speed) while maintaining a recognizable image.
4.4 Audio Features
- V.S.S. (Virtual Surround Sound): Press the ADVANCED SURROUND button on the front panel or remote to engage virtual surround sound for a more immersive audio experience with two speakers.
- Bass Plus: Press the BASS PLUS button to enhance low-frequency audio output.
- Dialogue Enhancer: Press the DIALOGUE ENHANCER button to make spoken dialogue clearer and more prominent.
4.5 Picture Controls
Access the player's setup menu to adjust picture settings such as color, brightness, contrast, and sharpness to suit your viewing preferences.
- Cinema Mode: Press the CINEMA button to activate a picture mode optimized for film content, enhancing dark scene visibility and color reproduction.
5. Maintenance
5.1 Cleaning the Unit
- Wipe the exterior of the DVD player with a soft, dry cloth.
- Do not use abrasive cleaners, waxes, or solvents as they can damage the finish.
- Ensure the unit is unplugged before cleaning.
5.2 Disc Handling and Care
- Always hold discs by their edges to avoid fingerprints on the playing surface.
- Clean discs with a soft, lint-free cloth, wiping gently from the center outwards.
- Do not use solvents or abrasive cleaners on discs.
- Store discs in their cases to protect them from dust and scratches.
6. Troubleshooting
If you experience problems with your DVD player, refer to the following common issues and solutions before contacting support.
| Problem | Possible Cause | Solution |
|---|---|---|
| No power | Power cord not connected; power outlet not active. | Ensure power cord is securely plugged into the unit and a working outlet. |
| No picture | Incorrect video input selected on TV; video cables loose or incorrect. | Select the correct input on your TV. Check all video cable connections. |
| No sound | Audio cables loose or incorrect; TV/receiver volume too low or muted; incorrect audio output selected. | Check audio cable connections. Increase volume/unmute TV/receiver. Ensure correct audio output is selected in player settings. |
| Disc does not play or skips | Disc is dirty, scratched, or incompatible format; disc inserted incorrectly. | Clean the disc. Try a different disc. Ensure the disc is inserted correctly (label side up). Verify disc format compatibility. |
| Remote control not working | Batteries are dead or inserted incorrectly; obstruction between remote and player. | Replace batteries. Ensure correct battery polarity. Remove any obstructions. Point remote directly at the player's sensor. |
| Choppy video or audio out of sync | Disc reading error; disc damage; player malfunction. | Clean the disc thoroughly. Try another disc. If the problem persists across multiple discs, the player may require service. |
7. Specifications
- Model: DVD-RP56
- Brand: Panasonic
- Media Type: CD, DVD (DVD-Video, Video CD, CD, CD-R, CD-RW with MP3)
- Video D/A Converter: 54 MHz / 10-bit
- Video Output: Component Video (Y, Pb, Pr), S-Video, Composite Video
- Audio Output: Digital Optical, Analog Stereo (L/R), Subwoofer Out
- Audio Output Mode: Surround (V.S.S.), Stereo
- Compatible Devices: Television
- Input Video Compatibility: NTSC
- Item Weight: Approximately 5.7 Pounds (2.59 kg)
- UPC: 037988405435
- ASIN: B00005AY8G
8. Warranty and Support
8.1 Warranty Information
The Panasonic DVD-RP56 DVD player typically comes with a warranty of one year on parts and 90 days on labor from the date of purchase. Please retain your proof of purchase for warranty claims. Warranty terms may vary by region and retailer.
8.2 Customer Support
For technical assistance, service, or further information, please contact Panasonic customer support. Refer to the official Panasonic website or your product packaging for the most current contact details.
Before contacting support, please ensure you have performed basic troubleshooting steps as outlined in Section 6 of this manual.


