Introduction
The Rain Bird CPF100 In-Line Automatic Sprinkler Valve with Flow Control is designed for residential and light commercial irrigation systems. This 1-inch threaded valve features flow control to optimize sprinkler performance and prevent misting, ensuring uniform water distribution. It is intended for below-ground installation and operates with any 24-volt AC irrigation timer/controller. The unique reverse-flow design helps prevent flooding in case of internal diaphragm failure, conserving water. This valve can be operated automatically or manually using its bleed screw. Its Buna-N diaphragm ensures superior performance in various water conditions, and the energy-efficient, low-power encapsulated solenoid includes a captured plunger for reliability.
Key Features:
- Residential/light commercial grade 1" female threaded inlet and outlet valve with flow control.
- Designed for below-ground installation.
- Operates automatically or manually with manual bleed screw.
- Reverse Flow design reduces stress on diaphragm for dependable operation.
- Energy efficient, low power encapsulated solenoid with captured plunger.
- Buna-N diaphragm provides superior performance in harsh water environments.
Setup and Installation
Proper installation is crucial for the optimal performance of your Rain Bird CPF100 valve. This valve is designed for below-ground installation within a valve box, downstream from a backflow prevention device (PVB or double-check valve). Always check local city codes for specific backflow prevention requirements.
Installation Steps:
- Shut off Main Water Supply: Before beginning any work, ensure the main water supply to your irrigation system is completely shut off.
- Prepare Connections: The valve features 1-inch female threaded inlet and outlet connections. Use appropriate threaded pipe adapters.
- Apply Thread Sealant: Wrap a thin layer of PTFE thread seal tape around the threads of the pipe adapters. Screw them into the valve's inlet and outlet. Tighten fittings with pliers or channel locks, being careful not to overtighten.
- Ensure Correct Flow Direction: Verify that the valve's flow arrows are pointing in the direction of water flow.
- Apply Primer and Glue (if using PVC pipe): Apply PVC primer to the insides of the fittings and the outsides of the pipes. After the primer dries, spread an even layer of PVC glue over the primed areas. Insert the pipes and ensure the valve is level. Allow the glue to dry for at least 30 minutes before turning the main water supply back on.
- Wire the Solenoid: Connect the white wire on the solenoid to the common wire (usually white) of your sprinkler timer. Connect the other solenoid wire to a power wire (usually colored) from your timer. Each solenoid should be connected to a different colored power wire. Use watertight wire nuts to protect connections from water.
- Restore Water Supply: Once all connections are secure and dry, slowly turn the main irrigation water supply back on.

Image: Rain Bird CPF100 In-Line Automatic Sprinkler Valve with Flow Control.
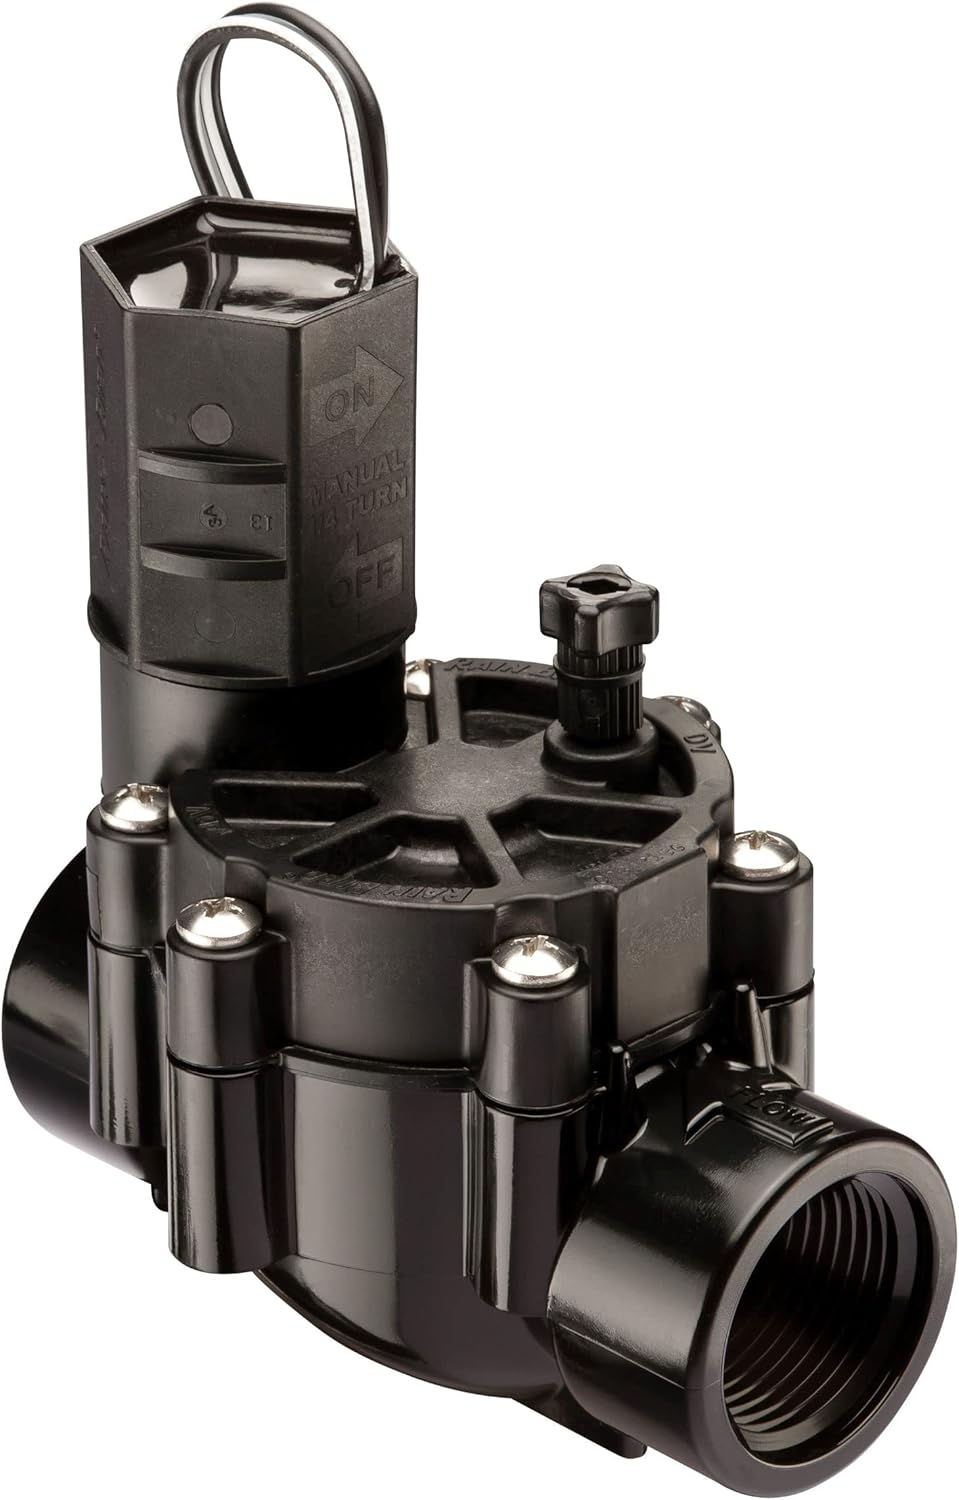
Image: Rain Bird CPF100 valve installed below ground in a valve box, connected to white PVC pipes and electrical wiring.

Image: Diagram illustrating the installation of in-line valves within an irrigation system, showing pipe connections and wiring.
Installation Video:
Video: This video demonstrates the installation process for Rain Bird In-Line Valves (CP and CPF models), covering pipe connections and proper placement.
Operating Instructions
The Rain Bird CPF100 valve offers both automatic operation via your irrigation controller and manual control options.
Manual On/Off Operation:
- To Open the Valve Manually: Rotate the solenoid one-quarter turn counter-clockwise. This will open the valve and allow water flow.
- To Close the Valve Manually: Turn the solenoid clockwise until it is hand-tight. This will stop the water flow.
- Caution: Do NOT completely remove the solenoid on a live system. Avoid overtightening the solenoid to prevent damage to the valve.
Flow Control Adjustment:
The flow control knob on the valve allows you to adjust the water flow to the zone, optimizing sprinkler performance and preventing misting.
- To Decrease Water Flow: Turn the flow control stem clockwise.
- To Increase Water Flow: Turn the flow control stem counter-clockwise.
- Note: If the irrigation controller is running, you can also turn off the zone or station at the controller to stop water flow.
Using the Bleed Screw:
The manual bleed screw can be used to flush debris from the valve or to manually open the valve for testing.
- To Open: Slowly turn the bleed screw counter-clockwise until water starts to escape from the top of the valve.
- To Flush: Leave the bleed screw open for approximately 60 seconds to allow debris to flush out.
- To Close: Turn the bleed screw clockwise until it is hand-tight.
- Caution: Never completely remove the bleed screw on a live system. During normal operation, the bleed screw should always be in the closed position.

Image: Top view of the Rain Bird CPF100 valve, highlighting the solenoid and flow control knob for manual operation.
Operation Videos:
Video: This video provides instructions on how to manually turn Rain Bird valves on and off using the solenoid.
Video: This video demonstrates the correct procedure for using the bleed screw on Rain Bird valves for flushing or manual operation.
Video: This video explains how to adjust the flow control on Rain Bird valves to manage water output.
Maintenance
Regular maintenance ensures the longevity and efficient operation of your Rain Bird CPF100 valve. Key components like the diaphragm and solenoid may require occasional replacement.
Replacing the Diaphragm:
If water is continuously leaking from a zone even when the valve is off, and flushing the bleed screw does not resolve the issue, the valve diaphragm may be damaged.
- Shut off Water Supply: Turn off the main water supply to your irrigation system.
- Disconnect Solenoid Wires: Disconnect the wires leading to the solenoid.
- Remove Solenoid: Turn the solenoid counter-clockwise to remove it.
- Remove Bonnet Screws: Unscrew the bonnet screws (usually six) and carefully remove the bonnet.
- Replace Diaphragm and Spring: Remove the old diaphragm and spring. Install the new diaphragm and spring from a Rain Bird diaphragm replacement kit, ensuring the diaphragm is oriented correctly (it's designed to fit only one way).
- Reinstall Bonnet: Carefully reinstall the bonnet and hand-tighten the screws.
- Reinstall Solenoid: Reinstall the solenoid by rotating it clockwise until it is hand-tight. Avoid overtightening.
- Reconnect Wires: Reconnect the solenoid wires using watertight wire nuts.
- Restore Water Supply: Turn the main irrigation water supply back on.

Image: Components of a Rain Bird valve diaphragm replacement kit, including the diaphragm, spring, and screws.
Replacing the Solenoid:
If the valve does not turn on even when the irrigation controller is sending power to it, and other valves are working, the solenoid may need to be replaced.
- Shut off Water Supply: Turn off the main water supply to your irrigation system.
- Disconnect Solenoid Wires: Disconnect the wires leading to the solenoid.
- Remove Old Solenoid: Turn the old solenoid counter-clockwise to remove it.
- Install New Solenoid: Install the replacement solenoid by rotating it clockwise until it is hand-tight. Avoid overtightening.
- Reconnect Wires: Reconnect the solenoid wires using watertight wire nuts.
- Restore Water Supply: Turn the main irrigation water supply back on.

Image: Close-up of a Rain Bird valve solenoid, a key electrical component.

Image: Rain Bird replacement solenoid for various valve series.
Maintenance Videos:
Video: This video guides you through the process of replacing the diaphragm in a Rain Bird valve.
Video: This video provides step-by-step instructions on how to replace the solenoid on a Rain Bird valve.
Troubleshooting
This section addresses common issues you might encounter with your Rain Bird CPF100 valve.
Valve Leaking Continuously:
- Possible Cause 1: Debris in Valve. If water is leaking from a zone even when the valve is not turned on by the controller, there may be debris stuck in the valve. Use the bleed screw to flush the valve (refer to 'Using the Bleed Screw' in Operating Instructions).
- Possible Cause 2: Damaged Diaphragm. If flushing the bleed screw does not resolve the leak, the valve diaphragm might be damaged. Refer to 'Replacing the Diaphragm' in the Maintenance section.
Valve Not Turning On:
- Possible Cause: Faulty Solenoid. If the valve does not turn on even though the irrigation controller is sending power to it, and other valves are working correctly, the solenoid may need to be replaced. Refer to 'Replacing the Solenoid' in the Maintenance section.
- Check Wiring: Ensure all wiring connections to the solenoid are secure and free from damage.
Specifications
| Material | Plastic |
| Brand | Rain Bird |
| Item Dimensions (L x W x H) | 3.25 x 4.5 x 5 inches |
| Exterior Finish | Black |
| Inlet Connection Size | 1 Inches |
| Inlet Connection Type | Threaded |
| Outlet Connection Type | FNPT |
| Maximum Operating Pressure | 150 Pound per Square Inch |
| Number of Ports | 2 |
| Outlet Connection Size | 1 Inches |
| Thread Size | 1 Inch |
| Thread Type | Female |
| Valve Type | In-line Valve |
| Item Weight | 0.22 Pounds |
| Specification Met | ASME, ANSI, EPA |
Warranty and Support
Rain Bird products are manufactured to high-quality standards and come with a manufacturer's warranty. For specific warranty details, please refer to the documentation included with your product or visit the official Rain Bird website. For technical support or further assistance, please contact Rain Bird customer service.


