1. Introduction
This manual provides essential information for the safe and proper installation, operation, and maintenance of the Square D Homeline Load Center, Model HOM612L100SCP. This unit is designed for indoor use as a 100-Amp, 6-space, 12-circuit electrical panel with fixed main lugs. Adherence to these instructions and all applicable local and national electrical codes is critical for safety and optimal performance.

Figure 1: Square D Homeline Load Center (HOM612L100SCP) with cover.
2. Safety Information
DANGER: HAZARD OF ELECTRIC SHOCK, EXPLOSION, OR ARC FLASH.
- This equipment must only be installed and serviced by qualified electrical personnel.
- Turn off all power supplying this equipment before working on or inside equipment.
- Always use a properly rated voltage sensing device to confirm power is off.
- Replace all devices, doors, and covers before turning on power.
- Failure to follow these instructions will result in death or serious injury.
Always consult the wiring diagram provided with the unit for specific connection details and voltage ratings. Ensure all connections are properly torqued according to specifications.
3. Specifications
| Feature | Specification |
|---|---|
| Model Number | HOM612L100SCP |
| Brand | Schneider Electric (Square D) |
| Amperage | 100 Amps (Maximum) |
| Number of Spaces | 6 |
| Number of Circuits | 12 (with tandem breakers) |
| Phase Type | Single Phase |
| Voltage Rating | 120/240 Vac Max, 1 Ph, 50/60 Hz |
| Enclosure Type | Type 1 (Indoor) |
| Mounting Type | Surface Mount (Flush mount possible with appropriate accessories) |
| Material | Metal |
| Product Dimensions (L x W x H) | 8.52" x 2.19" x 12.88" |
| Item Weight | 7.65 lbs |
| Included Components | Load Center with Cover, Circuit Tester |

Figure 2: Product dimensions of the Homeline Load Center.
4. Setup and Installation
Installation of this load center should only be performed by a qualified electrician in accordance with all national and local electrical codes. Ensure power is disconnected at the main service panel before beginning any work.
4.1 Mounting the Enclosure
The HOM612L100SCP load center can be surface mounted or flush mounted. For flush mounting, an appropriate flush mounting cover kit (not included) is required. Remove the small mounting knockouts on the back of the enclosure. Fasten the enclosure to the wall using appropriate fasteners through the mounting holes.
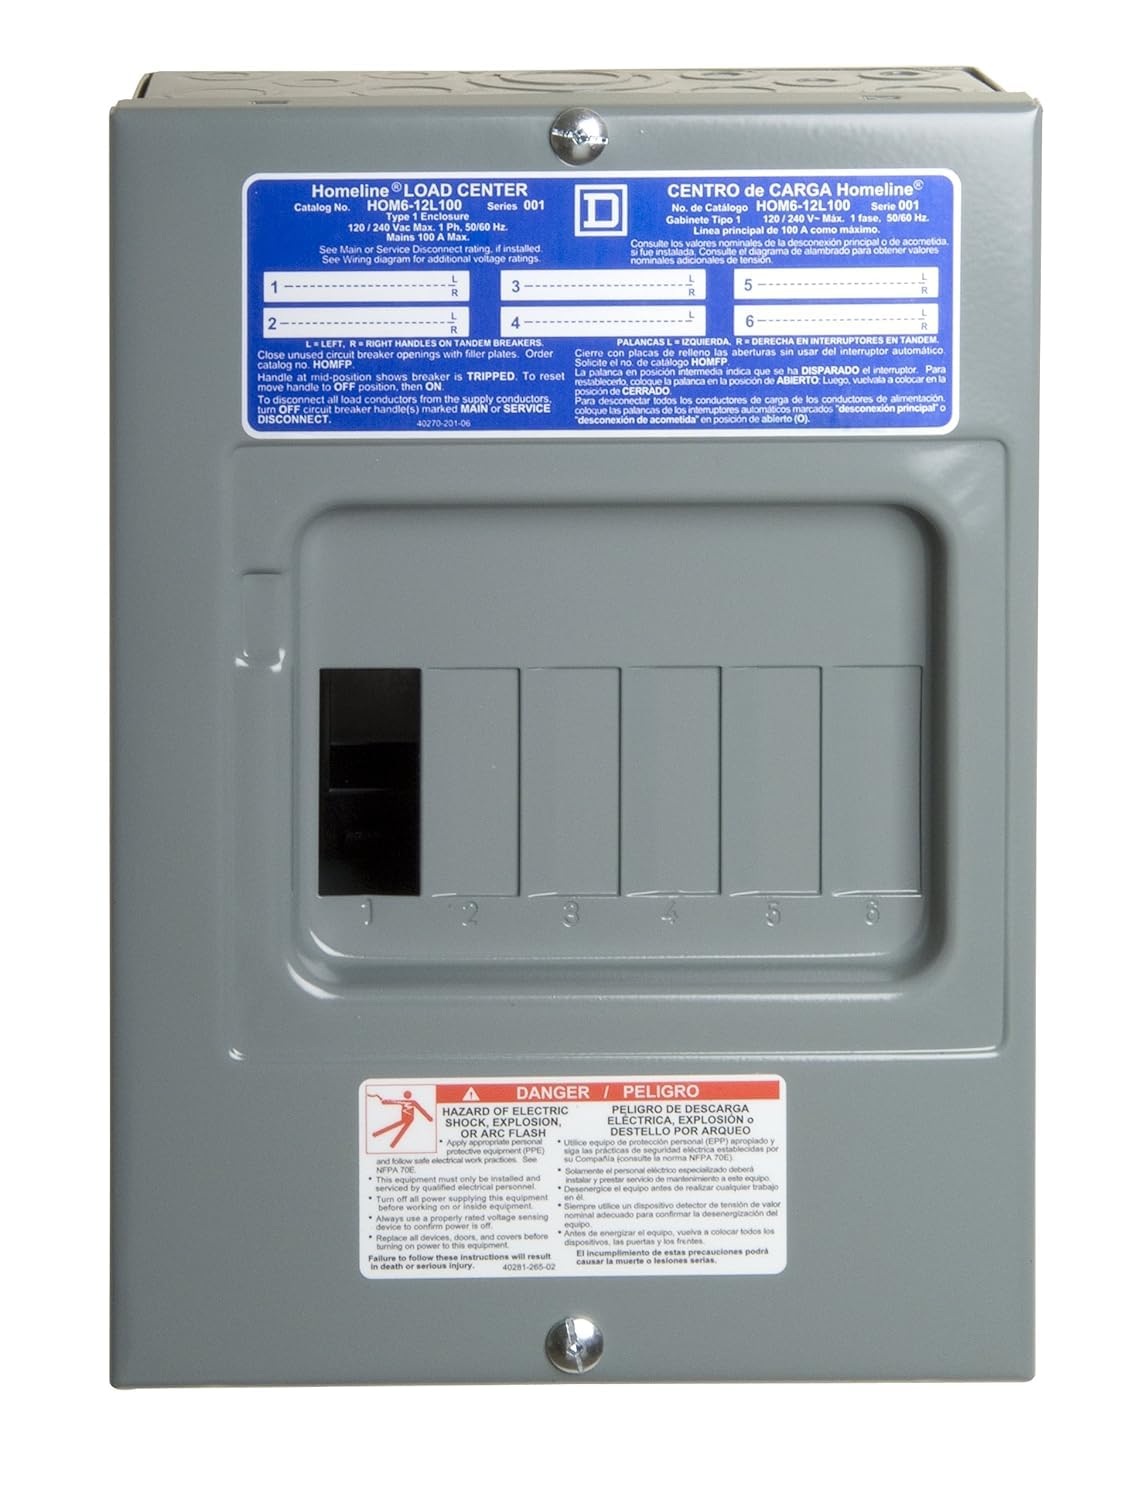
Figure 3: Front view of the load center, showing the label with model information and circuit layout.
4.2 Wiring Connections
The load center features main lugs for incoming power and a neutral bus bar. A separate ground bar (e.g., PK7GTA-1) is required for service entrance applications or if used as a sub-panel where the neutral and ground are separated.
- Main Power Connection: Connect the main incoming hot conductors to the main lugs at the top of the panel. Torque connections to the values specified on the label inside the enclosure.
- Neutral Connection: Connect the main neutral wire to the neutral bus bar. Ensure proper bonding or isolation as required by local codes.
- Grounding: If used as a service entrance, connect the service ground conductor to the neutral bus bar. For sub-panel applications, install a separate ground bar and connect the ground conductor to it, isolating it from the neutral bus.
- Branch Circuit Breakers: Install Square D Homeline circuit breakers into the available spaces. Connect the branch circuit conductors to the appropriate circuit breakers. Close unused circuit breaker openings with filler plates.

Figure 4: Internal view of the load center, showing main lugs and neutral bus bar.

Figure 5: Another internal view highlighting the main lugs and bus bar configuration.
5. Operating Instructions
The Homeline Load Center functions as a distribution point for electrical circuits within a building. Each circuit is protected by a circuit breaker.
- Turning Circuits ON/OFF: To turn a circuit ON, move the circuit breaker handle to the 'ON' position. To turn a circuit OFF, move the handle to the 'OFF' position.
- Resetting a Tripped Breaker: If a circuit breaker trips (indicating an overload or fault), its handle will move to a mid-position. To reset, first move the handle fully to the 'OFF' position, then to the 'ON' position. If the breaker immediately trips again, do not attempt to reset it; investigate the cause of the fault.
- Main Disconnect: To disconnect all load conductors from the supply, turn OFF the circuit breaker handle(s) marked 'MAIN' or 'SERVICE DISCONNECT'.
6. Maintenance
Regular maintenance helps ensure the safe and reliable operation of your load center. All maintenance should be performed by qualified personnel with power disconnected.
- Periodic Inspection: Annually inspect the load center for signs of wear, corrosion, loose connections, or overheating (discoloration of wires or components).
- Cleaning: Keep the interior of the load center clean and free of dust, debris, and moisture. Use a dry, non-conductive brush or vacuum.
- Tighten Connections: Periodically check and re-torque all electrical connections, especially main lugs and neutral/ground bus bar screws, to prevent loose connections that can cause overheating.
- Filler Plates: Ensure all unused circuit breaker openings are covered with appropriate filler plates to maintain enclosure integrity and prevent accidental contact with live parts.
7. Troubleshooting
If you experience issues with your load center, consider the following common troubleshooting steps. Always ensure power is OFF before inspecting or working on the unit.
- Frequent Breaker Tripping: This often indicates an overloaded circuit or a short circuit. Reduce the load on the circuit or inspect for damaged wiring or appliances.
- No Power to a Circuit: Check if the circuit breaker is in the 'TRIPPED' or 'OFF' position. Reset if necessary. If power is still absent, check connections or consult a qualified electrician.
- Overheating Smell/Discoloration: Immediately disconnect power and contact a qualified electrician. This indicates a serious electrical issue that requires professional attention.
8. Warranty and Support
This Schneider Electric product comes with a standard manufacturer's warranty. For specific warranty details, including coverage period and terms, please refer to the warranty documentation included with your purchase or visit the official Schneider Electric website. For technical support, installation assistance, or to report product issues, please contact Schneider Electric customer service.
Note: Returns will not be honored on this closeout item, as per product listing information. Please verify product suitability before purchase.
9. Contact Information
For further assistance or inquiries, please visit the Schneider Electric Store on Amazon or their official corporate website.


