ASCenDO L100 Elliptical Exercise Machine

SAFETY INSTRUCTIONS
NOTICE: This document provides important safety instructions, adjustments, and general troubleshooting information for the maintenance of the ASCEND L-100 Elliptical Bike.
If you need assistance, please call Ascend Customer Service (if purchased in US/Canada) or your local distributor (if purchased outside US/Canada).
![]() This icon means a potentially hazardous situation which, if not avoided, could result in death or serious injury. Read and understand all Warnings on this machine.
This icon means a potentially hazardous situation which, if not avoided, could result in death or serious injury. Read and understand all Warnings on this machine.
BEFORE SERVICING OR USING THIS EQUIPMENT, OBEY THE FOLLOWING WARNINGS:
![]() Read and understand the Service Manual before working on the machine. Failure to obey the instructions and safety warnings could cause injury to the service technician or bystanders.
Read and understand the Service Manual before working on the machine. Failure to obey the instructions and safety warnings could cause injury to the service technician or bystanders.
- Keep bystanders and children away from the product being serviced, at all times.
- Make sure that the repair is done in an appropriate workspace away from foot traffic and exposure to bystanders.
- Disconnect all power to the machine before you service it. (This includes the batteries) .
- Some components of the equipment can be heavy or awkward. Enlist the service of a second person when you do maintenance steps involving these components. Do not try to do heavy or awkward steps on your own.
- Use only replacement parts and hardware that are supplied or approved by Ascend. Failure to use Ascend-approved replacement parts can adversely affect the safety and functionality of the equipment creating a risk to users and will void the warranty.
- Be sure that all warning stickers and instructional placards applied to the product stay present and in good condition when doing maintenance or replacing components. If at any time the Warning labels become loose, unreadable, or dislodged, replace the labels. If purchased in US/Canada, contact Customer Service for replacement labels. If purchased outside US/Canada, contact your local distributor for them.
- Do not try to change the design or functionality of the machine being serviced as this can adversely affect user safety.
- Do not put the machine back in service until all shrouds, instructions, warning labels and correct functionality have been verified and tested for correct performance.
- Before starting your training, consult your doctor to determine whether your health and physical condition are suitable for the product. Because bad conditions can pose risks to your health and safety or prevent you from using the product correctly.
- If you are taking a medication that affects your heart rate and blood pressure, your doctor’s advice is extremely important.
- Always pay attention to the adverse reactions of the body. Incorrect and excessive use can damage your body immediately if you find the following symptoms; chest pain and chest tightness, abnormal heartbeat, shortness of breath, light head, dizziness or nausea. If you have the above symptoms during exercise, please consult your doctor for advice before continuing training! Place the device on a solid, flat level and soft material to protect your floor and carpet. Leave at least 0.6m (24’’) of open space around the device.
- Ensure that all the screws and nuts are locked before using the product.
- Use the product correctly according to the product label. If the device is assembled or inspected, or the abnormal sound from the device is heard during use, please stop using it immediately. It can never be forced to use it again until the problem is eliminated.
- Wear appropriate clothes during exercise; avoid wearing loose clothes during exercise; such clothes are easy to be hung or restrict movement.
![]() WARNING
WARNING
- Injury or death is possible if caution is not used while using this machine.
- Keep children and pets away.
- Read and follow all warnings on this machine.
- Refer to the Owner’s Manual for additional warnings and safety information.
- The heart rate displayed is an approximation and should be used for reference only.
- Not intended for use by anyone under 14 years of age.
- The maximum user weight for this machine is 330 lbs (150 kg.).
- This machine is for home use only.
- Consult a physician prior to using any exercise equipment.
- Set up and operate the exercise equipment on a solid and leveled surface.
- Care should be taken in mounting and and dismounting the exercise equipment.
Before dismounting, bring the machine to a complete stop. - Spinning pedals can cause injury.
- The exercise equipment does not have a freewheel and pedal speed must be reduced in a controlled manner.
SAVE THESE INSTRUCTIONS
SPECIFICATIONS
- Maximum User Weight:
120 Kg / 264.5 Lb - Net Weight:
25 Kg / 55 Lb - Gross Weight:
28 Kg / 62 Lb
![]() DO NOT dispose of this product as trash. This product is to be recycled. For proper disposal of this product, please follow the prescribed methods at an approved waste center.
DO NOT dispose of this product as trash. This product is to be recycled. For proper disposal of this product, please follow the prescribed methods at an approved waste center.
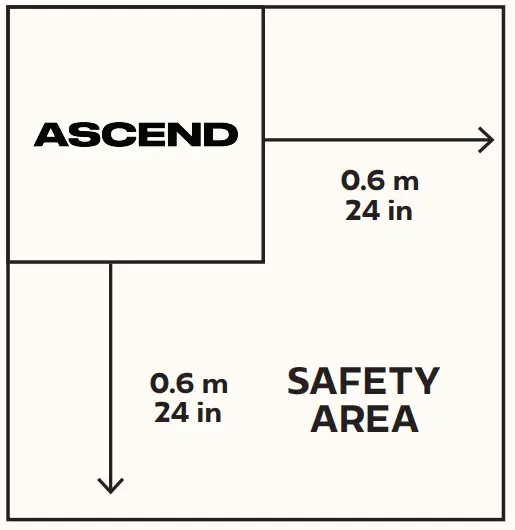
Select the area where you are going to set up and operate your machine. For safe operation the location must be on a hard leveled surface. You must keep a 0.6m (24”) clear space along the side & back to ensure safe access and operation.
REQUIRED MAINTENANCE
For instructions to replace the following parts, please refer to the Assembly Manual
![]() Equipment must be regularly examined for damage and repairs. The owner is responsible to make sure that regular maintenance is done. Worn or damaged components must be repaired or replaced immediately.
Equipment must be regularly examined for damage and repairs. The owner is responsible to make sure that regular maintenance is done. Worn or damaged components must be repaired or replaced immediately.
Only manufacturer supplied components can be used to maintain and repair the equipment.
If at any time the Warning labels become loose, unreadable, or dislodged, replace the labels.
If purchased in US/Canada, contact Customer Service for replacement labels. If purchased outside US/Canada, contact your local distributor for them.
Daily Maintenance
Before each use, examine the exercise machine for loose, broken, damaged, or worn parts. Do not use if found in this condition. Repair or replace all parts at the first sign of wear or damage. Make sure adjustment knobs are tight. Tighten as necessary. After each workout, use a damp cloth to wipe your machine and Console free of moisture.
NOTICE: If necessary, only use a mild dish soap with a soft cloth to clean the Console. Do not clean with a petroleum-based solvent, automotive cleaner, or any product that contains ammonia. Do not clean the Console in direct sunlight or at high temperatures. Be sure to keep the Console free of moisture.
Weekly Maintenance
Check pedals and tighten as necessary.
![]() Since this machine operates with a fixed gear, do not back, or reverse, pedal. Doing so may loosen the Pedals, which could result in damage to the machine and/or injury to the user. Never operate this machine with loose Pedals.
Since this machine operates with a fixed gear, do not back, or reverse, pedal. Doing so may loosen the Pedals, which could result in damage to the machine and/or injury to the user. Never operate this machine with loose Pedals.
Clean the machine to remove any dust, dirt, or grime from the surfaces.
Check for smooth seat operation. If needed, sparingly apply a thin coating of silicone lube to ease operation.
![]() Silicone lubricant is not intended for human consumption. Keep out of reach of children.
Silicone lubricant is not intended for human consumption. Keep out of reach of children.
Store in a safe place.
Note: Do not use petroleum-based products
Monthly or after 20 hours
Check crank arms and tighten as necessary. Make sure all bolts and screws are tight.
Tighten as necessary.
Check the drive belt tension and adjust if necessary.
HARDWARE LIST
- BOLTS
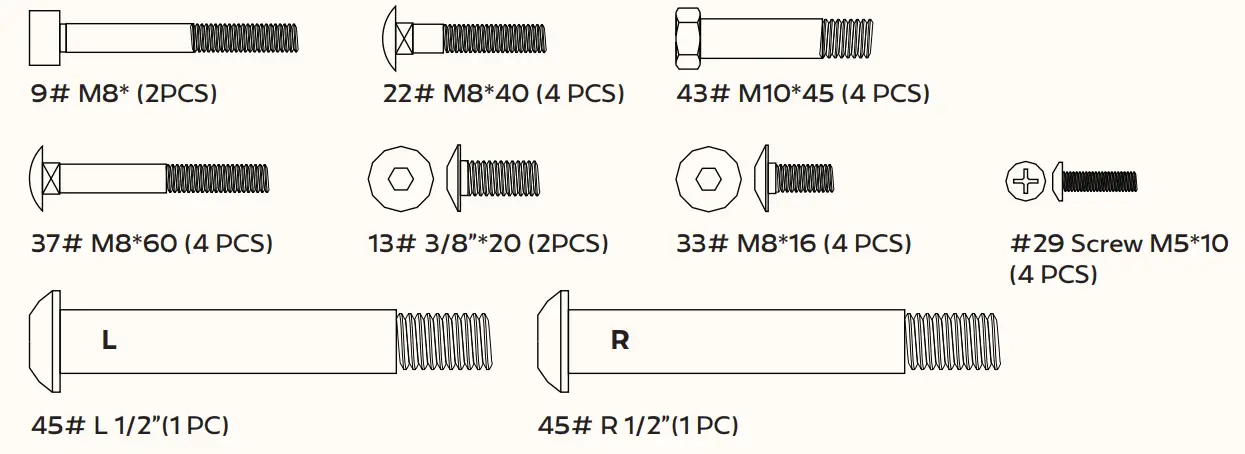
- WASHERS

- NUTS

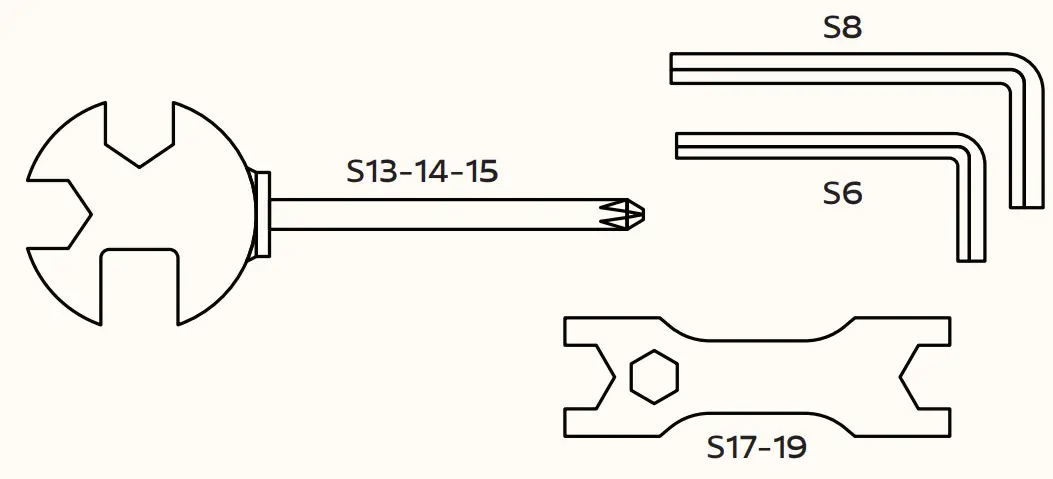
- TOOLS
HARDWARE LIST
| # | Part | Qty |
| 1 | Middle handlebar | 1 |
| 2 | End cap Φ22 | 2 |
| 3 | Foam grip | 2 |
| 4 | Pulse | 2 |
| 5 | End cap Φ28 | 4 |
| 6 | Handlebar | 2 |
| 7 | Foam grip | 2 |
| 8 | Screw ST4.2*19 | 2 |
| 9 | Bolt M8*62 | 2 |
| 10 | Handlebar wire | 2 |
| 11 | Cap nut M8 | 12 |
| 12 | Arc washer d8*Φ12*1.5*R30 | 4 |
| 13 | Bolt 3/8”*20 | 2 |
| 14 | Spring washer D10 | 2 |
| 15 | D washer d10*Φ20*5 | 2 |
| 16 | Bushing 2 Φ32*Φ19*28 | 4 |
| 17 | Bushing 2 Φ32*Φ19*28 | 1 |
| 18 | Hexagon bolt M10*60 | 4 |
| 19 | Bushing Φ14*12.5*Φ10.1 | 8 |
| 20 | Washer d10*Φ20*2 | 4 |
| 21 | Nylon nut M10 | 8 |
| 22 | Carriage bolt M8*40 | 4 |
| 23 | Spacer bush | 2 |
| 24 | Screw M5*45 | 1 |
| 25 | Arc washer d6 | 1 |
| 26 | Support tube | 1 |
| 27 | Tension control | 1 |
| 28 | Middle wire | 1 |
| 29 | Screw M5*10 | 4 |
| 30 | Computer | 1 |
| 31 | Lower handlebar(R) | 1 |
| 32 | Arc washer d8*Φ20*1.5*R30 | 8 |
| 33 | Bolt M8*16 | 4 |
| 34 | Induction Line | 1 |
| 35 | Tension wire | 1 |
| 36 | Foot strap Φ50 | 2 |
| 37 | Carriage bolt M8*60 | 4 |
| 38 | Font stabilizer | 1 |
| 39 | Tapping screw ST4.2*16 | 11 |
| 40 | End cap | 4 |
| 41 | Pedal tube | 2 |
| 42 | Pedal | 2 |
| 43 | Hexagon bolt M10*45 | 4 |
| 44 | Main frame | 1 |
| 45 | Bolt(L) 1/2” | 1 |
| 46 | Bushing 3 Φ28*Φ16*28 | 4 |
| 47 | U bracket(L/R) | 2 |
| 48 | Nylon nut(L) 1/2” | 1 |
| 49 | Spring washer 1/2” | 2 |
| 50 | End cap Φ50 | 2 |
| 51 | Rear stabilizer | 1 |
| 52 | Bolt(R) 1/2” | 1 |
| 53 | Nylon nut (R) 1/2” | 1 |
| 54 | Small cover | 2 |
| 55 | Chain cover L | 1 |
| 56 | Nut | 1 |
| 57 | Washer | 1 |
| 58 | Nut II | 1 |
| 59 | Collar ball | 2 |
| 60 | Collar housing | 2 |
| 61 | Nut I | 1 |
| 62 | Washer | 1 |
| 63 | Crank | 1 |
| 64 | Chain Wheel | 1 |
| 65 | Belt | 1 |
| 66 | Chain cover R | 1 |
| 67 | Pinch roller | 1 |
| 68 | Nylon nut M8 | 2 |
| 69 | Bolt | 1 |
| 70 | U bracket | 1 |
| 71 | Tension spring | 1 |
| 72 | Hexagon bolt M6*15 | 2 |
| 73 | Spring washer d6 | 2 |
| 74 | washerd6*Φ12*1 | 2 |
| 75 | Snap spring d12 | 2 |
| 76 | Axle | 1 |
| 77 | Tension spring | 1 |
| 78 | Magnet | 4 |
| 79 | Plastic lattice | 1 |
| 80 | Nut M10*1.0*H5 | 2 |
| 81 | Bolt group | 2 |
| 82 | Hexagon thin nut M10*1.0*H2 | 2 |
| 83 | Bearing | 2 |
| 84 | Flywheel | 1 |
| 85 | Axle | 1 |
| 86 | Magnetic board | 1 |
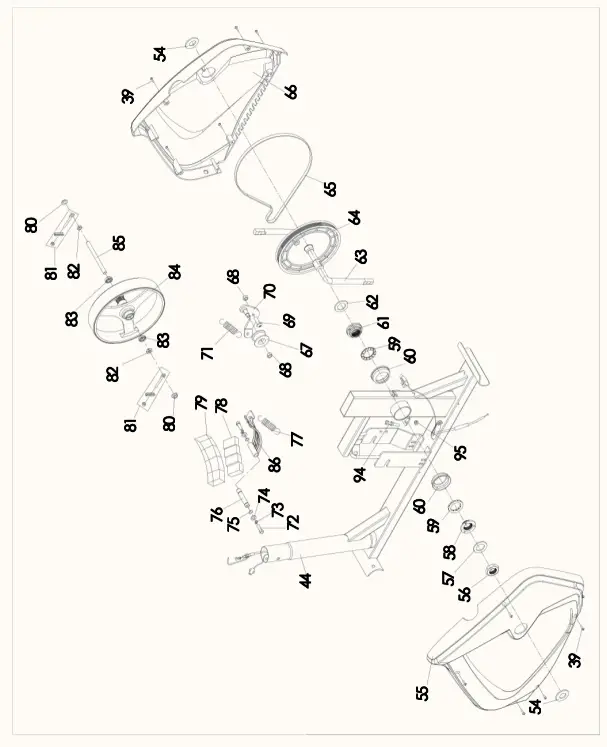
EXPLODED VIEW

ASSEMBLY INSTRUCTIONS
- STEP 1
Attach the front stabilizer(38) and the Rear Stabilizer(51) to the Main frame(44) with carriage bolt(37), Cap nut(11)and Arc washer(32).

Hardware Required

- STEP 2
Connect the Sensor (28)&(34),and Tension Control wire (27)&(35) as shown in FIG.2. Fix the Upright Post (26) on the Main Frame (44) with Bolt (33) & Arc Washer (32).

Hardware Required

- STEP 3
Fix the Lower Handle Bar (17)&(31)to the Upright Post (26) with Bolt (13), Washer (14) & D Washer (15). Fix the Pedal Tubes (41L)&(41R) on their respective pedal Crank with the Pedal Hinge Bolt (45) for the left & (52) for the right, Curved Washer (49), and Nylon Nut (48) for Left and (53) for right.

Hardware Required

- STEP 4
Install the Pedal(42) on the Pedal Tube (41L)&(41R) with Hex Head Bolt(43) and Nylon Nut (21).

Hardware Required

- STEP 5
Fix the Handlebars (6L)&(6R) to the Lower Handle Bars (17)&(31) with Bolt (22), Arc Washer (12) and Domed Nut (11).

Hardware Required

- STEP 6
Insert the handle pulse wire(10) through the upright post(26).
Then fix the Middle handlebar(1) on the Upright Post (26) with bolts(9), Arc Washers (32) and nuts(11).

Hardware Required

- STEP 7
Connect Handle Pulse Wires(10) to (30a), then connect Sensor wire(28)- to the computer (30b). Fix the Computer(30) onto the Upright Post (26) with Screws(29).

Hardware Required

MONITOR

| TIME | Workout duration |
| TIEM/500m | Average time per 500m |
| DISTANCE | Distance per workout |
| WATT | Watt power generated |
| PULSE* | Heart rate during exercise |
| CALORIE | Estimated Calories burned during exercise |
| SPM | Average strokes per minute |
* Note: Heart rate and APP functions are optional, depending on the product. Key function description.
| MODE |
|
| RESET |
|
| UP KEY |
|
| DOWN KEY |
|

Documents / Resources
 |
ASCenDO L100 Elliptical Exercise Machine [pdf] User Manual L100 Elliptical Exercise Machine, L100, Elliptical Exercise Machine, Exercise Machine, Machine |


