Anona HM1006-01 Lucio Security Camera Set User Manual

Package contents
Read this manual carefully before use, and retain it for future reference.

Product overview
Camera

Solar panel

Note: Illustrations of product, accessories, and user interface in the user manual are for reference purposes only. Actual product and functions may vary due to product enhancements.
Installing the camera
- Rotate counterclockwise to disassemble the camera bracket.

- Drill holes based on the mounting sticker (drill bit size: 6 mm), insert the wall anchors, and fix the base to the wall with screws.
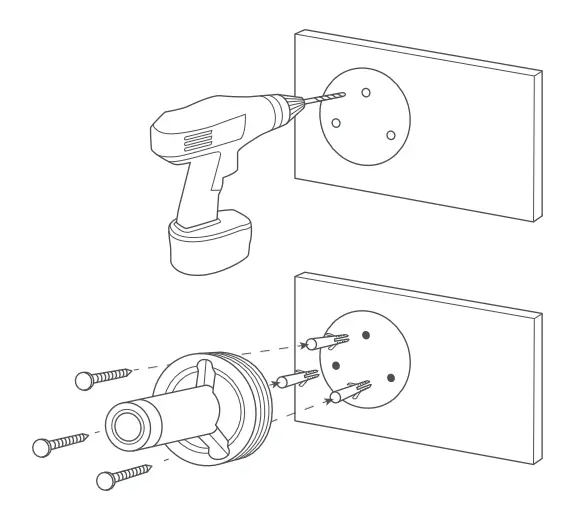
- Fix the locking cap onto the base.

- Hold the camera by hand and screw it to the bracket.

- Loosen the locking cap, hold the camera by hand and adjust the angle. After adjustment, tighten the locking cap.

Note: Please install the camera with its power port facing downwards. When the power port is not used, please cover it with the protective cover to prevent water ingress.
Installing the solar panel
- Select a suitable installation position where the solar panel gets the most sunlight throughout the year.
- Drill holes based on the mounting sticker (drill bit size: 6 mm), insert the wall anchors, and fix the bracket to the wall with screws.

- Fix the solar panel to the bracket.

- Loosen the adjustment knob on the bracket and adjust the angle of the solar panel to maximize the direct sunlight exposure.

- After the adjustment, tighten the adjustment knob.

- Completely insert the charging connector into the power port of the camera.

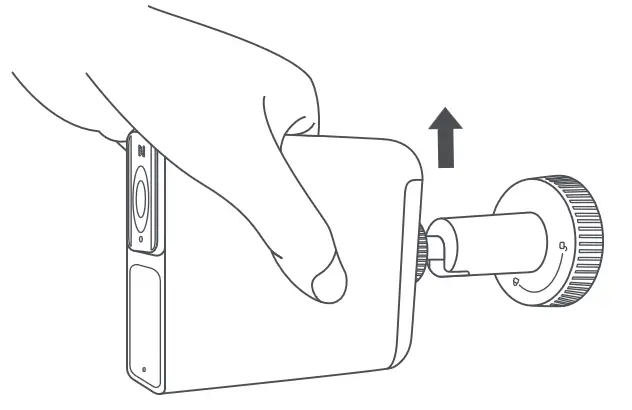
Disassembling/assembling the camera
Disassembling
Hold the camera by hand and lift it up with force; the camera will detach from the quick-release panel.
Assembling
- Hold the camera by hand and insert it into the quick-release panel.
- Slide the camera down until you hear a click sound, the camera is attached to the quick- release panel.


Note: If the camera malfunctions, press and hold the SYNC button for about 12 seconds to restart the device.
Indicator status

Binding the camera
- Scan the QR code to download and install the Anona Security app. Or search for “Anona Security” in the app store to download and install it.
- Press and hold the SYNC button for about 3 seconds to turn on the camera. Then press and hold the SYNC button until the indicator blinks orange.
- Open the homepage of the Anona Security app and tap “Add device”. In the Bluetooth scanning result list, tap the camera’s device ID and then follow the on-screen instructions to complete the binding process.

https://www.anonasecurity.com/pages/download
Notes:
- Your mobile phone must be running Android 8.0, iOS 12.0, or a later version.
- To find the device ID, detach the camera from the quick-release panel and locate it on the product label.
- Before starting the binding process, ensure that your phone is connected to the internet and Bluetooth is enabled.
- This product only supports 2.4GHz Wi-Fi networks, 5GHz Wi-Fi networks are not supported.
Precautions
- Please select a suitable installation position for the camera. It is recommended to be 2–3 m above the ground and there are no buildings or trees around the mounting wall surface.
- The operating temperature range for the camera and the solar panel is -20°C to 55°C. Do not use them at a too high or too low temperature.
- Do not use the camera and the solar panel in extremely humid environments or locations that may cause water ingress to avoid malfunctions.
- Do not expose the camera lens to direct sunlight, as this may damage the camera’s photosensitive components.
- Make sure that the camera is installed in an area with a strong Wi-Fi signal. Do not install the camera near microwave ovens, and other objects or places that affect its Wi-Fi signal.
- Keep the camera away from strong magnetic environments. Do not subject the camera to severe shock or vibration.
- When charging with a power adapter, use the included charging cable and a qualified power adapter (with an output of 5V
 2A) that meets safety standards. Charging should be carried out indoors in a well-ventilated environment.
 - When charging with a solar panel, only use Anona solar panel and do not use solar panels from any other brands.
- This camera is equipped with a built-in battery that cannot be removed or replaced. Do not disassemble or modify the battery by yourself.
- Be sure to install the solar panel in a location with abundant sunlight and free from any obstructions like tree branches, billboards, or buildings that may impact the conversion efficiency of the solar panel.
- To improve the performance of the solar panel, do not place it completely horizontally. Otherwise, dust, soil, or other debris may accumulate on it. Regularly clean the solar panel.
- Stop using the solar panel immediately if you notice any loose wiring or exposed electronics.
- Do not strike, crush, step on, bend, dismantle, or scratch the solar panel with sharp objects.
- Do not use or store the solar panel in flammable or explosive areas, nor throw it into a fire.
Warnings:
- Replacement of a battery with an incorrect type can defeat a safeguard.
- Disposal of a battery into fire or a hot oven, or mechanically crushing or cutting a battery can result in an explosion.
- Leaving a battery in an extremely high temperature environment can result in an explosion or the leakage of flammable liquid or gas.
- A battery subjected to extremely low air pressure may result in an explosion or the leakage of flammable liquid or gas.
Specifications

FCC Caution.
15.19 Labelling requirements.
This device complies with part 15 of the FCC Rules. Operation is subject to the following two conditions: (1) This device may not cause harmful interference, and (2) this device must accept any interference received, including interference that may cause undesired operation.
15.21 Information to user.
Any Changes or modifications not expressly approved by the party responsible for compliance could void the user’s authority to operate the equipment.
15.105 Information to the user.
Note: This equipment has been tested and found to comply with the limits for a Class B digital device, pursuant to part 15 of the FCC Rules. These limits are designed to provide reasonable protection against harmful interference in a residential installation. This equipment generates uses and can radiate radio frequency energy and, if not installed and used in accordance with the instructions, may cause harmful interference to radio communications. However, there is no guarantee that interference will not occur in a particular installation. If this equipment does cause harmful interference to radio or television reception, which can be determined by turning the equipment off and on, the user is encouraged to try to correct the interference by one or more of the following measures:
-Reorient or relocate the receiving antenna.
-Increase the separation between the equipment and receiver.
-Connect the equipment into an outlet on a circuit different from that to which the receiver is connected.
-Consult the dealer or an experienced radio/TV technician for help.
RF warning for Mobile device:
This equipment complies with FCC radiation exposure limits set forth for an uncontrolled environment. This equipment should be installed and operated with minimum distance 20cm between the radiator & your body.
FCC ID: 2BB7K-1006
ISED compliance statement
This device contains licence-exempt transmitter(s)/receiver(s) that comply with Innovation, Science and Economic Development Canada’s licence-exempt RSS(s). Operation is subject to the following two conditions:
1. This device may not cause interference.
2. This device must accept any interference, including interference that may cause undesired operation of the device.
ISED Radiation Exposure statement
This equipment complies with IC RSS-102 radiation exposure limits set forth for an uncontrolled environment. This equipment should be installed and operated with minimum distance 20 cm between the radiator and your body.
IC: 30992-1006
CAN ICES-003 (B) / NMB-003 (B)
![]()
Please use the LPS adapter.
V1.0-20240704
Service: help@anonasecurity.com
For further information, please go to www.anonasecurity.com
Manufacturer: Anona Security Technology Limited
Address: 8 The Green, Ste A Dover DE 19901, America
Documents / Resources
 |
Anona HM1006-01 Lucio Security Camera Set [pdf] User Manual HM1006-01 Lucio Security Camera Set, HM1006-01, Lucio Security Camera Set, Camera Set, Set |