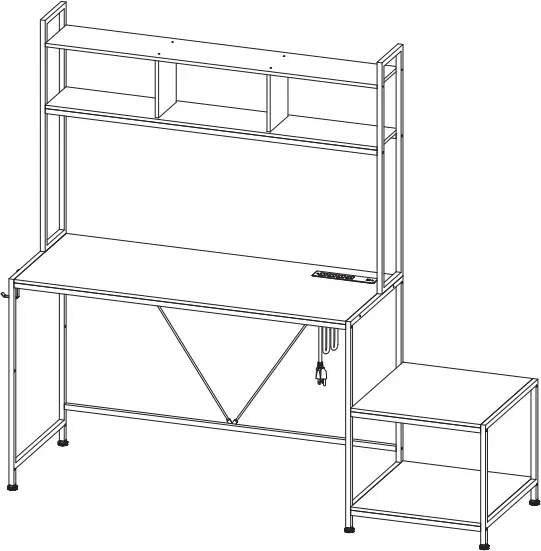
One Line Computer Desk
Instruction Manual
Note: There is also a more detailed installation video on the product detail page on Amazon.
![]()
![]()
![]()
E-mail: support@allstand.net
Made in China

![]()
MATTERS NEEDING ATTENTION
- You need a helper to finish the installation.
- Don’t over-tighten the screws until all the parts are in place. Failure to follow the instructions may cause misalignment of the screws.
- DO NOT let children climb the product.
- To avoid suffocation danger, keep small parts and package materials away from children.
- Adult assembly required. Keep children away during the installation.
- Children should not use it without parents’ supervision.
- You could use “corner guard” to protect children from getting hurt by the edges.
- In order to avoid giving you a bad installation experience, please follow the steps in the instruction manual to install and carefully distinguish screws and steel strips.


PART LIST
| (1)
x1
|
(2)
x1
|
| (3)
x1
|
(4)
x2
|
| (5)
x3
|
(6)
x1
|
| (7)
x1
|
(8)
x4
|
| (9)
x1
|
(10)
x2
|
| (11)
x1
|
(12)
x1
|
| (13)
x2
|
(14)
x2
|


|
(A) (B) (C) (D) (E) (F) |
|
| (G)
x2
|
(H)
x2
|
| (I)
x1
|
(J)
x1
|
| (K)
x1
|
(L)
x1
|
 ø5x40mm
  M6x35mm
  M6x26mm
 M6x15mm
  M6
M6

ASSEMLYIN INSTRUCTION
(Note: There is also a more detailed installation video on the product detail page on Amazon.)
To better adapt to your home layout and environment, we provide 2 installation methods for you to choose from. There maybe extra screw holes after installation, please do not worry.
I

II

ASSEMLYIN INSTRUCTION I
Note: Don’t over-tighten all the screws until all the parts are in place.

1


(F) ![]() x6
x6
2

|
(L) |
(B)  x6 x6 |
 x1
x13

|
(L) |
(B) x8 |
4

|
(L) |
(D)  x3 x3 |
5

|
(L) |
(C)  x6 x6 |
6

|
(L) |
(C) x4 |
7

|
(L) |
(C) x4 |
8

| (I) |
(E) |
(K)  x1 x1 |
9

|
(L) |
(C) x4 |
10

|
(L) |
(B) x4 |
11

|
(L) |
(C) x6 |
12

|
(L) |
(A) |
13

|
(L) |
(A) |
14

|
(L) |
(D) x2 |
(H)  x2 x2 |
Note: When pasting the LED strip in the position as shown, peel off the double-sided tape. Don’t tear off the bottom side of the tape.
After pasting the tail, you can use the cable ties to organize the wires.
15

(G)  x2 x2 |
(J)   x1 x1 |
Note: Please power on the LED strip, remove the plastic piece inside the remote, and control the strip.
16

ASSEMLYIN INSTRUCTION II
Note: Don’t over-tighten all the screws until all the parts are in place.

1


(F) ![]() x6
x6
2

|
(L) |
(B) x6 |
3

|
(L) |
(B) x8 |
4

|
(L) |
(D) x3 |
5

|
(L) |
(C) x6 |
6

|
(L) |
(C) x4 |
7

|
(L) |
(C) x4 |
8

| (I) |
(E) |
(K) x1 |
9

|
(L) |
(C) x4 |
10

|
(L) |
(B) x4 |
11

|
(L) |
(C) x6 |
12

|
(L) |
(A) |
13

|
(L) |
(A) |
14

|
(L) |
(D) x2 |
(H) x2 |
Note: When pasting the LED strip in the position as shown, peel off the double-sided tape. Don’t tear off the bottom side of the tape.
After pasting the tail, you can use the cable ties to organize the wires.
15

| (G) x2 |
(J) x1 |
Note: Please power on the LED strip, remove the plastic piece inside the remote, and control the strip.
16

ASSEMLY INSTRUCTION

(1) Turn On/Standby
(2) Dynamic Mode/Speed Adjust
(3) Static Color/Brightness Adjust
(4) Direct Color Select
Specification
|
Dynamic Mode |
22 modes |
|
Static Color |
20 colors |
| PWM Grade |
256 levels |
|
Brightness Grade |
5 levels |
| Speed Grade |
10 levels |
|
Demo Mode |
Yes |
| Direct Color Select |
Yes |
|
Output Color Switchable |
Yes, 6 options |
| Working Voltage |
DC 5~24V |
|
Output Current |
3x4A peak, 3x2A constant |
| Remote Frequency |
433.92MHz |
Documents / Resources
 |
ALLSTAND 20230906 One Line Computer Desk [pdf] Instruction Manual 20230906 One Line Computer Desk, 20230906, One Line Computer Desk, Line Computer Desk, Computer Desk, Desk |


