“
Specifications
- Product: Button
- Type: Wireless panic button
- Compatibility: Ajax hubs only
- Range: Up to 1,300m from the hub
- Features: Protection against accidental press, automation
device control mode - Notifications: Push notifications, SMS, phone calls
- Water and Dust Resistance: Yes
Product Usage Instructions
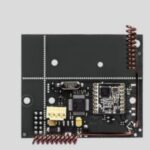
Functional Elements
1. Alarm button
2. Indicator lights
3. Button mounting hole
Operating Principle
The Button can operate in two modes:
- Panic Mode: Used as a panic button to signal
threats or emergencies. - Control Mode: Allows control of Ajax
automation devices with short or long button presses.
Setting Up and Configuration
- Install the Ajax app on your device.
- Login to your account or create a new one.
- Select a space or create a new one within the app.
- Add at least one virtual room and a compatible hub to the
space.
Ensure the hub is switched on and has internet access. Follow
the app instructions to connect Button to the security system.
Additional Features
- Protection against accidental press.
- Battery charge auto-check option.
- Easy to carry around – can be worn on wrist or necklace.
Range Extender Connection
If using a range extender, manually assign Button to the
appropriate hub or range extender in the app.
Compatibility and Updates
Ensure Button firmware version and hub OS version meet the
minimum requirements for auto-check features.
Frequently Asked Questions (FAQ)
A: No, Button is only compatible with Ajax hubs.
A: Button can transmit alarms up to 1,300m from the hub, but
this distance may vary based on obstructions like walls or
floors.
Q: What types of notifications can users receive?
A: Users can receive push notifications, SMS, and phone calls
(if enabled) for all alarms and events.
“`
Button user manual
Updated July 22, 2024
Button is a wireless panic button with protection against accidental press and additional mode to control automation devices.
Button is compatible with Ajax hubs only. No support for ocBridge Plus and uartBridge integration modules!
Button is connected to the security system and configured via Ajax apps on iOS, Android, macOS, and Windows. The users are alerted of all alarms and events via push notifications, SMS, and phone calls (if enabled).
Buy panic button Button
Functional elements
1. Alarm button 2. Indicator lights 3. Button mounting hole
Operating principle
00:00
00:12
Button is a wireless panic button that, when pressed, transmits an alarm to users, as well as to the security company’s CMS. In Control mode, Button allows you to control Ajax automation devices with a short or long press of a button.
In panic mode, the Button can operate as a panic button and signal about a threat, or notify of the need for auxiliary help, or inform about the intrusion, fire, gas alarm, or leakage. You can select the type of alarm in the button settings. The text of alarm notifications depends on the selected type, as well as the event codes transmitted to the central monitoring station of the security company (CMS).
In the Button settings — Scenarios menu, you can assign the action of an automation device (Relay, WallSwitch or Socket) to a button press.
The Button is equipped with protection against accidental press and transmits alarms at a distance of up to 1,300 m from the hub. Please be aware that the presence of any obstructions that impede the signal (for example, walls or floors) will reduce this distance. Button is easy to carry around. You can always keep it on a wrist or a necklace. The device is resistant to dust and splashes.
When connecting Button via radio signal range extender, please note that Button does not automatically switch between the radio networks of the radio signal extender and the hub. You can manually assign Button to another hub or range extender in the app.
Button has the Battery charge auto-check option. When enabled, the system once a day checks the battery state of the button. If the auto-check is disabled, the battery state updates only when the device is pressed.
The feature is available for buttons with firmware version 6.60.0.13 and later. When added to a hub with OS Malevich version 2.17 and later (except Hub (2G) Jeweller and Hub (4G) Jeweller).
Adding to the system
Before adding a device
1. Install the Ajax app. 2. Log in to your account or create a new one. 3. Select a space or create a new one.
What is a space
How to create a space
The space functionality is available for apps of such versions or later: Ajax Security System 3.0 for iOS; Ajax Security System 3.0 for Android; Ajax PRO: Tool for Engineers 2.0 for iOS; Ajax PRO: Tool for Engineers 2.0 for Android; Ajax PRO Desktop 4.0 for macOS; Ajax PRO Desktop 4.0 for Windows.
4. Add at least one virtual room. 5. Add a compatible hub to the space. Ensure the hub is switched on and has
internet access via Ethernet, Wi-Fi, and/or mobile network. . Ensure the space is disarmed, and the hub is not starting an update by
checking statuses in the Ajax app.
Only a PRO or a space admin with the rights to configure the system can add a device to the hub.
Types of accounts and their rights
Connecting to the hub
1. Open the Ajax app and select the space where you want to add the button. 2. Go to the Devices tab and click Add device. 3. Name the device, scan its QR code (located on the package) or enter it
manually, select a room and a group (if group mode is enabled). 4. Click Add and the countdown will begin. 5. Hold the button for 7 seconds. When the Button is added, the LEDs will flash
green once.
For detection and pairing, the Button must be located within the hub radio communication zone (on the single protected object).
The connected button will appear in the list of hub devices in the application. Updating the statuses of the device in the list does not depend on the polling time value in the hub settings. Data is updated only by pressing the Button.
The Button only works with one hub. When connected to a new hub, the button Button stops transmitting commands to the old hub. Note that after being added to the new hub, the Button is not automatically removed from the device list of the old hub. This must be done manually through the Ajax application.
States
Button states can be found in the Ajax app:
1. Ajax app Devices Button
Parameter Battery charge
Value Battery level of the device. Two states available:
.
Battery discharged.
You can check the battery charge by clicking on the icon (displayed when the Battery Charge Auto-Check option is enabled).
The feature is available for buttons with firmware version 6.60.0.13 and later. When added to a hub with OS Malevich version 2.17 and later (except Hub (2G) Jeweller and Hub (4G) Jeweller).
How battery charge is displayed in Ajax apps
Operating mode
Displays the operating mode of the button. Three modes are available:
Panic. Control. Mute Fire Alarm.
LED Brightness
Displays current brightness level of indicator light:
Disabled (LED indication is disabled). Low. Max.
Accidental press protection
(displayed only for Panic and Mute Fire Alarm operating modes)
Displays the selected type of protection against accidental activation:
Off — protection disabled.
Long press — in order to send alarm you should hold the button down for more than 1.5 seconds.
Double-pressing — in order to send alarm you should double-press on the button with a pause of no more than 0.5 seconds.
ReX
Permanent deactivation Firmware Device ID Device No.
Displays the status of using a radio signal range extender.
Displays the device’s status: active or completely disabled by the user.
Button firmware version.
Device identifier. Also available on the device’s board and its package.
Number of the device loop (zone).
Settings
You can adjust the device parameters in the settings section:
1. Ajax app Devices Button Settings
Name Room
Parameter
Battery charge auto-check
Value
Name of the device, can be changed.
The choice of the virtual room that the device is assigned to.
If the toggle is enabled, the system checks the battery state of the device once a day. If the autocheck is disabled, the battery state updates only when the device is pressed.
The feature is available for buttons with firmware version 6.60.0.13 and later. When added to a hub with OS Malevich version 2.17 and later (except Hub (2G) Jeweller and Hub (4G) Jeweller).
Notify if the device was unreachable for 3 days
When the toggle is enabled, the user receives a corresponding notification if the button has not communicated with the hub for three days. The setting is available when the Battery charge auto-check toggle is enabled.
Displays the operating mode of the button. Three modes are available:
Operating mode
Panic — sends an alarm when pressed.
Control — controls automation devices by short or long (3 sec) pressing.
Mute Fire Alarm — when pressed, mutes the alarm of Ajax fire detectors. The option is available if Interconnected Fire Alarm feature is enabled.
Learn more
Type of event (displayed only for Panic operating mode)
Selection of the Button alarm type: Intrusion. Fire. Auxiliary alarm. Panic button. Gas alarm. Malfunction. Leakage. Custom.
The text of SMS and notifications in the app depends on the selected type of alarm.
LED brightness
This displays the current brightness of the indicator lights:
Disabled (LED indication is disabled). Low. Max.
Accidental press protection
(displayed only for Panic and Mute Fire Alarm operating modes)
Displays the selected type of protection against accidental activation:
Off — protection disabled.
Long press — in order to send an alarm, you need to press and hold the button for more than 1.5 seconds.
Double press — in order to send an alarm, you need to double-press the button with a pause of no more than 0.5 seconds between the presses.
Alert with a siren if button is pressed
If the toggle is enabled, pressing a panic button
activates Ajax sirens connected to the
system. Ajax Button activates all sirens, regardless of the groups they are in.
Scenarios Battery state check User guide Permanent deactivation Delete device
Operating indication
Opens the menu for creating and configuring scenarios. Opens the menu for the battery charge checking.
The feature is available for buttons with firmware version 6.60.0.13 and later. When added to a hub with OS Malevich version 2.17 and later (except Hub (2G) Jeweller and Hub (4G) Jeweller).
Opens Button User manual. Allows a user to deactivate the device without deleting it from the system.
Once deactivated, the device will no longer execute system commands and participate in automation scenarios. Additionally, the panic button of a deactivated device will be disabled.
Learn more
Disconnects Button from the hub and deletes its settings.
00:00
00:03
Button status is indicated with red or green LED indicators.
Category
Indication
Event
Linking to security system
Green LEDs flash 6 times.
Lights up green for a few seconds.
The button is not registered in any security system.
Adding a button to the security system.
Command delivery indication
Lights up green briefly. Lights up red briefly.
Command is delivered to security system.
Command is not delivered to security system.
Long press indication in Control
mode
Flashes green briefly.
Button recognized the pressing as a long press and sent the corresponding command to the hub.
Feedback Indication
(follows the Command Delivery Indication)
Lights up green for about half a second after the command delivery indication.
The security system has received and performed the command.
Briefly lights up red after the command delivery indication.
The security system did not perform the command.
Battery status (follows Feedback Indication)
After the main indication it lights up red and goes out smoothly.
Button battery needs to be replaced. At the same time, button commands are delivered to the security system.
Battery Replacement
Use cases
Panic Mode
In the panic button mode, Button can call security or help, as well as alert of an emergency by activating sirens and sending other users a notification in the app. In the Button settings, you can select one type of alarm out of eight:
Intrusion Fire
Auxiliary alarm Panic button Gas alarm Malfunction Leakage Custom (not sent to the security company monitoring station)
The type of alarm determines the event code sent to the security company monitoring station (CMS) and the notification text received by the user. This ensures the accurate response to the threat.
Note that in Panic Mode, pressing the Button will raise an alarm regardless of the system security mode.
If Button is pressed, an alarm can also run a scenario in the Ajax system.
Button can be installed on a flat surface or carried around. To install on a flat surface (for example, under the table), secure the Button with double-sided adhesive tape. To carry the Button on the strap: attach the strap to the Button using the mounting hole in the main body of the Button.
Control Mode
Button can be used to control the automation devices. In Control mode, the Button has two pressing options: short and long (the button is pressed for more than 3 seconds). These pressings can trigger the execution of an action by one or more automation devices: Relay, WallSwitch, or Socket.
To bind an automation device action to a long or short press of a Button:
1. Open the Ajax app and go to the Devices tab. 2. Select Button in the list of devices and go to settings by clicking the gear icon
.
3. Select the Control mode in the Operation mode section. Click on the actual Button device to save the changes
4. Go to the Scenarios menu. Click Create Scenario if you are creating a scenario for the first time, or Add Scenario if scenarios have already been created in the security system.
5. Select a pressing option to run the scenario: Short press or Long press.
. Select the automation device to execute the action.
7. Enter the Scenario Name and specify the Device Action to be executed by pressing the Button. Switch on Switch off Switch the state
The Device Action setting is unavailable when configuring a scenario for the automation devices operating in pulse mode. During the scenario execution, such devices will close/open the contacts for a set time. The operating mode and pulse duration are set in the automation device settings.
. Click Next. The scenario will appear in the list of device scenarios.
Mute Interconnected Fire Detectors Alarm
By pressing the Button, the interconnected fire detectors alarm can be muted (if the corresponding operating mode of the button is selected). The reaction of the system to pressing a button depends on the state of the system:
The Interconnected Fire Detectors Alarm have already propagated — by the first press of the Button, all fire detectors sirens are muted, except for those that registered the alarm. Pressing the button again mutes the remaining detectors.
The interconnected alarms delay time lasts — the siren of the triggered Ajax fire detector is muted by pressing.
Learn more about Interconnected Fire Detectors Alarm
With the OS Malevich 2.12 update, users can mute fire alarms in their groups without affecting detectors in the groups to which they do not have access. Learn more
Placement
Button can be fixed on a surface or carried around.
How to fix Button
To fix Button on a surface (e. g. under a table), use Holder.
To install the button in the holder: 1. Choose a location to install the holder. 2. Press the button to test whether the commands can reach the hub. If not, choose another location or use a radio signal range extender.
When connecting Button via radio signal range extender, note that Button does not automatically switch between the radio networks of the radio signal extender and the hub. You can assign Button to another hub or range extender manually in the app.
3. Fix Holder on the surface using the bundled screws or double-sided adhesive tape.
4. Put Button into the holder.
Please note that Holder is sold separately.
Buy Holder
How to carry around Button
The button is convenient to carry with you thanks to a special hole on its body. It can be worn on the wrist or around the neck, or hung on a key ring. Button has an IP55 protection rating. This means that the device body is protected from dust and splashes. Tight buttons are recessed into the body and software protection helps to avoid accidental pressing.
Maintenance
Clean the button body from dust, cobwebs and other contaminants as they appear. Use a soft, dry cloth for cleaning appliances. Never use substances containing alcohol, acetone, gasoline and other active solvents to clean the Button. The pre-installed battery provides up to 5 years of Button operation in normal use (one press per day). More frequent use may reduce battery life. You can check battery level in the Button states in the Ajax app. The pre-installed battery is sensitive to low temperatures and if the key fob is cooled significantly, the battery level indicator in the app may show incorrect
values until the key fob becomes warmer. The battery level value is updated each time the button is pressed. When the battery has run down, the user will receive a notification in the Ajax app, and the LED indicator will smoothly light up red and go out each time the button is pressed.
How long Ajax devices operate on batteries, and what affects this
Battery Replacement
Technical specifications
All technical specifications of Button Jeweller
Compliance with standards
Complete Set
1. Button 2. Pre-installed CR2032 battery 3. Double-sided tape 4. Quick start guide
Warranty
The warranty for the products manufactured by the Limited Liability Company “Ajax Systems Manufacturing” is valid for 2 years after purchase and does not extend to the bundled battery. If the device does not function properly, we recommend that you first contact the support service as technical issues can be resolved remotely in most cases.
Warranty obligations
User agreement Contact technical support:
e-mail Telegram Phone number: 0 (800) 331 911
Subscribe to the newsletter about safe life. No spam
Subscribe
Documents / Resources
 |
Ajax Systems Button Ajax Systems [pdf] User Manual Button Ajax Systems, Ajax Systems, Systems |