Inleiding
This manual provides comprehensive instructions for setting up, operating, and maintaining your RCA RCRP05BR 5-Device Universal Remote Control. This remote is designed to consolidate control of up to five audio/video devices, offering a familiar layout for cable box control and supporting various digital television features.
Afstandbeheer-uitleg
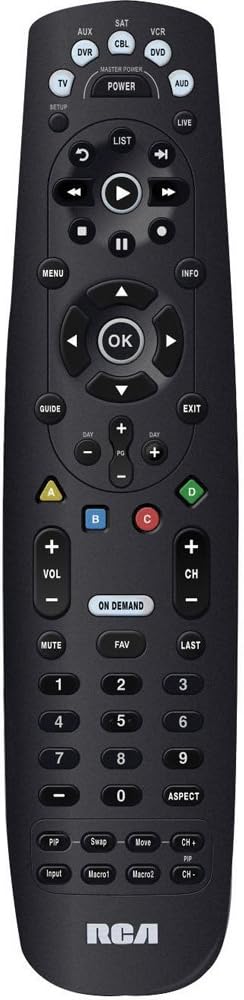
The image above displays the RCA RCRP05BR universal remote control. Key sections include:
- Top afdeling: Device selection buttons (TV, AUX, SAT, CBL, VCR, DVD, AUD) and the Master Power button. The SETUP button is also located here.
- Middle Section (Playback & Navigation): Includes playback controls (Play, Pause, Stop, Rewind, Fast Forward, Skip), a circular navigation pad with an OK button, and MENU, INFO, GUIDE, and EXIT buttons.
- Lower Middle Section (Channel & Volume): Features Volume (+/-), Channel (+/-), MUTE, FAV (Favorites), LAST, and the colored A, B, C, D buttons. The ON DEMAND button is also present.
- Bottom Section (Numeric Keypad & Advanced Functions): A standard numeric keypad (0-9) and buttons for ASPECT, PIP (Picture-in-Picture), Swap, Move, Input, Macro1, and Macro2. The RCA logo is at the very bottom.
Opstelling
1. Battery Installasie
- Verwyder die deksel van die batterykompartement aan die agterkant van die afstandsbediening.
- Insert two (2) fresh AA alkaline batteries, matching the polarity (+ and -) indicators inside the compartment.
- Plaas die deksel van die batterykompartement terug.
2. Programmering van die afstandbeheerder
The remote can be programmed using direct code entry, auto code search, or a learning feature.
Direkte kode-invoer
- Skakel die toestel aan wat jy wil beheer (bv. TV, DVD-speler).
- Druk en hou die OPSTEL knoppie totdat die rooi aanwyserliggie brand.
- Press the device button you want to program (e.g., TV, DVD). The red indicator light will blink once and remain lit.
- Enter the 4-digit code for your brand and device from the provided code list (not included in this manual, refer to product packaging or manufacturer's webwerf).
- If the code is valid, the red indicator light will turn off. If the light blinks four times, the code is invalid; re-enter the code.
- Toets die afstandbeheerder deur op die KRAG button. If the device turns off, try other functions like volume or channel. If it works, programming is complete. If not, try the next code for your brand or use auto code search.
Outomatiese kodesoektog
- Skakel die toestel aan wat u wil beheer.
- Druk en hou die OPSTEL knoppie totdat die rooi aanwyserliggie brand.
- Press the device button you want to program. The red indicator light will blink once and remain lit.
- Druk die KRAG knoppie herhaaldelik (ongeveer elke 2 sekondes) totdat jou toestel afskakel.
- Once the device turns off, press the ENTER button (usually the OK button in the center navigation pad) to save the code. The red indicator light will turn off.
- Test the remote. If it works, programming is complete.
Leerfunksie
This feature allows the universal remote to learn functions directly from your original remote control. This is useful for functions not covered by pre-programmed codes or for devices not listed.
- Place the RCA universal remote and your original remote control on a flat surface, facing each other, about 1-2 inches apart.
- Druk en hou die OPSTEL knoppie totdat die rooi aanwyserliggie brand.
- Druk die toestelknoppie (bv. TV) you want to assign the learned function to. The red indicator light will blink once and remain lit.
- Press the button on the RCA remote that you want to teach a function (e.g., a specific function button). The red indicator light will blink rapidly.
- Press and hold the corresponding button on your original remote control until the red indicator light on the RCA remote blinks twice and then stays lit. This indicates successful learning.
- Repeat steps 4 and 5 for any other functions you wish to learn.
- Druk die OPSTEL button to exit learning mode. The red indicator light will turn off.
- Test the learned functions.
3. Volume Punch-Through
This feature allows the volume control (VOL +/-) to always control a specific device, regardless of which device mode the remote is currently in. This is useful if you use an audio receiver for all sound.
- Druk en hou die OPSTEL knoppie totdat die rooi aanwyserliggie brand.
- Druk die toestelknoppie (bv. AUD) that you want to control the volume. The red indicator light will blink once and remain lit.
- Druk die VOL+ knoppie. Die rooi aanwyserliggie sal twee keer flikker en afskakel.
- Now, when you press VOL +/- in any device mode, it will control the volume of the selected device (e.g., AUD).
- To disable volume punch-through, repeat steps 1-3, but in step 3, press the VOL- knoppie in plaas van VOL+.
Bedien die afstandsbediening
Toestelkeuse
To control a specific device, press the corresponding device button at the top of the remote (e.g., TV, CBL, DVD). The remote will then send commands for that device.
Basiese funksies
- KRAG: Skakel die gekose toestel aan of af.
- VOL +/-: Pas die volume aan.
- CH +/-: Verander kanale.
- DEMPEL: Demp of ontdemp die oudio.
- Numeriese sleutelbord (0-9): For direct channel entry or other numeric inputs.
Gevorderde funksies
- SPYSKAART: Accesses the on-screen menu of the selected device.
- GIDS: Displays the program guide (for TV/Cable/Satellite).
- INLIGTING: Displays information about the current program or selection.
- Navigasie-knoppie (Op/Af/Links/Regs/OK): Word gebruik om deur spyskaarte te navigeer en keuses te bevestig.
- Playback Controls (Play, Pause, Stop, Rewind, Fast Forward, Skip): Controls playback for DVRs, VCRs, and DVD/Blu-ray players.
- Gekleurde knoppies (A, B, C, D): These buttons (Red, Blue, Yellow, Green) are often used for special functions in cable/satellite boxes or Blu-ray players. Their function varies by device.
- OP AANVRAAG: Accesses On Demand services (for cable/satellite).
- PIP (Picture-in-Picture), Swap, Move, Input, Macro1, Macro2: These buttons provide additional functionality, which may need to be programmed via the learning feature or specific codes for your devices.
Onderhoud
- Battery vervanging: Replace batteries when the remote's indicator light becomes dim or functions become unreliable. Always use fresh AA alkaline batteries.
- Skoonmaak: Wipe the remote with a soft, dry cloth. Avoid using liquid cleaners or abrasive materials.
- Berging: Bêre die afstandbeheerder op 'n koel, droë plek weg van direkte sonlig en uiterste temperature.
Probleemoplossing
- Remote not operating device:
- Maak seker dat vars batterye korrek geïnstalleer is.
- Verify the correct device button (e.g., TV, CBL) is pressed before attempting to control the device.
- Reprogram the remote using a different code for your device, or try the auto code search method.
- Maak seker dat daar geen obstruksies tussen die afstandbeheer en die toestel is nie.
- Some buttons do not work after programming:
- The selected code may only support basic functions. Try another code for your device.
- Use the learning feature to teach specific functions from your original remote.
- Roku "Back" button not working (as noted in user reviews):
- The RCA RCRP05BR may not have a pre-programmed "Back" function for all Roku devices.
- If your original Roku remote is IR-based, use the learning feature to teach the "Back" function to an unused button on the RCA remote.
- If your Roku remote uses Wi-Fi Direct (not IR), the learning feature will not work directly. Some users have successfully used IR remote apps on smartphones (if the phone has an IR blaster) to teach the function.
- Volume control not working as expected:
- Check if Volume Punch-Through is enabled for a different device than intended. Adjust or disable it as needed.
Spesifikasies
| Kenmerk | Detail |
|---|---|
| Modelnommer | RCRP05BR |
| Aantal toestelle | 5 |
| Kragbron | 2 AA-batterye (nie ingesluit nie) |
| Afmetings | 11.1 x 4.75 x 2 duim |
| Gewig | 6.4 onse |
| Spesiale kenmerke | Universal compatibility, Learning feature, Volume Punch-Through |
Waarborg inligting
RCA products typically come with a limited warranty. Please refer to the warranty card included with your purchase or visit the official RCA website for detailed warranty terms and conditions specific to the RCRP05BR model. Keep your proof of purchase for warranty claims.
Kliënte ondersteuning
For further assistance, technical support, or to access the latest code lists, please visit the official RCA support website or contact their customer service department. Contact information can usually be found on the product packaging or the RCA brand webwebwerf.


