
1. Introduction
The GODIAG GT100 is an advanced ECU connector and protocol communication testing tool designed for automotive diagnostics, programming, and coding. It facilitates the connection of ECU modules for individual diagnosis and programming, and helps verify the communication signal integrity of diagnostic and programming tools. This device is an essential tool for automotive professionals and enthusiasts alike.

Figure 1: GODIAG GT100 device and included accessories.
2. Key Features
- OBDII Protocol Detection: Detects OBDII protocol communication and displays real-time voltage.
- ECU Connection: Allows connection to single or multiple ECU modules for diagnosis, programming, and coding.
- Signal Detection: Converts car OBD2 interface into a 6-pin interface for signal detection and electrical level conversion.
- Diagnostic Tool Compatibility: Works with various diagnostic tools such as Xhorse VVDI2, Autel devices, Launch, and Foxwell.
- Power Supply Function: Provides power to the car during battery replacement to prevent data loss or module locking.
- OBD1 to OBD2 Conversion: Converts OBD1 diagnostic interfaces to standard OBD2 interfaces based on communication protocols.
- Extension Capabilities: Supports extension cables for improved accessibility in tight spaces or for longer reach.
3. Setup and Connections
The GODIAG GT100 offers versatile connection options for various diagnostic and programming scenarios. Always ensure all connections are secure before powering on the device.
3.1. Hardware Connection Overview

Figure 2: General hardware connection diagram for GODIAG GT100.
3.2. OBDII Protocol Detector & Communication Detection
- Connect the GODIAG GT100 to the vehicle's OBDII diagnostic port.
- Once the device displays the voltage, turn on the power switch of the GODIAG GT100.
- Connect your diagnostic tool. When the tool communicates with the car, the LED indicator for the corresponding protocol will light up or flash. If a CAN protocol is detected, it will show maximum brightness. Upon successful communication, the corresponding CAN-H and CAN-L LEDs may dim or twinkle weakly.
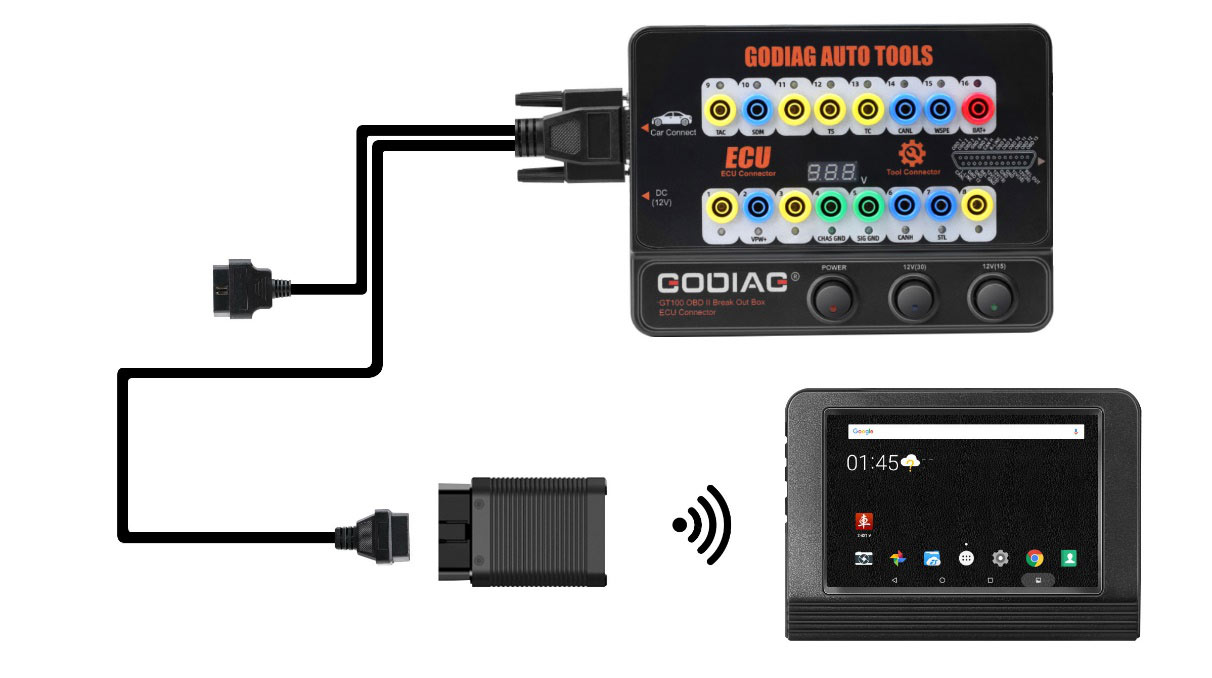
Figure 3: OBDII Protocol Detector setup.
3.3. ECU Connection (Single Module)
For diagnosing and programming a single ECU module:
- Connect the ECU to the GODIAG GT100 using the provided colored jumper cables. If the ECU uses a CAN protocol, verify if a 120 ohm resistor is required.
- Power the GODIAG GT100 either by connecting it to the car's OBDII diagnostic interface or by using an AC power adapter.
- Connect your diagnostic tool or ECU programmer to the GT100 to perform diagnosis and programming on the single ECU.
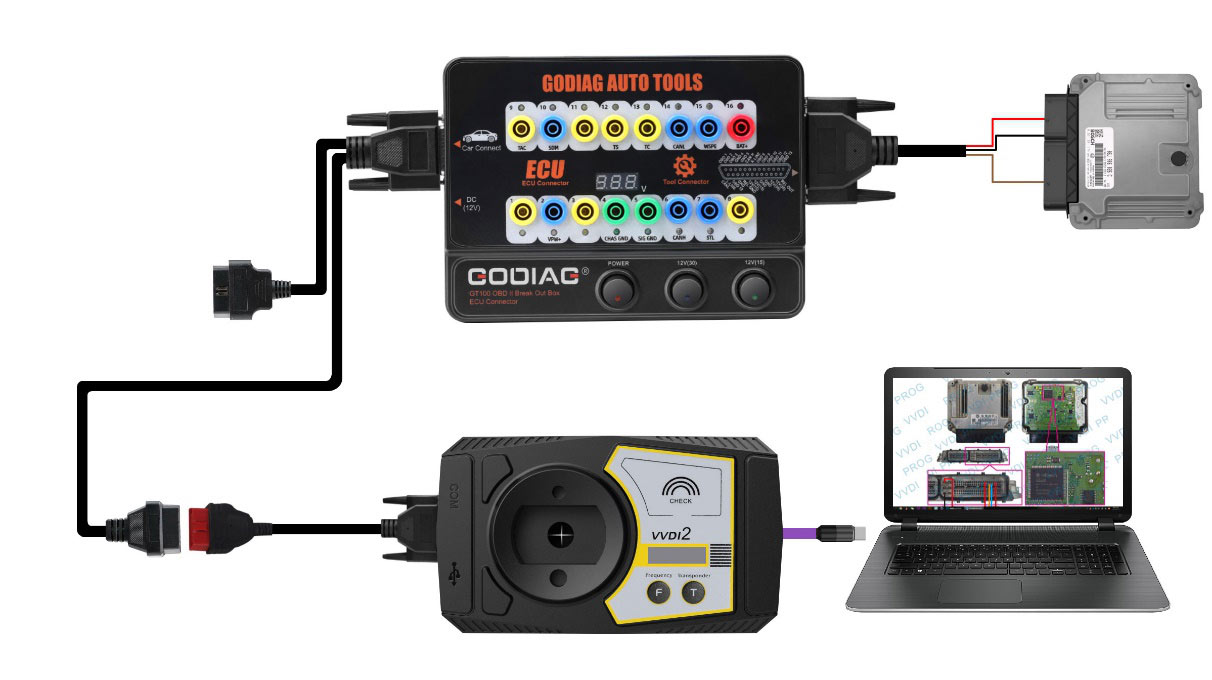
Figure 4: Single ECU module connection.
3.4. Banana Plug Extension Connection
The GT100 extends the car's OBDII 16-pin interface, allowing for easy testing of OBDII interface voltage waveforms and verifying connection integrity.
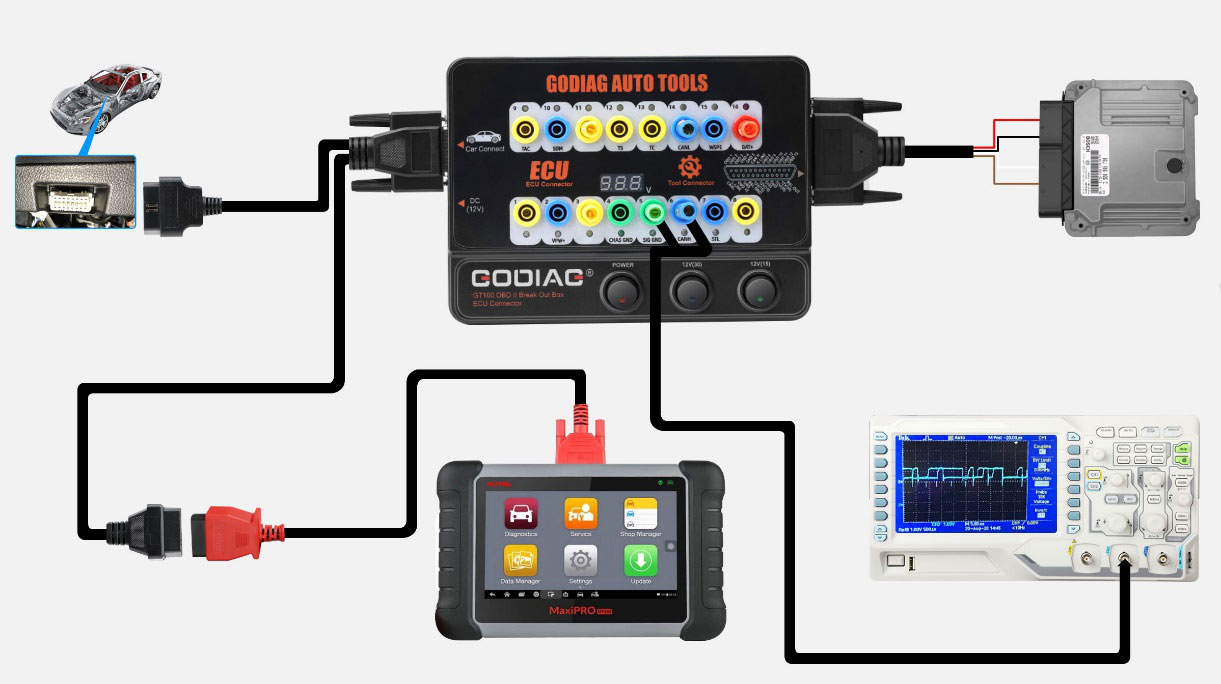
Figure 5: Banana plug extension connection.
3.5. Converting OBD1 to Standard OBD2
Use the appropriate connector to convert an OBD1 interface to a standard OBD2 interface, following the specific diagnostic interface communication protocol.
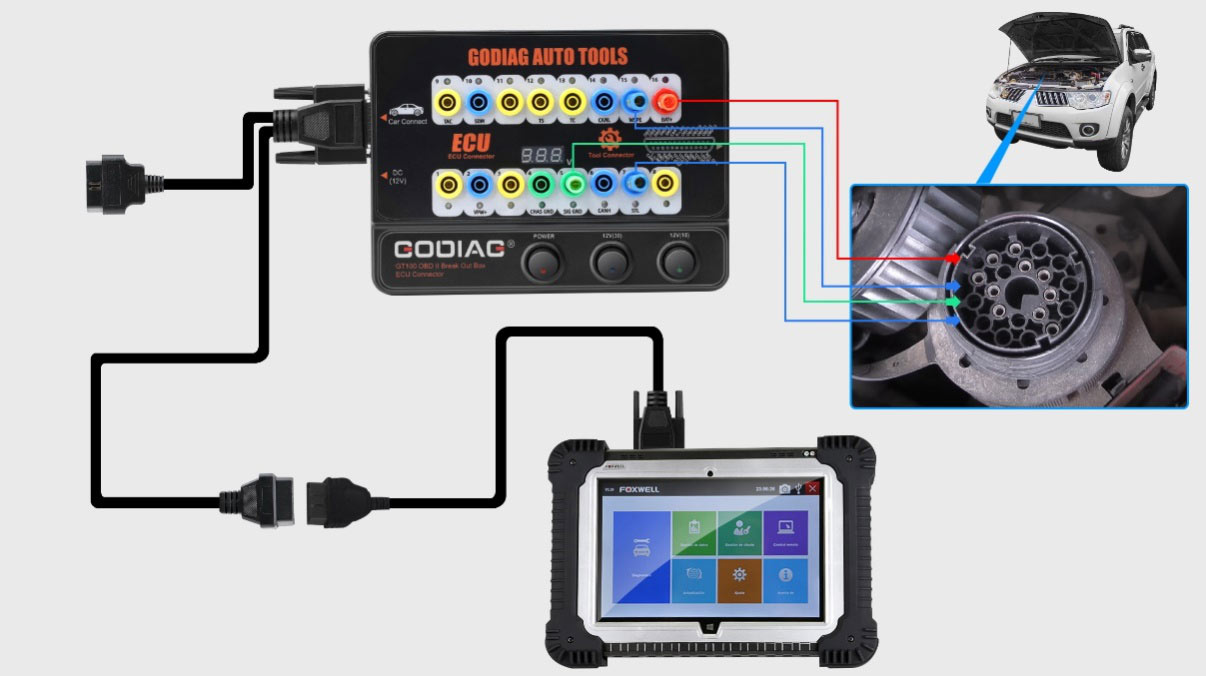
Figure 6: OBD1 to OBD2 conversion setup.
3.6. Connecting Multiple ECU Control Modules
The GT100 allows for simultaneous connection of multiple ECU control modules, which is beneficial for professional engineers during detection and maintenance tasks.
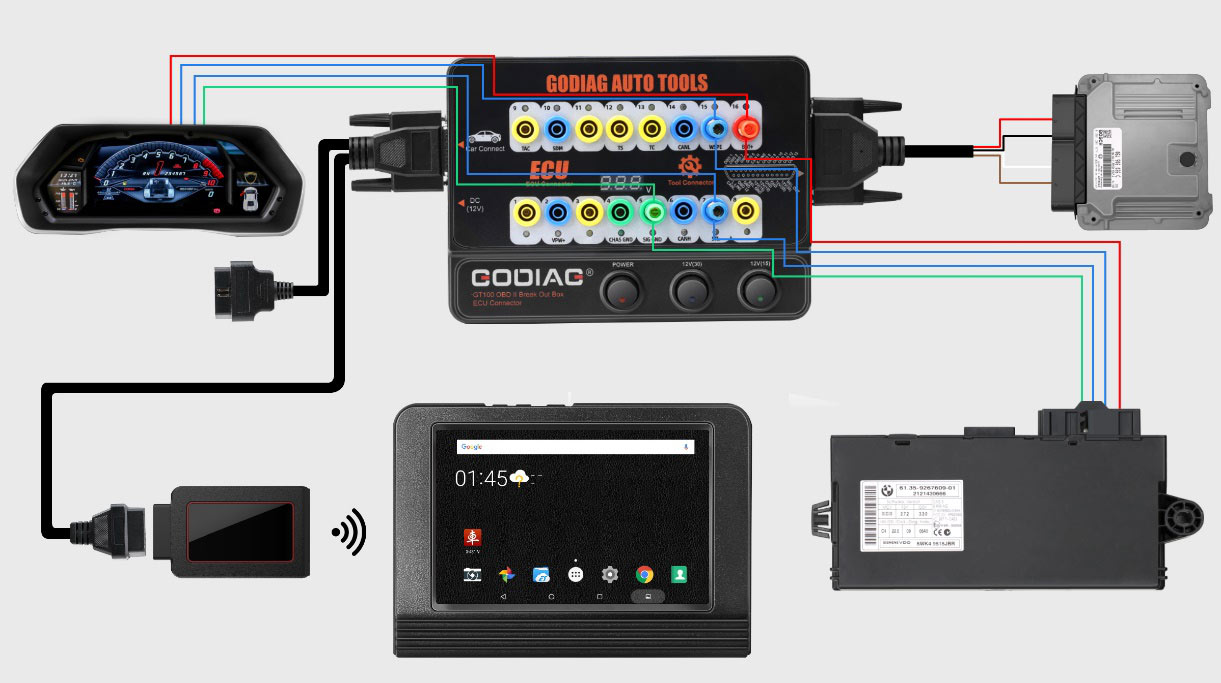
Figure 7: Multiple ECU modules connection.
3.7. Using Extension Cables
When the diagnostic interface location is too narrow or the diagnostic cable is not long enough, the provided 1.2-meter extension cables can be used to extend the reach.
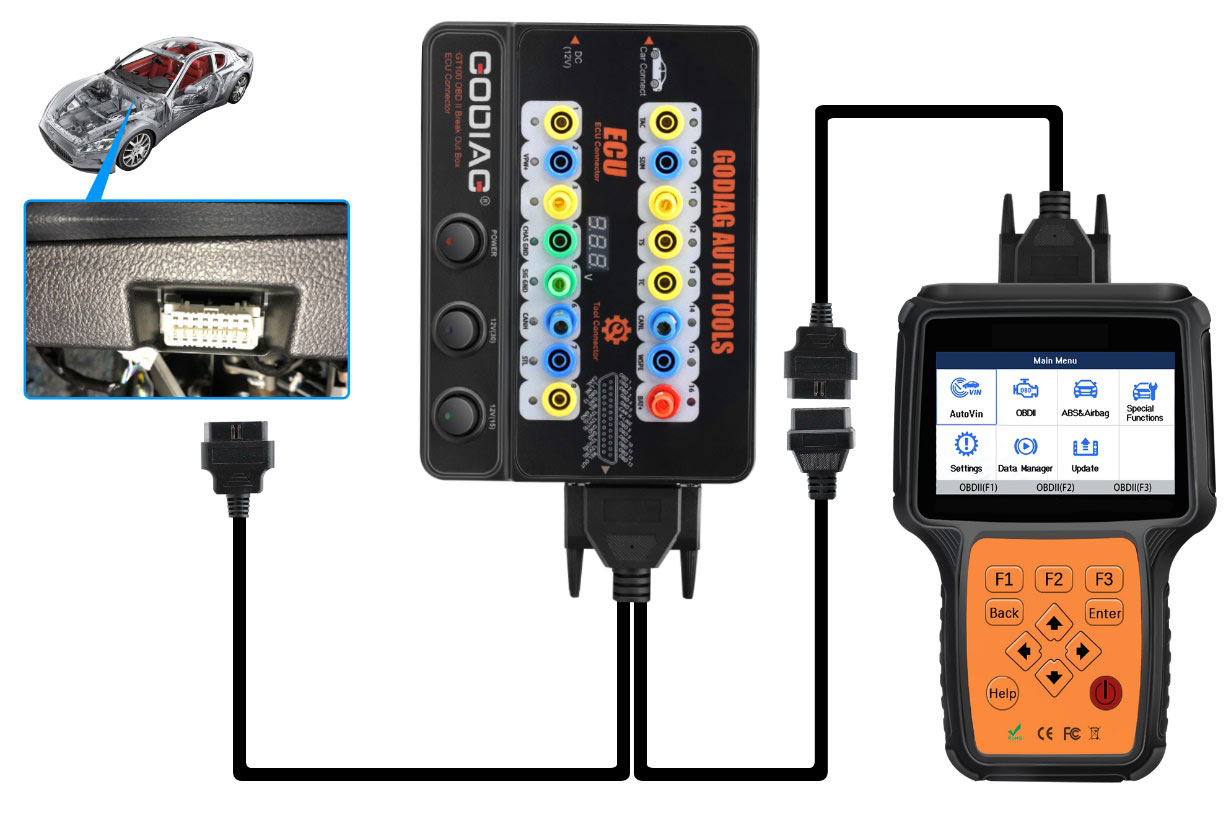
Figure 8: Extension cables in use.
3.8. Powering the Car During Battery Replacement
To prevent data loss, automatic locking, key remote control failure, or fault lights when replacing a car battery:
- Connect battery A to supply power by connecting to pins 16, 4, and 5 of the GODIAG GT100 and to the car's OBD2 diagnostic interface.
- Turn on the power switch of the GODIAG GT100.
- Important: Do not turn on the ignition switch or start the car during this process.
- Replace the old car battery with a new one (battery B). This ensures continuous power to the vehicle's control modules, preventing data loss or malfunctions due to power interruption.
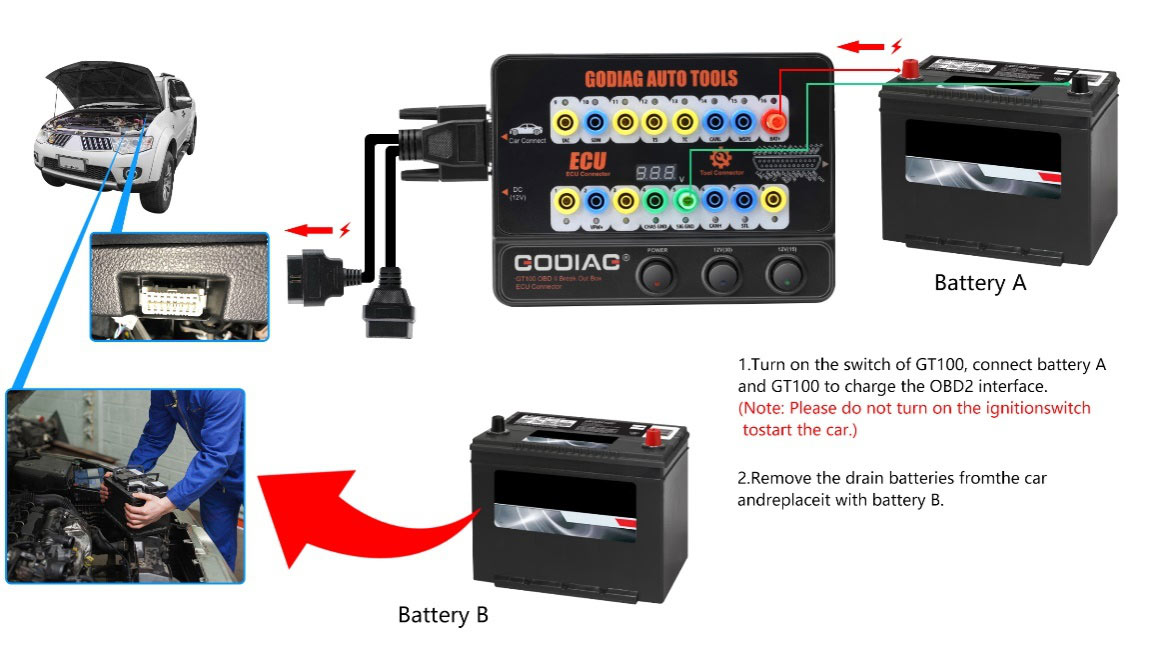
Figure 9: Powering the car during battery replacement.
3.9. Truck Diagnostic Interface Conversion
The GT100 can convert the OBD1 port of special trucks to a standard OBD2 diagnostic port, adhering to the specific protocol requirements.
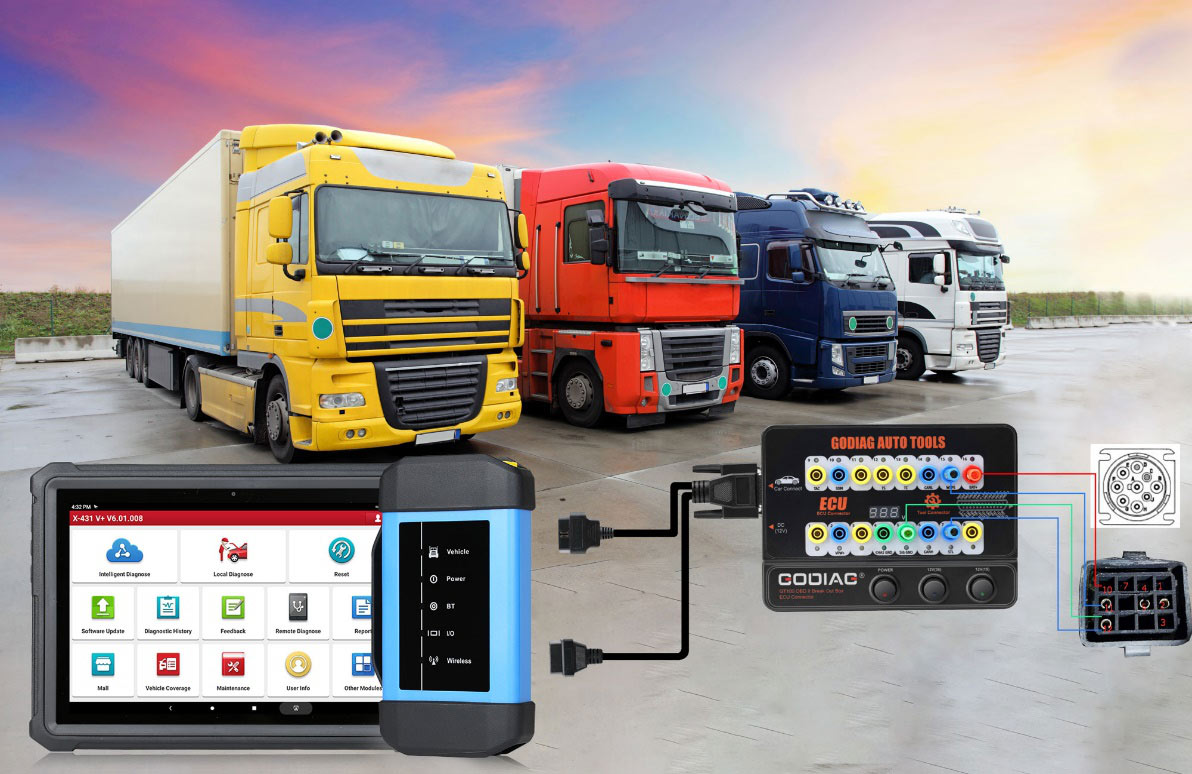
Figure 10: Truck diagnostic interface conversion.
4. Operation Guide
4.1. Monitoring OBDII Interface Voltage
The GODIAG GT100 monitors the voltage of the vehicle's OBDII interface and displays it in real-time. If the voltage drops below 11V, it is crucial to stop any ongoing diagnosis or programming to prevent potential issues such as the vehicle being unable to start, data loss, or module locking.
4.2. LED Indicator Meanings
The GT100 features LED indicators for each pin of the OBDII interface, providing visual feedback on communication status and power. Refer to the diagram below for a detailed explanation of each pin's function and its corresponding LED behavior.
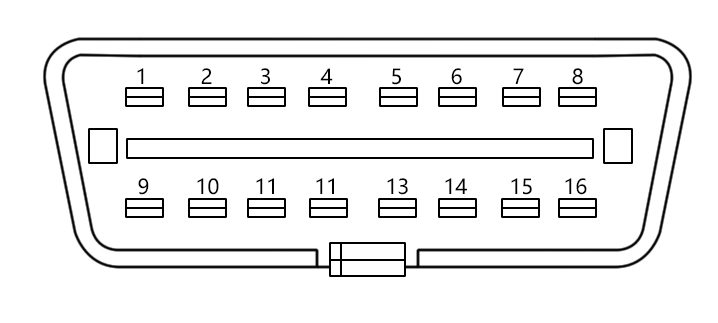
Figure 11: OBDII Pinout and LED Indicator Meanings.
| Pin | Function | Pin | Function |
|---|---|---|---|
| 1 | Manufacturer custom | 9 | Manufacturer custom |
| 2 | SJE1850 wire | 10 | SJE1850 wire (bus-) |
| 3 | Manufacturer custom | 11 | Manufacturer custom |
| 4 | Power grounding | 12 | Manufacturer custom |
| 5 | Signal grounding | 13 | Manufacturer custom |
| 6 | SAEJ2284 CAN high | 14 | SAEJ2284 CAN low |
| 7 | ISO9141-2 & ISO/DIS 4230-4K wire | 15 | ISO9141-2 & ISO/DIS 4230-4L wire |
| 8 | Manufacturer custom | 16 | Car battery positive |
4.3. Using with ThinkCar Pro (Example)
The following video demonstrates how to use the GODIAG GT100 to connect to a Bosch ECU and read Diagnostic Trouble Codes (DTCs) using the ThinkCar Pro application. This process involves following the wiring diagram, connecting the colored jumper cables to the ECU and GT100, connecting the OBD 2-in-1 extension cable, plugging in the power adapter, and then operating the ThinkCar Pro app to perform diagnostics.
Video 1: Reading DTCs from Bosch ECU using GODIAG GT100 and ThinkCar Pro.
5. Maintenance
- Cleaning: Regularly wipe the device and cables with a soft, dry cloth. Avoid using abrasive cleaners or solvents.
- Storage: Store the GODIAG GT100 and its accessories in a dry, cool place, away from direct sunlight and extreme temperatures.
- Cable Care: Inspect all cables for any signs of wear, cuts, or damage before each use. Replace damaged cables immediately to ensure safe and reliable operation.
- Software Updates: Ensure your connected diagnostic tools and applications are updated to the latest versions for optimal performance and compatibility.
6. Troubleshooting
- No Power/LEDs Off: Check the power adapter connection and ensure the power switch on the GT100 is turned on. If using car power, verify the car's OBDII port is supplying power.
- No Communication: Ensure all cables are securely connected. Check the LED indicators on the GT100 to confirm protocol detection. If the voltage is below 11V, address the vehicle's power supply.
- Diagnostic Tool Errors: Verify that the diagnostic tool's software is up-to-date and compatible with the vehicle's ECU. Ensure the correct protocol is selected if manual selection is required.
- VIN Identification Failed: If automatic VIN identification fails, the diagnostic tool will prompt you to manually select the car model.
7. Specifications
| Item | Specification |
|---|---|
| Diagnostic Port | OBDII |
| Working Voltage | DC 9V-24V |
| Work and Power Consumption | 0.5-0.6W |
| Adapter Power Input | AC100V-240V |
| Adapter Power Output | DC12V 1A |
| Operating Temperature Range | -20 to 70 °C (-4 to 158 °F) |
| Storage Temperature Range | -40 to 85 °C (-40 to 185 °F) |
| Dimension (L x W x H) | 23cm x 18cm x 7cm |
| Item Type | ECU Connector |
| Certification | CE |
| Language Support | English |
7.1. Package Contents
- 1x GODIAG GT100 Host
- 1x OBD 2-in-1 Extension Cable
- 1x Colored Jumper Cable Set
- 1x 12V Power Supply
- 1x 120 Ohm Resistance
- 6x Banana Plugs
- 24x Wire Accessories (Dupont 2.54mm connector female pins)
8. User Tips
- The GODIAG GT100 supports a wide working voltage range of DC 9V-24V, making it compatible with various vehicle electrical systems, including those found in some trucks.
- Always ensure the power adapter is correctly connected and the power switch is on before initiating any diagnostic or programming procedures.
- When connecting to an ECU, double-check the wiring diagram for the specific ECU to ensure correct pin connections, especially for CAN protocols where a 120 ohm resistor might be necessary.
9. Warranty and Support
The GODIAG GT100 comes with a One Year Warranty. For any technical assistance or support, please contact your vendor or the manufacturer's after-sale service, which is committed to providing comprehensive support.