
1. Product Overview
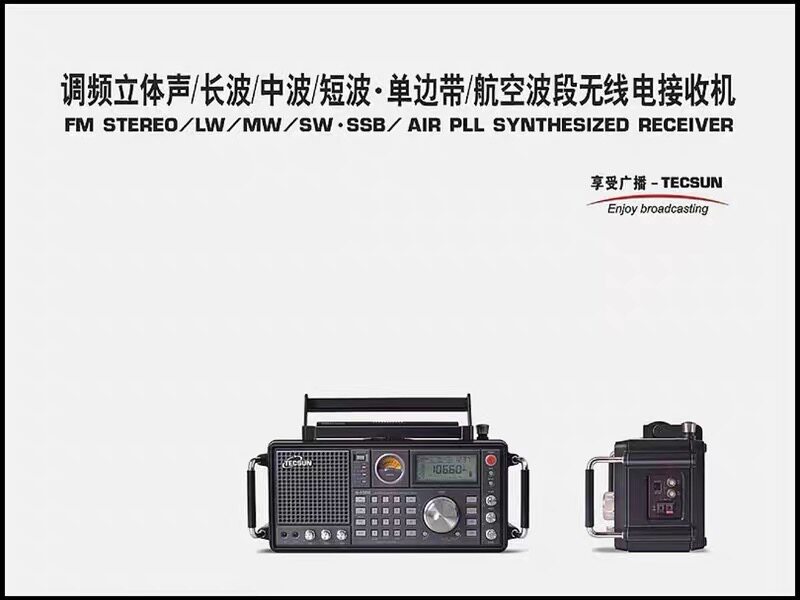
The Tecsun S-2200 is a professional-grade full-band telecommunications receiver designed for enthusiasts and casual listeners alike. It combines precision, versatility, and high-fidelity audio in a single, elegant package. This receiver offers exceptional performance across a wide spectrum of frequencies, including AM, FM, Shortwave (SW), Longwave (LW), Mediumwave (MW), Single Sideband (SSB), and Aviation bands.
Key features include digital tuning, one-click station storage, high sensitivity, wide reception range, USB charging, and excellent sound quality with high fidelity reproduction. Its portable design makes it easy to carry around, while the clear LCD screen provides convenient viewing of radio information. The unit also features a rear-mounted speaker for rich and full sound quality.


2. Setup
2.1 Power Supply
The Tecsun S-2200 can be powered by four D-size dry cell batteries or a rechargeable battery pack. It can also be powered by an internal 220V AC power supply or an external DC power supply.
2.2 Antenna Connection
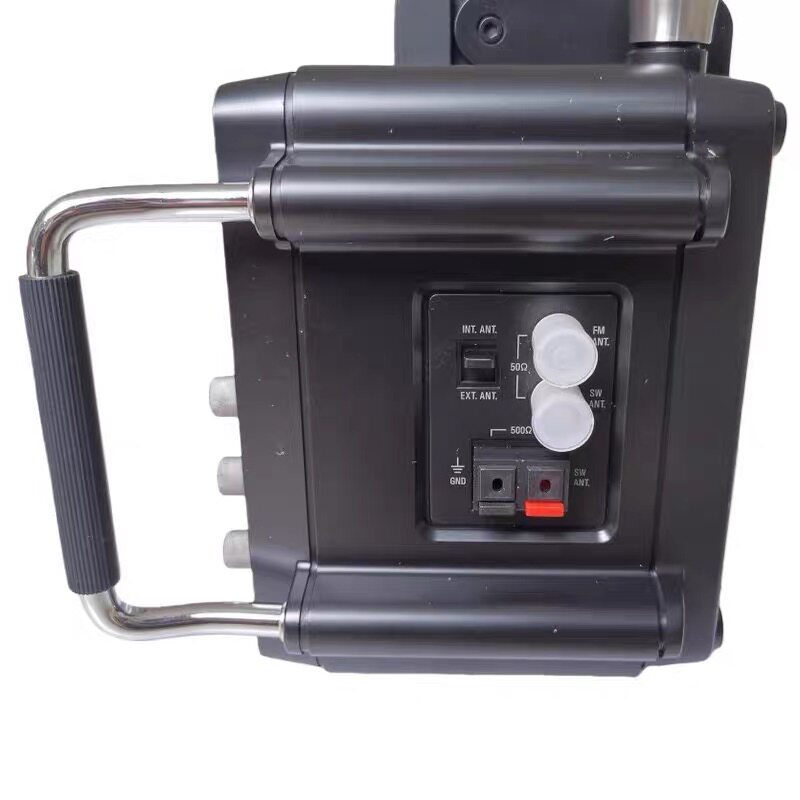
For optimal reception, especially on shortwave bands, connect the included external antenna or a longwire setup. The rear panel provides dedicated connections for internal and external antennas.
2.3 Initial Power On
Press and hold the power switch until the LCD screen lights up. The radio will enter standby mode. To turn off the radio, briefly press the power switch. The screen will display a shutdown animation, and then the radio will automatically shut down.
3. Operating Instructions
3.1 Basic Controls
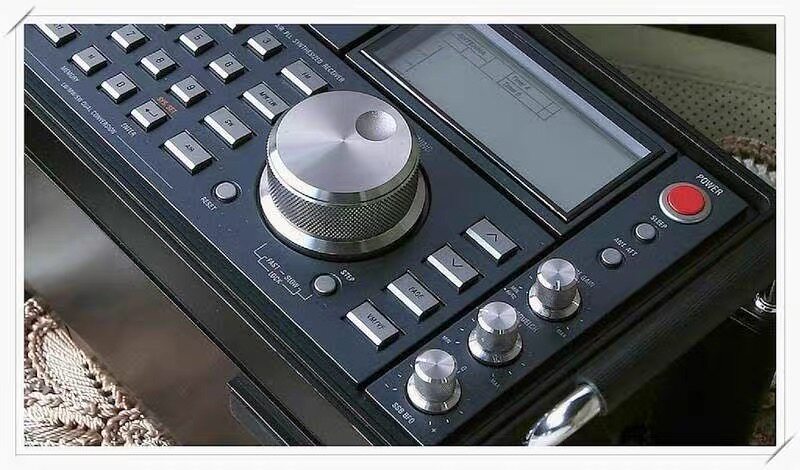
- Power Switch: Press and hold to turn on, press briefly to turn off.
- Volume Adjustment: Rotate the volume knob clockwise to increase volume, counterclockwise to decrease.
- Band Switching: Press the band selection button briefly to switch between FM, AM (MW/LW), SW, and Air bands.
- Numeric Keys: Use these keys to directly enter the desired radio frequency.
- Storage/Deletion Key: Long press to store the currently tuned radio station. Short press to delete a stored radio station.
- Scheduled Shutdown Button: Activates the scheduled shutdown function, allowing you to set a timer for the radio to turn off automatically.
- USB Charging Port: Connect the charging cable here to charge the internal battery pack.
3.2 Tuning and Station Management
- Band Selection: Briefly press the band selection button to cycle through FM and AM modes.
- Frequency Adjustment: Enter the desired radio station frequency using the numeric keys, then press the confirmation key to initiate the search.
- Automatic Station Search: Press and hold the search button. The radio will automatically scan for all stations in the current frequency band and play them one by one.
- Saving Radio Stations: After finding a desired station, long press the storage/delete key to save its frequency to a specific memory location for easy recall.
3.3 Advanced Features
- SSB Reception: For Single Sideband reception, ensure the mode is set to USB (Upper Sideband) or LSB (Lower Sideband) depending on the signal source.
- RF Gain and AGC: Adjust the RF gain and Automatic Gain Control (AGC) settings based on signal strength. Use lower gain for strong signals and higher gain for weak ones to optimize reception.
- Noise Reduction: Utilize the built-in noise blanker and notch filter to minimize interference from electrical devices or atmospheric noise.
- External Audio: Connect external speakers or headphones via the 3.5mm stereo output jack for an enhanced audio experience.
4. Maintenance
- Environment: Always use the radio in a dry and well-ventilated environment. Avoid exposure to high temperatures, humidity, and direct sunlight to prolong the product's service life.
- Cleaning: When cleaning the radio, use a dry, soft cloth to gently wipe it. Do not use any chemical solvents, as they may damage the finish.
- Interference: To ensure optimal sound quality and reception, do not place the radio near metal objects, which can cause interference.
- Headphones: When using headphones, select an appropriate volume level to prevent hearing damage.
- Long-Term Storage: If the radio will not be used for an extended period, remove the batteries to prevent leakage and potential damage to the device.
5. Troubleshooting
- Radio Won't Turn On:
- Check if the batteries are inserted correctly.
- Verify that the battery level is sufficient. If using rechargeable batteries, ensure they are fully charged.
- If the problem persists, try connecting the power supply with the charging cable to turn on the device.
- Abnormal Volume:
- If the volume suddenly becomes louder or quieter, check if the volume knob is loose or damaged.
- If the knob is normal, try adjusting the volume again.
- Unable to Receive Radio Station:
- Confirm that the correct frequency band has been selected.
- Check if the antenna is properly deployed and extended.
- In areas with weak signals, you may need to adjust the position or direction of the antenna.
- If the problem persists, try manually searching for the radio station or moving to a location with stronger signals.
- Charging Issues:
- If the charging indicator light is not on, check whether the charging cable and power interface are properly connected.
- If the charging cable or USB port is damaged, replacement may be necessary.
- Display Screen Not Illuminated:
- Check if the radio is turned on.
- If the display is not lit up even when the radio is on, it might indicate LCD screen damage or that the battery is running out of power.
6. Specifications
| Feature | Specification |
|---|---|
| Brand Name | Tecsun |
| Model Number | S-2200 |
| Type | FM, MW, SW, LW |
| AM FM SW Radio | FM: 87-108MHz |
| Dimensions (WxHxD) | 372 x 183 x 153 mm |
| Body Material | Plastic |
| Screen | Yes |
| Power Supply | Rechargeable Battery Pack |
| Function | Built-In Speaker |
| Battery Included | Yes |
| Package | Yes |
| WIFI | No |
| Bluetooth | No |
| Origin | Mainland China |
| Certification | NONE |
6.1 Frequency Coverage (S-2000/S-2200 Similar)
- Longwave (LW): 100-519 kHz
- Mediumwave (MW): 520-1710 kHz (American standard)
- Shortwave (SW): 1711-29999 kHz
- Aviation Band (AIR): 118-137 MHz
- FM: 87-108 MHz (Japanese standard), 76-108 MHz (European/American standard)
6.2 Sensitivity (S-2000/S-2200 Similar)
- Longwave (S/N=26dB): <3mV/m
- Mediumwave (S/N=26dB): <0.35mV/m
- Shortwave (S/N=26dB): <18uV
- Single Sideband (S/N=10dB): <1uV
- Aviation Band (S/N=10dB): <5uV
- FM (S/N=30dB): <3uV
6.3 Audio Performance (S-2000/S-2200 Similar)
- FM Stereo Output: Yes (Dual Channel)
- SSB Reception: Yes (Full Support)
- Signal-to-Noise Ratio (SNR): ≥ 70 dB
- Audio Distortion (THD): ≤ 0.5%
- Frequency Stability: ±0.5 ppm

7. User Tips
- Optimal Shortwave Reception: For long-distance shortwave signals, ensure your external antenna is properly connected and positioned. Adjusting RF gain and AGC settings can significantly improve clarity.
- Challenging Conditions: The S-2200's advanced filtering and noise reduction capabilities are effective in mitigating interference during storms or in noisy environments, making signals more intelligible.
- Aviation Band Monitoring: The radio is highly reliable for monitoring air traffic control (ATC) frequencies, even during adverse weather conditions, thanks to its built-in filters and dynamic range.
- Audio Quality: For the best audio experience, especially with music or international broadcasts, utilize the 3.5mm stereo output jack with quality external speakers or headphones.
8. Warranty and Support
8.1 Warranty Information
This product is entitled to free warranty service for one year from the date of purchase. Please retain your shopping vouchers as proof of purchase for warranty claims.
8.2 Customer Support
In case of any product quality issues or questions during use, please contact customer service. Our professional staff is available to assist you.
8.3 Additional Resources
A detailed user manual in PDF format is available for download. You can access it here.
8.4 Environmental Protection and Recycling
Do not discard used batteries or electronic products randomly. Please follow local environmental protection regulations for recycling and disposal. For proper processing, send the radio to a designated recycling point in accordance with electronic product recycling standards.