
1. Introduction and Overview
This manual provides detailed instructions for the installation, operation, and maintenance of your MakeSkyBlue 72V 50A MPPT Solar Charge Controller. This intelligent device is designed to optimize the charging process for your 72V battery system from solar panels, ensuring efficiency and longevity.
Key Features:
- 100% MPPT (Maximum Power Point Tracking) technology for optimal solar energy harvesting.
- Intelligent Maximum PowerPoint Tracking technology.
- Built-in DSP controller with high performance.
- Three-stage charging optimizes battery performance.
- Multi-function LCD for easy monitoring.
- Output limited current protection.
- Overcharge protection.
- Over-temperature protection.
- Easy to be mounted on the wall.
- No need for an extra device to be in parallel, and no limited quantity to be in parallel.
- Easy to set for lithium battery.
- Suitable for battery types of sealed lead acid, vented Gel, and Lithium battery.
2. Safety Information
Please read all safety instructions carefully before installation and operation. Failure to follow these instructions may result in electric shock, fire, or serious injury.
- Ensure all connections are secure and correct before powering on the controller.
- Always disconnect PV modules before setting up the solar charge controller.
- Use flexible multi-stranded copper cables of appropriate gauge for battery and PV connections.
- Do not exceed the specified PV open circuit voltage (Voc) or nominal PV power to prevent damage to the controller.
- Only use the screws provided for mounting to avoid damaging the internal PCB. Apply proper torque when tightening screws.
- The controller supports IEC safety standards EN 62109-1, EN 60730-1, EN IEC 61000-6-3, and EN IEC 61000-6-1.

3. Package Contents
Upon unpacking, please verify that all items listed below are included and in good condition:
- 1 x MakeSkyBlue MPPT Solar Charge Controller
- 1 x English User Manual (this document)
- 4 x Mounting Brackets
- 4 x Screws for the controller casing


4. Specifications
| Category | Parameter | Value |
|---|---|---|
| Model | Model No. | 72V 50A |
| General | Charging Mode | MPPT Maximum power point tracking automatically |
| Charging Stages | 3-stage: constant current (MPPT), constant voltage (Absorption Voltage), floating charge | |
| System Type | 72V battery | |
| System Voltage Auto Recognition | 72V (DC60V~DC90V) | |
| Performance | Soft Start Time | ≤1S |
| Dynamic Response and Recovery Time | 100us | |
| Max Efficiency | ≥98.2% (Voc is 1.5 or 2 times than battery, then it’s the best efficiency) | |
| PV Utilization | ≥99% | |
| Consumption | Self Consumption | ≤1.2W |
| Input | Voc Range of PV | DC100V~DC190V (Make sure the Voc of PV meets the requirement. If Voc is 1.5 or 2 times the battery voltage, it’s the best efficiency.) |
| Maximum Nominal PV Power | 3600W (The total power rated of PV can’t be over this watt that will break the controller.) | |
| Output | Selectable Battery Type | Vented/ Sealed / Gel / NiCd / Lithium battery (Default is Sealed battery) |
| Absorption Charging Voltage | Settable from 72V to 102V | |
| Floating Charging Voltage | Settable from 72V to 102V | |
| Overcharging Protection Voltage | 90V | |
| Rated Output Current | 50A | |
| Output Voltage Ripple-peak | 100mV | |
| Output Voltage Accuracy | ≤±1% | |
| Display | LCD | Refer to the manual |
| Protection | Temperature Protection | 75 °C / 167℉ |
| Fan-on Temperature | >45 °C / 113℉ | |
| Fan-off Temperature | <40 °C / 104℉ | |
| PV Reverse Polarity Protection | Yes (When Voc<100V only) | |
| PV Over-voltage Protection | Yes (When Voc>190V, the controller will be burnt.) | |
| Battery Overcharge Current Protection | Yes | |
| Battery Overcharge Voltage Protection | Yes | |
| Battery Low Voltage Protection | Yes | |
| Physical & Environmental | Acoustic Noise | ≤40dB |
| Cooling Way | Forced air cooling | |
| Components | Industrial grade | |
| Size (cm) | 21.5*11.5*5 cm / 8.46*4.52*1.96 in | |
| Net Weight (Kg) | 1.3kg / 2.86lb | |
| Gross Weight (Kg) | 1.4kg / 3.08lb | |
| Safety | EN 62109-1 EN 60730-1 EN IEC 61000-6-3 EN IEC 61000-6-1 | |
| Protection Category | IP21 | |
| Environmental Condition | Indoor | |
| Temperature | Operating Temperature | -20℃ ~ +55℃ / -4℉ ~ + 131℉ |
| Storage Temperature | -40℃ ~ +75℃ / -40℉ ~ + 167℉ |
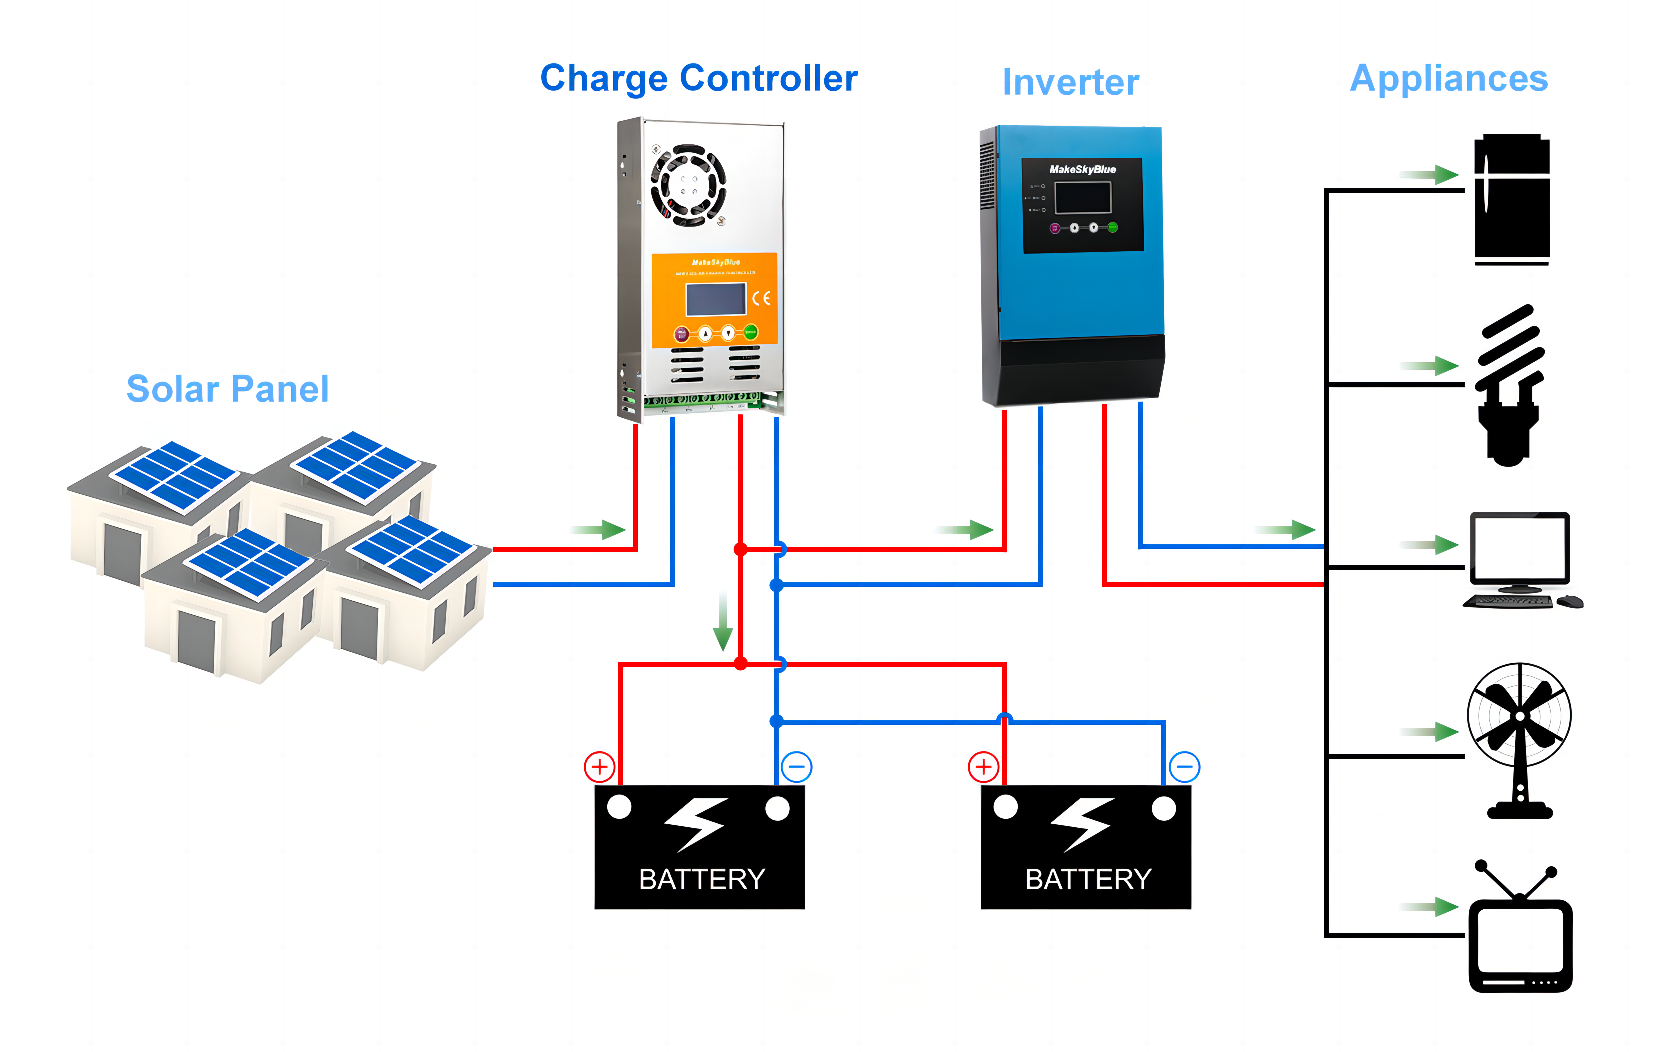
5. Setup and Installation
Follow these steps carefully to install your MPPT Solar Charge Controller. Ensure all power sources are disconnected before making any connections.
5.1. How to Choose Solar Panels
The selection of solar panels is crucial for the optimal performance and safety of your system. Refer to the table below for guidance based on your controller's specifications.
| MiniSolar Charge Controller | Nominal PV Power | PV Open Circuit Voltage | Maximum PV Array Open Circuit Voltage |
|---|---|---|---|
| 60A12V | ≤720W | 20V~80V | 80V |
| 60A24V | ≤1440W | 37V~100V | 100V |
| 60A36V | ≤2100W | 72V~160V | 160V |
| 60A48V | ≤2800W | 72V~160V | 160V |
| 72V30A | 2200W | 100V-190V | 190V |
| 72V50A | 3600W | 100V-190V | 190V |
| 96V30A | 3000W | 100V-190V | 190V |
| 96V45A | 4500W | 100V-190V | 190V |
5.2. How to Select Appropriate DC Circuit Breaker and Cables
Use flexible multi-stranded copper cable for the battery and PV connections. The table below provides recommendations for cable size and circuit breaker ratings.
| MiniSolar Charge Controller | Pure copper cables | DC Circuit Breaker | Connection |
|---|---|---|---|
| 60A12V | 8pcs 6mm²/ 9 awg | 2pcs 100A | Two cables to two PV+ Another two cables to two PV- Two cables to two BAT+ Another two cables to two BAT- |
| 60A24V | |||
| 60A36V | |||
| 60A48V | |||
| 72V30A | 4pcs 6mm²/ 9 awg | 2pcs 63A | One cable to one PV+ Another cable to one PV- One cable to one BAT+ Another cable to one BAT- |
| 96V30A | |||
| 72V50A | 8pcs 6mm²/ 9 awg | 2pcs 100A | Two cables to two PV+ Another two cables to two PV- Two cables to two BAT+ Another two cables to two BAT- |
| 96V45A |
5.3. Connection Order Electrical Connections
Always connect in the following order:
- Connect the Battery:
- Ensure the DC circuit breaker is OFF.
- Install the circuit breaker between the controller and the battery. The battery voltage should be over 15V to power on for a 60A12V device.
- Check battery polarity.
- Turn the DC circuit breaker ON.
- The LCD will display the current and version.
- Set the controller parameters (refer to Section 6.2).
- Turn the DC circuit breaker OFF after setting parameters.
- GND Connection: Connect a cable from the controller's GND screw to the battery negative terminal.
- Connect DC Loads (if needed): Connect your DC loads to the appropriate terminals.
- Connect the PV (Solar Panels):
- Ensure the DC circuit breaker is OFF.
- Install the circuit breaker between the controller and the PV modules.
- Check PV polarity.
- Turn the DC circuit breaker ON.
- Power On: Turn ON the circuit breaker between the controller and batteries, then turn ON the circuit breaker between the controller and PV modules.
- Verification: The controller LCD will display the parameters if all connections are correct.
- Wifi CloudBox (Optional): If you have purchased the Wifi CloudBox (excluded for V125), connect it now.

Note on Overcharging Protection: The controller includes overcharging protection. For example, overcharging protection voltage is 90V. It also features PV reverse polarity protection (when Voc < 100V only) and PV over-voltage protection (controller will be burnt if Voc > 190V).

6. Operation
6.1. Initial Page and LCD Display
Upon startup, the LCD will display the current and version. For example, '60 125' indicates a 60A current and Version 125.
The LCD provides various working modes and information:
| LCD Display Number | Description | Working Mode Code | Working Mode Description |
|---|---|---|---|
| 1 | PV voltage / Output power | 3.0 | Night mode, no charging |
| 2 | Battery voltage / Charging current | 4.0 | MPPT mode |
| 3 | Working mode/Error code/Temperature | 7.0 | Absorption mode |
| 4 | ACC Power Generation | 8.0 | Floating mode |
6.2. Manual Settings
Caution! Disconnect the PV modules before setting up the solar charge controller.
To access and modify parameters:
- Press the "PRG" button to begin setting the parameters.
- Use the "UP" and "DOWN" buttons to select the desired value or navigate to the next page of settings.
- Press the "ENTER" button to confirm the selected value.
Available parameters:
- D00: Load working time. Default is 24-hour. The load output is only for DC loads with a current less than 5 Amps, and the output voltage will be the same as the battery voltage.
- D01: Floating charge voltage. Set between 12V to 17V.
- D02: Absorption voltage (constant voltage). Set between 12V to 17V. For lithium batteries, please set D01=D02.
- D03: Battery discharge protection voltage.
- D04: Battery type.
- 01 for lithium battery
- 00 for lead-acid battery
- D05: Clear the password for the Wifi version.
- D06: Battery voltage calibration. If you have an accurate device and need to calibrate the battery voltage, use this parameter. For example, if you measure the battery voltage as 24.5V, but the controller is reading 24V, use D06 to calibrate the voltage to 24.5V. Please be cautious when using this function.
Reminder:
- The default settings are for lithium batteries.
- After connecting all the cables and setting up the solar controller, reboot it to ensure all settings are successful.
7. SmartLife APP Operation Manual (Optional)
If you have purchased the WiFi CloudBox, you can use the SmartLife mobile app for remote monitoring and control. The WiFi feature provides a cloud service accessible via the Internet for iOS and Android mobile phones.
7.1. APP Download
Search for "SmartLife" in the Google Play Store or Apple App Store to download the mobile app.
Alternatively, you can use your phone to scan the barcodes provided in the original manual to download the APK.
7.2. Log In, Register, and Add Device
Users can register using their phone number or email address, or log in using a third-party account binding. If no project is available, click the '+' icon in the upper right corner and select "Create project". The app will automatically detect nearby machines and add devices based on the corresponding machine name.
7.3. Configure Network
Select the corresponding WiFi network and enter the password to complete network configuration.
7.4. Delete Device
To change device binding or delete a device, click the button in the upper right corner of the app to view machine information and proceed with deletion.
8. Troubleshooting
The controller provides error codes to help diagnose issues. Refer to the table below for common problems and their solutions.
| Code | Description | How to Solve |
|---|---|---|
| 18 | Input PV voltage is low | Increase the PV voltage |
| 60 | Over-temperature protection | The fan will work automatically for temperature reduction |
| 63 | Battery voltage is high | Battery high voltage protection with automatic recovery |
| 65 | Battery voltage is low | Battery over-discharge protection with automatic recovery |
| 71 | Input PV voltage is high | Decrease the PV voltage/power to be within the correct Voc (open-circuit voltage) range |
| 73 | Over-charging current | Decrease the PV voltage/power to be within the correct Voc (open-circuit voltage) range |
| 74 | Output load is short | Disconnect the load, then press and hold the "ENT" button for over 5 seconds |
9. Maintenance
To ensure the longevity and optimal performance of your MPPT Solar Charge Controller, regular maintenance is recommended:
- Cleaning: Periodically clean the exterior of the controller, especially the fan vents, to prevent dust buildup which can hinder cooling. Use a soft, dry cloth.
- Connections: Annually check all electrical connections (PV, battery, load) for tightness and corrosion. Loose connections can lead to power loss or overheating.
- Environment: Ensure the controller is installed in a well-ventilated area, away from direct sunlight, moisture, and corrosive substances. Maintain operating temperatures within the specified range.
- Firmware: If applicable, check for firmware updates through the SmartLife app or manufacturer's website to ensure you have the latest features and bug fixes.
10. User Tips
- Battery Voltage Check: Always ensure your battery voltage is sufficient (e.g., over 15V for 60A12V devices) before connecting the controller to avoid power-on issues.
- Reboot After Settings: After making any manual settings (D00-D06), always reboot the controller by cycling the battery circuit breaker to ensure the new settings are applied successfully.
- Cable Sizing: Proper cable sizing is critical. Refer to Section 5.2 to select the correct gauge for your PV and battery connections to minimize energy loss and prevent overheating.
- PV Array Sizing: Pay close attention to the Nominal PV Power and PV Open Circuit Voltage limits (Section 5.1) to prevent damage to the controller. Exceeding these limits can burn out the device.
- Monitoring: Regularly check the LCD display for current status and any error codes to quickly identify and resolve potential issues.
11. Warranty and Support
For any technical support or warranty inquiries, please contact MakeSkyBlue directly. Ensure you have your product model and purchase details ready.
MakeSkyBlue (Shenzhen) Technology Co., LTD
702b, Bldg. C6, Hengfeng Industry Zone, Hezhou, Baoan,
Shenzhen Guangdong 518101
China
Tel: 86 755 2759 5076
Website: www.makeskyblue.com
Email: sales@makeskyblue.com
For the complete user manual in PDF format, please refer to the official documentation provided by MakeSkyBlue.