
1. Introduction
The ToupTek GPM662C (Color) and GPM662M (Mono) are cost-effective guide cameras designed for a variety of astronomical applications, including deep-space star guiding and infrared imaging. These cameras feature a 1/2.8-inch frame, 2.9μm square pixels, and a 1920x1080 resolution, offering enhanced performance in sensitivity, dynamic range, full well charge, and readout noise compared to previous models. They are particularly sensitive and efficient in the infrared band, with high Quantum Efficiency (QE) at 650nm, making them ideal for capturing the Milky Way even in light-polluted urban environments.

Figure 1: TeSeek ToupTek GPM662C Astronomical Guide Camera
2. Package Contents
Please verify that all the following items are included in your package:
- 1 x Guide Camera (GPM662C or GPM662M)
- 1 x 1.25” Extender
- 1 x 5mm Adapter Ring
- 1 x 1.5m USB3.0 Cable
- 1 x 2.0m Guiding Cable
- 1 x 825nm IR Filter
- 1 x 2.8mmf2cs Lens
3. Setup and Installation
3.1. Camera Assembly and Filter Installation
Follow these steps to install the included 825nm IR filter and CS lens:
- Remove the front window mount and CS lens adapter ring from the GPM camera.
- Install the LP825 filter adapter with the 825nm IR filter onto the camera.
- Screw the CS lens adapter ring back onto the GPM camera.
- Install the 2.8mmf2cs lens into the adapter ring.
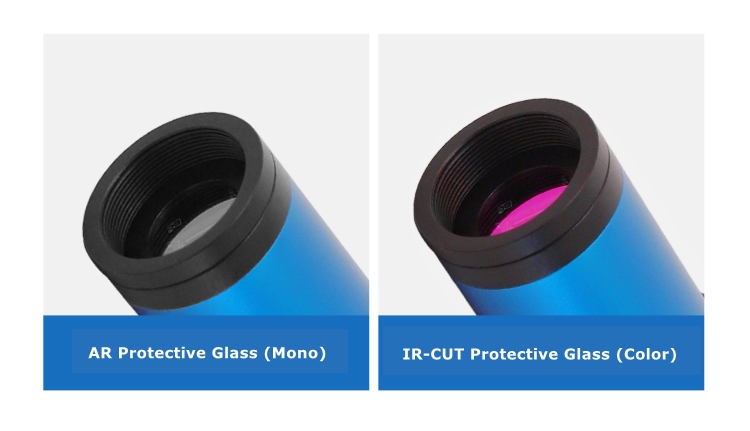
Figure 2: Step-by-step guide for filter and lens installation.
3.2. Front Window and Filter Replacement
The GPM series cameras allow for user-replaceable filters to expand infrared imaging capabilities. The GPM662M (Mono) features an AR anti-reflective protective glass front window, while the GPM662C (Color) uses an IR-CUT protective glass. The original front window glass has a diameter of 19mm and a thickness of 0.55mm, secured by a pressing ring. To replace the filter, carefully remove the front window and insert a third-party filter. Compatible third-party filters should have a diameter of 19-22mm and a thickness of approximately 1mm.

Figure 3: Front window types: AR Protective Glass (Mono) vs. IR-CUT Protective Glass (Color).
3.3. Connecting to a Telescope
The GPM camera, when paired with a 1.25" extension tube, can be directly connected to a 1.25" visual aperture telescope. Ensure a secure connection to prevent light leaks and ensure stability during imaging.
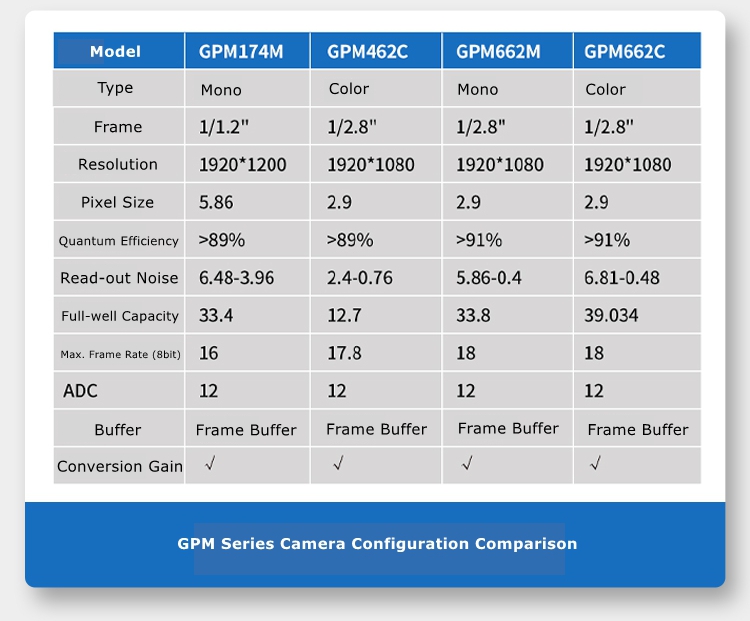
Figure 4: Camera dimensions and connection to a 1.25" visual aperture telescope.
4. Operating Instructions
4.1. Software Compatibility
GPM series cameras are designed for broad compatibility with astronomical imaging software. They can be controlled directly through the native ToupSky software. Additionally, they support ASCOM and DirectShow SDK usage, allowing integration with a wide range of third-party astronomy applications.
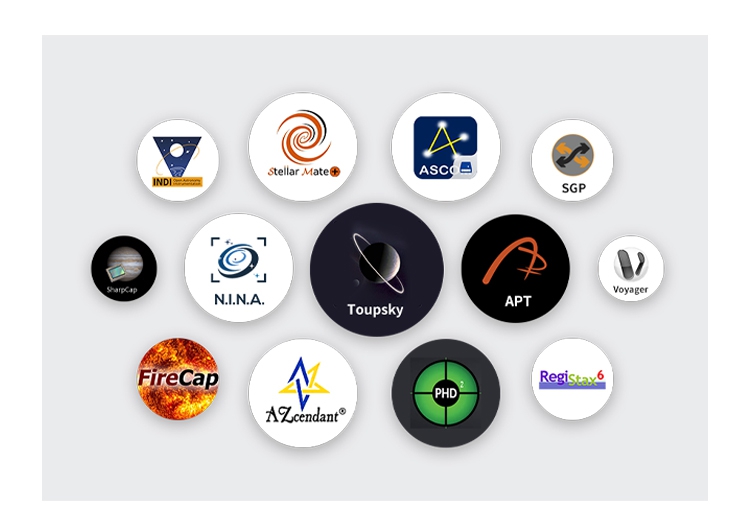
Figure 5: Compatible astronomical software applications.
4.2. Native 12-bit ADC and Region of Interest (ROI)
The camera features a native 12-bit Analog-to-Digital Converter (ADC), ensuring high image fidelity and detailed representation. It supports hardware Region of Interest (ROI), allowing flexible selection of focus areas. Utilizing a smaller ROI increases the frame rate, which is crucial for timely star guidance feedback and smooth real-time imaging previews.
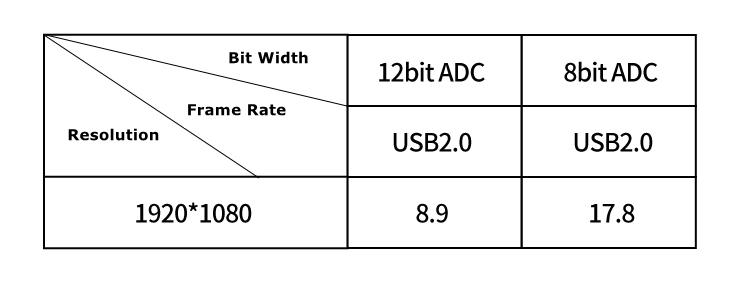
Figure 6: Frame Rate performance based on Bit Width and Resolution.
4.3. Built-in Frame Cache
The GPM662M and GPM662C cameras incorporate a built-in frame cache. This cache temporarily stores image data, ensuring stable and complete transmission to connected devices like computers. This feature effectively reduces the 'glow' phenomenon caused by slow image data readout and allows the camera to achieve its maximum frame rate even when multiple cameras are operating simultaneously.
4.4. Pixel Merging and Dual Gain Switching
The camera supports digital pixel merging from 1x1 up to 8x8 (stacking or averaging). It also offers dual gain switching between High Conversion Gain (HCG) and Low Conversion Gain (LCG). HCG mode enhances signal sensitivity in low-light environments, while LCG mode maintains a wide dynamic range when capturing bright targets, helping to balance overall brightness and darkness details in your images.

Figure 7: Performance characteristics in LCG (Low Conversion Gain) Mode.
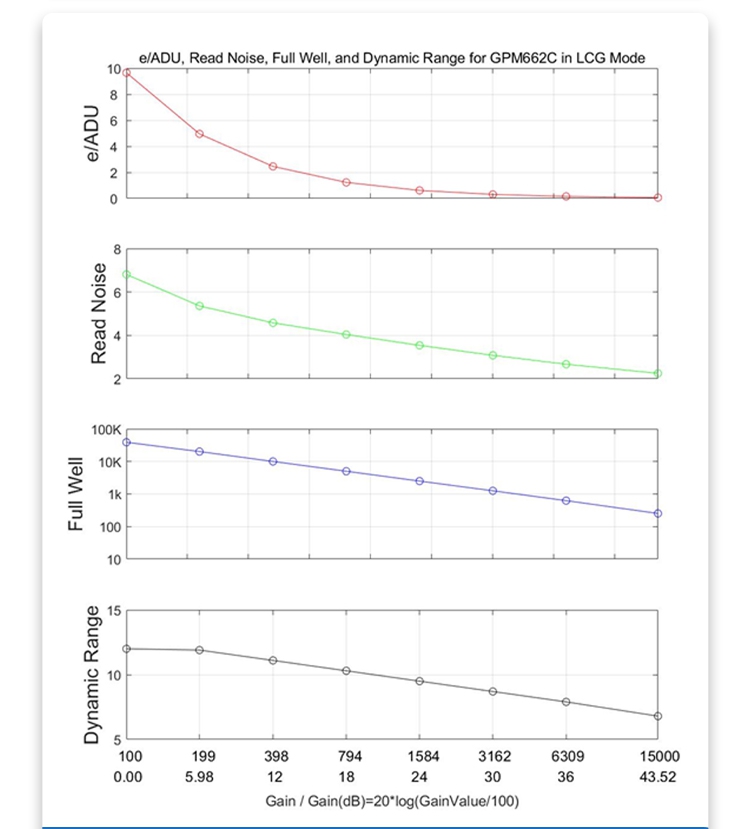
Figure 8: Performance characteristics in HCG (High Conversion Gain) Mode.
5. Maintenance
- Cleaning the Optical Window: Use a soft, lint-free cloth specifically designed for optics. For stubborn dust, use a blower brush first. For smudges, use a small amount of optical cleaning solution applied to the cloth, not directly to the window.
- Storage: When not in use, store the camera in a dry, dust-free environment, preferably in its original packaging or a protective case. Avoid extreme temperatures and humidity.
- Cable Care: Handle USB and guiding cables carefully. Avoid sharp bends or kinks that can damage internal wires.
6. Troubleshooting
- Camera Not Detected:
- Ensure the USB cable is securely connected to both the camera and your computer.
- Try a different USB port on your computer.
- Verify that the necessary drivers (e.g., ASCOM drivers for ToupTek) are installed correctly.
- Restart your computer and the imaging software.
- No Image or Black Screen:
- Check if the lens cap is removed.
- Ensure the camera is properly focused.
- Adjust exposure settings in your software; very short exposures in dark conditions can result in a black image.
- Confirm the camera is selected as the active device in your imaging software.
- Poor Guiding Performance:
- Ensure the guiding cable is correctly connected to both the camera and your mount's guide port.
- Calibrate your guiding software (e.g., PHD2) properly.
- Check for flexure in your imaging train.
- Ensure sufficient guide star brightness and focus.
7. Specifications
The following table provides a comparison of key specifications for the GPM series cameras, including the GPM662C and GPM662M models:
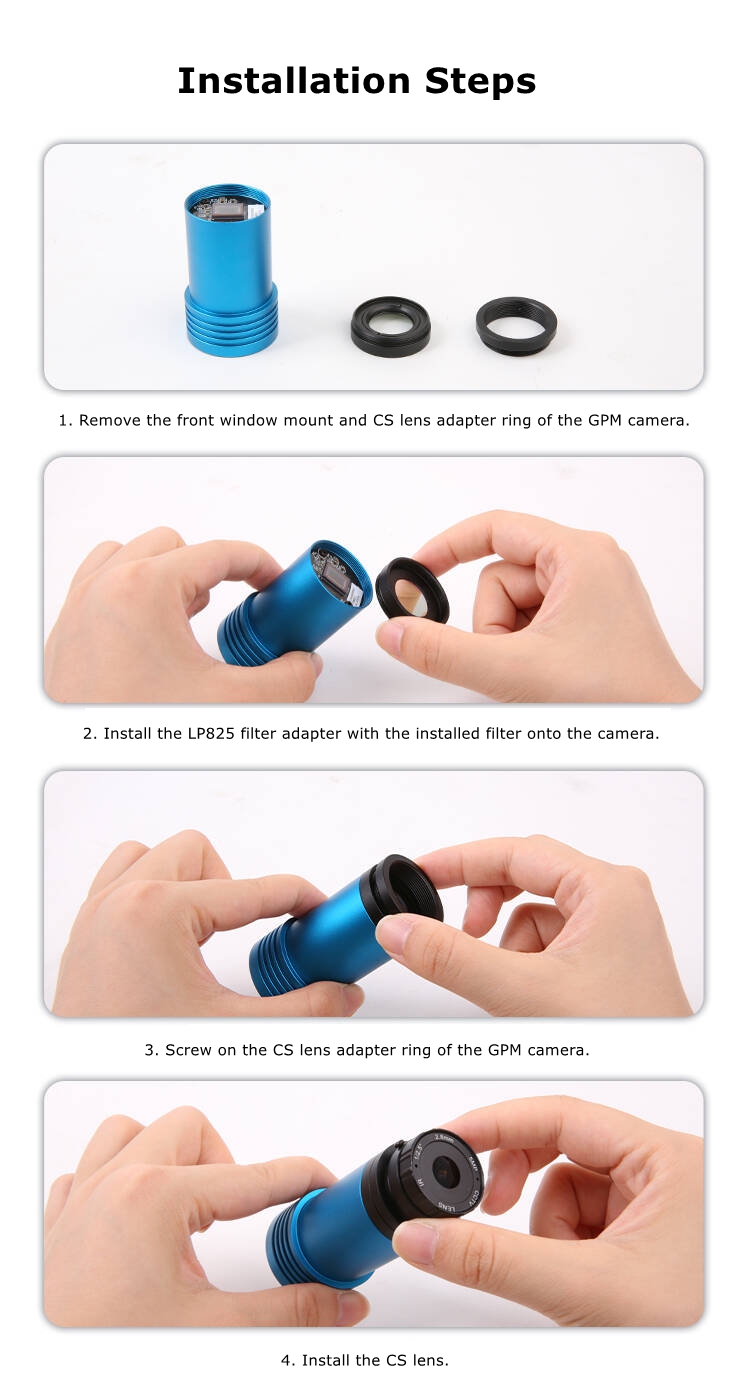
Figure 9: GPM Series Camera Configuration Comparison.
Key Features:
- Sensor: IMX662 IR High Sensitivity Sensor
- Resolution: 1920x1080
- Pixel Size: 2.9μm
- Frame: 1/2.8 inch
- ADC: Native 12-bit
- Buffer: Built-in Frame Buffer
- Connectivity: USB2.0
- Filter (GPM662M): AR anti-reflective protective glass (user-replaceable)
- Filter (GPM662C): IR-CUT protective glass (user-replaceable)
- Lens: 2.8mmf2cs Lens included
- IR Filter: 825nm IR Filter included
Spectral Sensitivity:
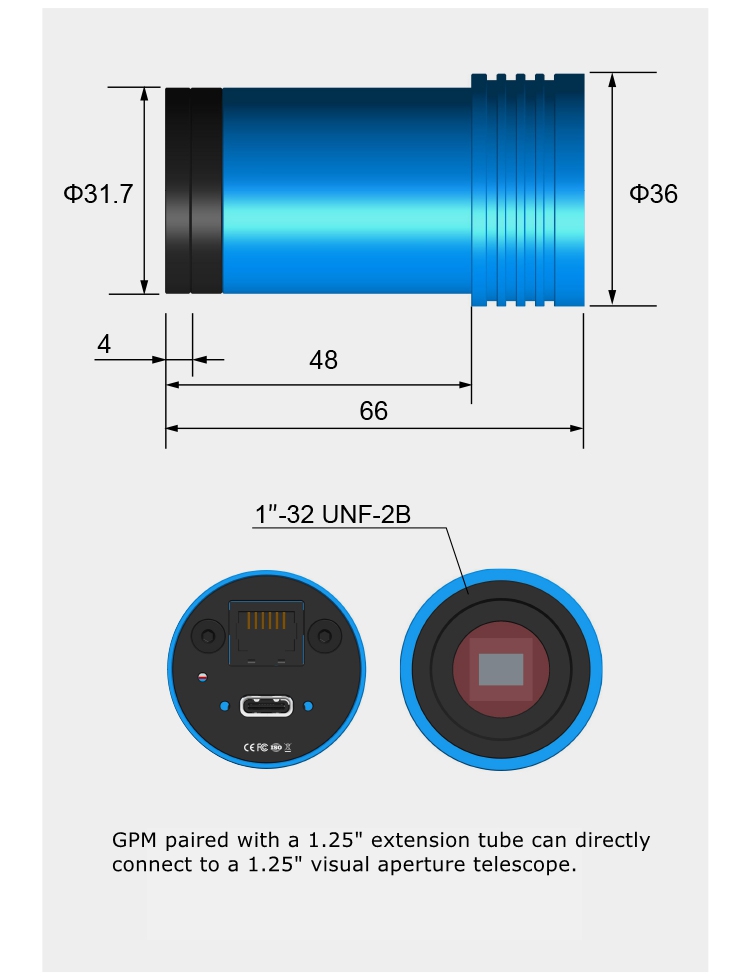
Figure 10: IMX662 IR High Sensitivity Sensor Spectral Sensitivity Characteristic Curve.
7. User Tips
- For optimal guiding, ensure your telescope is well-balanced and polar aligned.
- Experiment with both HCG and LCG modes to find the best settings for your specific target and light conditions.
- When using the camera for deep-sky imaging, consider stacking multiple short exposures to improve signal-to-noise ratio.
- Regularly check for software updates for ToupSky, ASCOM drivers, and any third-party imaging applications you use to ensure compatibility and access to the latest features.
8. Warranty and Support
For warranty information, technical support, and service inquiries, please refer to the official ToupTek website or contact your authorized dealer. Keep your purchase receipt as proof of purchase for any warranty claims.