
1. Introduction
The Sumry MPS-VIII ECO Series Hybrid Solar Inverter is a versatile power solution designed for both on-grid and off-grid solar applications. It integrates the functions of a solar inverter, MPPT solar charger, and battery charger to provide uninterruptible power support. This manual provides essential information for the safe and efficient installation, operation, and maintenance of your inverter.

Key Features:
- Pure sine wave output for sensitive electronics.
- Output power factor 1.0.
- WIFI & GPRS connectivity for iOS and Android (optional module required).
- Ability to run without a battery.
- One-key restoration to factory settings.
- Built-in Lithium battery automatic activation.
- Dual communication ports for Battery communication (RS485) and Wifi communication (RS232).
- Built-in 120A MPPT solar charge controller.
- High PV input voltage range (60~500VDC).
- Built-in anti-dust kit for harsh environments.
- Smart battery charge design to optimize battery life.
- Dual output.
2. Safety Instructions
Please read all instructions and cautionary markings on the unit and in this manual before installation and operation. Failure to follow these instructions may result in electric shock, fire, or severe injury.
- Installation must be performed by qualified personnel.
- Ensure all wiring is correctly polarized and securely connected.
- Do not disassemble the inverter. There are no user-serviceable parts inside.
- Keep the inverter away from flammable materials and moisture.
- Ensure adequate ventilation around the inverter to prevent overheating.
- Always disconnect all power sources (PV, battery, AC input) before performing any maintenance or wiring.
- The inverter contains high voltage components; exercise extreme caution.

3. Product Overview and Components
Familiarize yourself with the inverter's ports and connections:

- AC In: Alternating Current Input (from utility grid or generator).
- Main Out: Main Alternating Current Output.
- Second Out: Secondary Alternating Current Output.
- COMM: RS-232 communication port / Wifi-port (for monitoring and parameter setup).
- PV In: Photovoltaic Input (from solar panels).
- Battery: Battery Input (for connecting battery bank).
4. Installation and Wiring
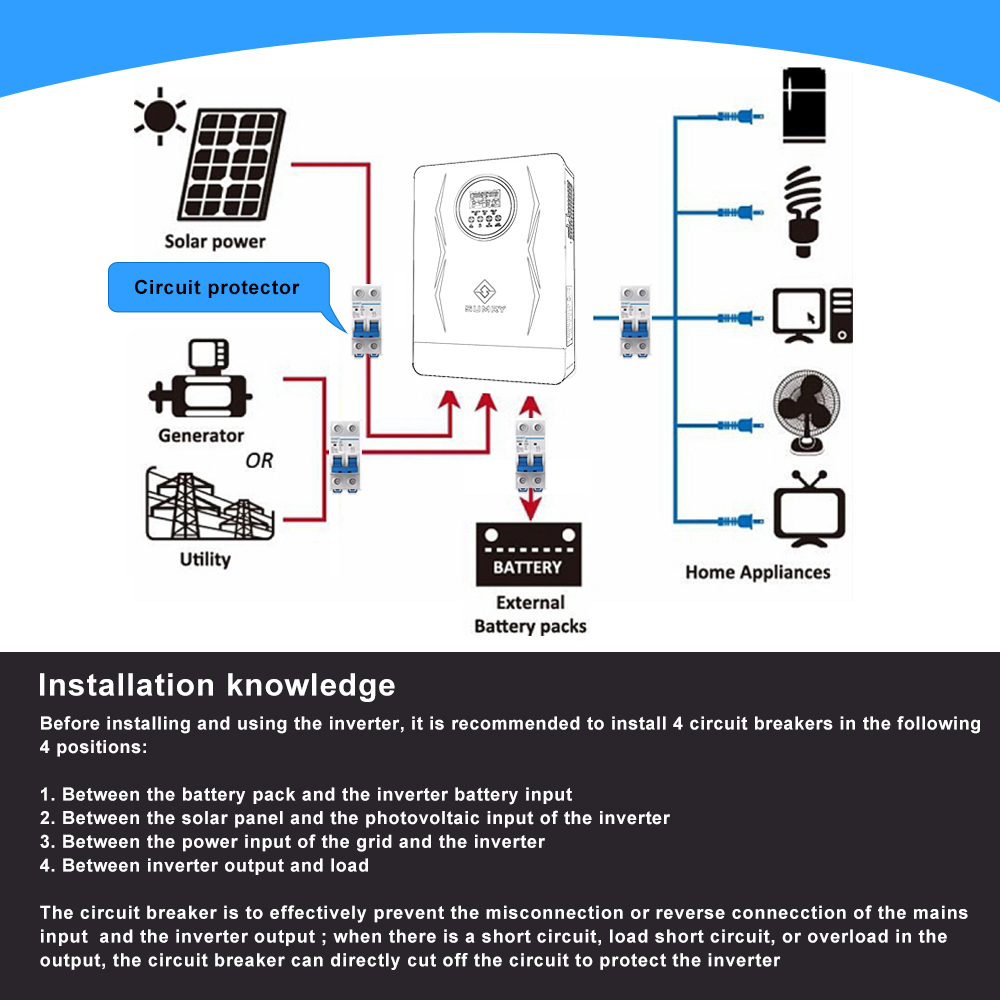
Proper installation is crucial for the safe and efficient operation of your solar inverter. It is recommended to install circuit breakers at various points in the system for safety and protection.
4.1. General Installation Steps
- Battery Connection: Install a circuit breaker between the battery and the inverter. After successful installation, open the breaker. Connect the battery (24V for 3.6kW/4.2kW models, 48V for 6.2kW models). Close the circuit breaker and measure the voltage on the battery side of the inverter to ensure it's normal.
- PV Input Connection: Install a circuit breaker between the PV input and the inverter. Turn on this circuit breaker after successful installation. Ensure the battery voltage is normal. Connect the solar panels to the inverter. Close the circuit breaker between the PV input and the inverter. The inverter display should automatically light up and begin charging.
- Inverter Start-up: Press the button on the bottom right corner of the inverter to start the machine. Verify that there is 220V/230V/240V AC voltage output from the inverter's output ports.
- AC Input/Output Connection: Install a circuit breaker between the AC input and the inverter, and another circuit breaker between the inverter's output and your loads. After successful installation, turn on the AC input and output circuit breakers. Connect the machine to the mains. After 2 minutes, turn off the mains input circuit breaker, then turn off the circuit breaker of the inverter's output. This completes the installation procedure.
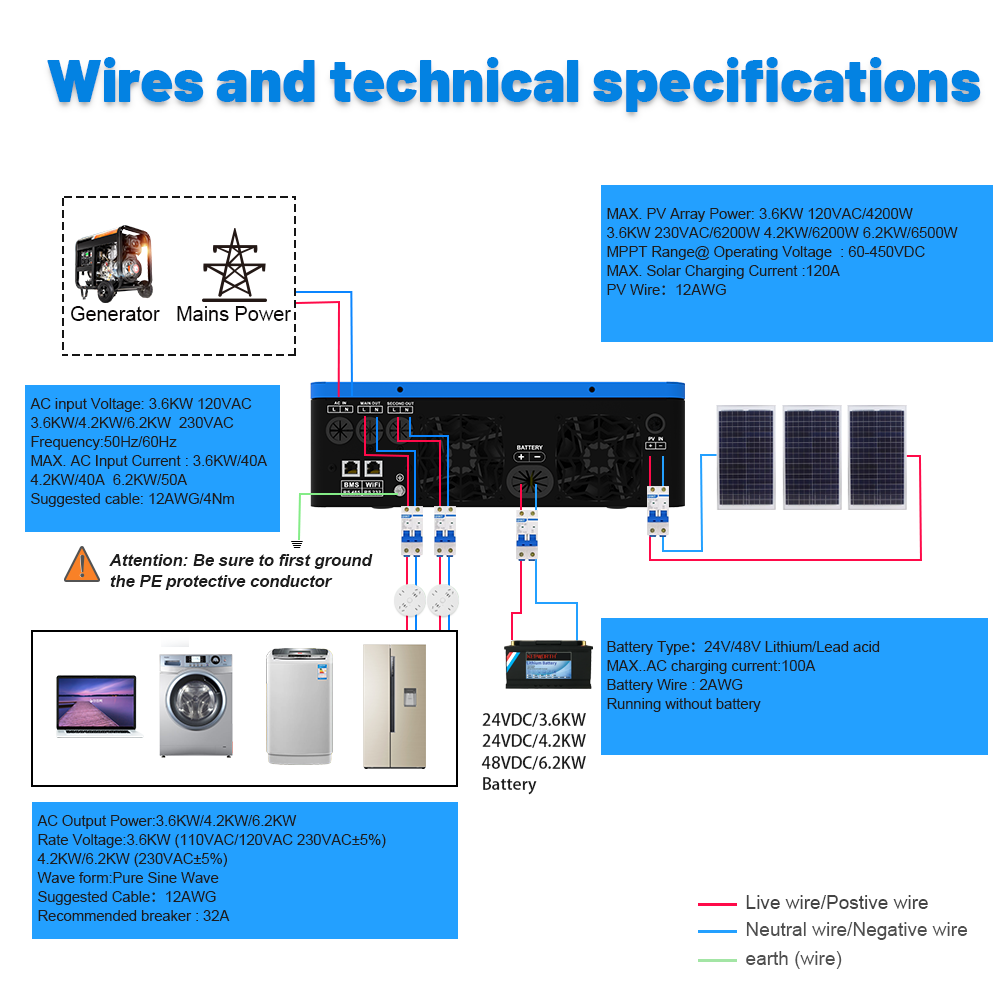
4.2. Circuit Breaker Specifications
The following table outlines the recommended circuit breaker specifications based on your inverter model:
| Inverter Power | Battery Breaker | PV Input Breaker | Utility Input Breaker | Output Breaker |
|---|---|---|---|---|
| 3.6kW | 2P80A | 2P20A | 2P63A | 2P30A |
| 4.2kW | 2P200A | 2P20A | 2P40A | 2P20A |
| 6.2kW | 2P150A | 2P20A | 2P63A | 2P25A |

5. Operation
5.1. Pure Sine Wave Output
The Sumry MPS-VIII ECO Series Inverter utilizes pure sine wave technology, ensuring a powerful and continuous loading capacity. This protects sensitive appliances by providing clean and stable power, similar to grid electricity.

5.2. Versatile Working Modes
The inverter offers flexible power management with user-configurable charging and output priorities:

4 Charging Modes:
- Solar First: Prioritizes solar power for charging batteries.
- Mains First: Prioritizes utility grid power for charging batteries.
- Hybrid Charge: Uses both solar and mains power for charging.
- Only Solar: Charges batteries exclusively from solar power.
3 Output Modes:
- Solar First: Prioritizes solar power for supplying loads.
- Utility First: Prioritizes utility grid power for supplying loads.
- SBU First (Solar-Battery-Utility): Prioritizes solar, then battery, then utility for supplying loads.
5.3. Battery Compatibility
The inverter is compatible with a wide range of battery types:
- Lithium batteries
- Gel batteries
- LiFePO4 batteries
- Lead-acid batteries
- AGM batteries
- User-customized battery settings
It also supports operation without a battery, powering loads directly from the PV array.

6. Communication and Monitoring
The Sumry ECO series inverter features two communication ports for enhanced monitoring and control:
6.1. RS232 Communication Port (for WiFi Module)
This port is used for communication with an optional WiFi module. The WiFi module enables remote monitoring of your inverter via a mobile application (Smartess App) on both iOS and Android devices. When connected to your home router, you can monitor the inverter's performance and adjust basic parameters from anywhere with an internet connection. The WiFi module must be purchased separately.

6.2. RS485 Communication Port (for BMS)
This port is dedicated to lithium battery BMS (Battery Management System) communication. If you intend to use lithium batteries with BMS communication, ensure your battery uses the PACE or PYLONTECH communication protocol for compatibility.

7. Technical Specifications
The following table provides detailed technical specifications for the Sumry MPS-VIII ECO Series Hybrid Solar Inverter:

| Parameter | VICTOR NM-ECO-3.6KW PLUS | VICTOR NM-ECO-4.2KW PLUS | VICTOR NM-ECO-6.2KW |
|---|---|---|---|
| MODEL | VICTOR NM-ECO-3.6KW PLUS | VICTOR NM-ECO-4.2KW PLUS | VICTOR NM-ECO-6.2KW |
| Phase | 1-Phase | 1-Phase | 1-Phase |
| Max. PV Input Power | 6200W | 6200W | 6500W |
| Max. Solar Charging Current | 120A | 120A | 120A |
| OPERATING VOLTAGE | 24VDC | 24VDC | 48VDC |
| AC Output Voltage | 220/230/240VAC | 220/230/240VAC | 220/230/240VAC |
| Output Frequency | 50/60Hz | 50/60Hz | 50/60Hz |
| Dimensions (H*W*D) | 480*300*180mm | 480*300*180mm | 500*415*180mm |
| Net Weight | 8.0KG | 8.0KG | 10.9KG |
| Interface | RS232/RS485/WIFI/GPRS/LITHIUM BATTERY | ||
| Humidity | 5% to 95% Relative Humidity (Non-condensing) | ||
| Operating Temperature | -10°C to 50°C | ||
| Compliance Standard | CE | ||
8. Maintenance
Regular maintenance ensures the longevity and optimal performance of your inverter.
- Cleaning: Periodically clean the exterior of the inverter, especially the ventilation openings, to prevent dust buildup. The inverter has a built-in anti-dust kit for harsh environments.
- Connections: Regularly check all electrical connections for tightness and signs of corrosion. Loose connections can lead to overheating and poor performance.
- Environment: Ensure the inverter is installed in a well-ventilated area, free from direct sunlight, moisture, and corrosive substances.
- Cooling System: The inverter features intelligent cooling fans that adjust rotation speed based on ambient temperature. Ensure these fans are not obstructed.

9. Troubleshooting
This section provides general guidance for common issues. For complex problems, contact technical support.
- No Power Output: Check all circuit breakers (battery, PV, AC input/output) to ensure they are in the 'ON' position. Verify battery voltage and PV input voltage are within the specified range. Ensure the inverter is powered on.
- Overload Error: Reduce the load connected to the inverter. Check for any short circuits in the connected appliances.
- Overheating Warning: Ensure the inverter has adequate ventilation. Clean any dust from the fan vents. Reduce ambient temperature if possible.
- Battery Not Charging: Verify PV panel connections and voltage. Check the solar charging current on the display. Ensure the correct charging mode is selected.
- Communication Issues: For WiFi, ensure the optional module is correctly installed and configured, and the inverter is within range of your router. For BMS, confirm the battery's communication protocol is compatible (PACE or PYLONTECH) and the cable is correctly connected.
10. User Tips
- Optimal PV Sizing: Ensure your solar panel array's voltage and power are within the inverter's specified MPPT range for maximum efficiency.
- Battery Management: Utilize the smart battery charge design to prolong battery life. Consider the 'Mains First' or 'Solar First' charging modes based on your energy priorities and local grid stability.
- Remote Monitoring: If using the optional WiFi module, regularly check the Smartess App for system performance and alerts. This can help identify potential issues early.
- Cable Sizing: Always use appropriately sized cables for all connections (PV, battery, AC) to minimize power loss and ensure safety. Refer to the wiring diagram for suggested cable gauges.
- Grounding: Ensure the PE (protective earth) conductor is properly grounded as indicated in the wiring diagrams for safety.
11. Warranty and Support
This Sumry Hybrid Solar Inverter comes with a standard manufacturer's warranty. Please refer to your purchase documentation for specific warranty terms and conditions. For technical assistance, troubleshooting beyond this manual, or warranty claims, please contact your original point of purchase or the manufacturer's customer support.
12. Product Demonstration Video
Watch this video for a visual guide on unpacking, connecting, and demonstrating the Sumry Hybrid Solar Inverter.