1. Product Overview
The Pixhawk 6C Mini is the latest iteration in the successful Pixhawk flight controller series, adhering to the Pixhawk FMUv6C Open Standard and Connector Standard. It incorporates the same STMH743 microprocessor and advanced sensors as the standard Pixhawk 6C. This Mini version is designed for a compact form factor, featuring a built-in PWM header while optimizing port selection.
At its core, the Pixhawk 6C Mini utilizes an STM32H743 micro-controller from ST Microelectronics, complemented by sensor technology from Bosch and InvenSense. This combination ensures high flexibility and reliability for controlling various autonomous vehicles, making it suitable for both academic research and commercial applications.
The H7 micro-controller boasts an Arm Cortex-M7 core operating at up to 480MHz, equipped with 2MB of flash memory and 1MB of RAM. This enhanced processing capability empowers developers to implement complex algorithms and models more efficiently. The FMUv6C open standard integrates high-performance, low-noise IMUs with redundancy, designed for cost-effectiveness. An integrated vibration isolation system effectively filters out high-frequency vibrations and reduces noise, ensuring accurate sensor readings and contributing to superior flight performance.
The Pixhawk 6C Mini is an ideal solution for developers in corporate research labs, startups, academic institutions, and a wide range of commercial applications requiring advanced flight control capabilities.
2. Features
- High-performance STM32H743 Processor offering increased computing power and RAM.
- New cost-effective design in a compact Mini form factor.
- IMU redundancy with advanced sensor technology from Bosch and InvenSense.
- Integrated vibration isolation system to filter high-frequency vibrations and reduce noise for accurate readings.
- Temperature-controlled IMUs via onboard heating resistors, ensuring optimal operating temperature.
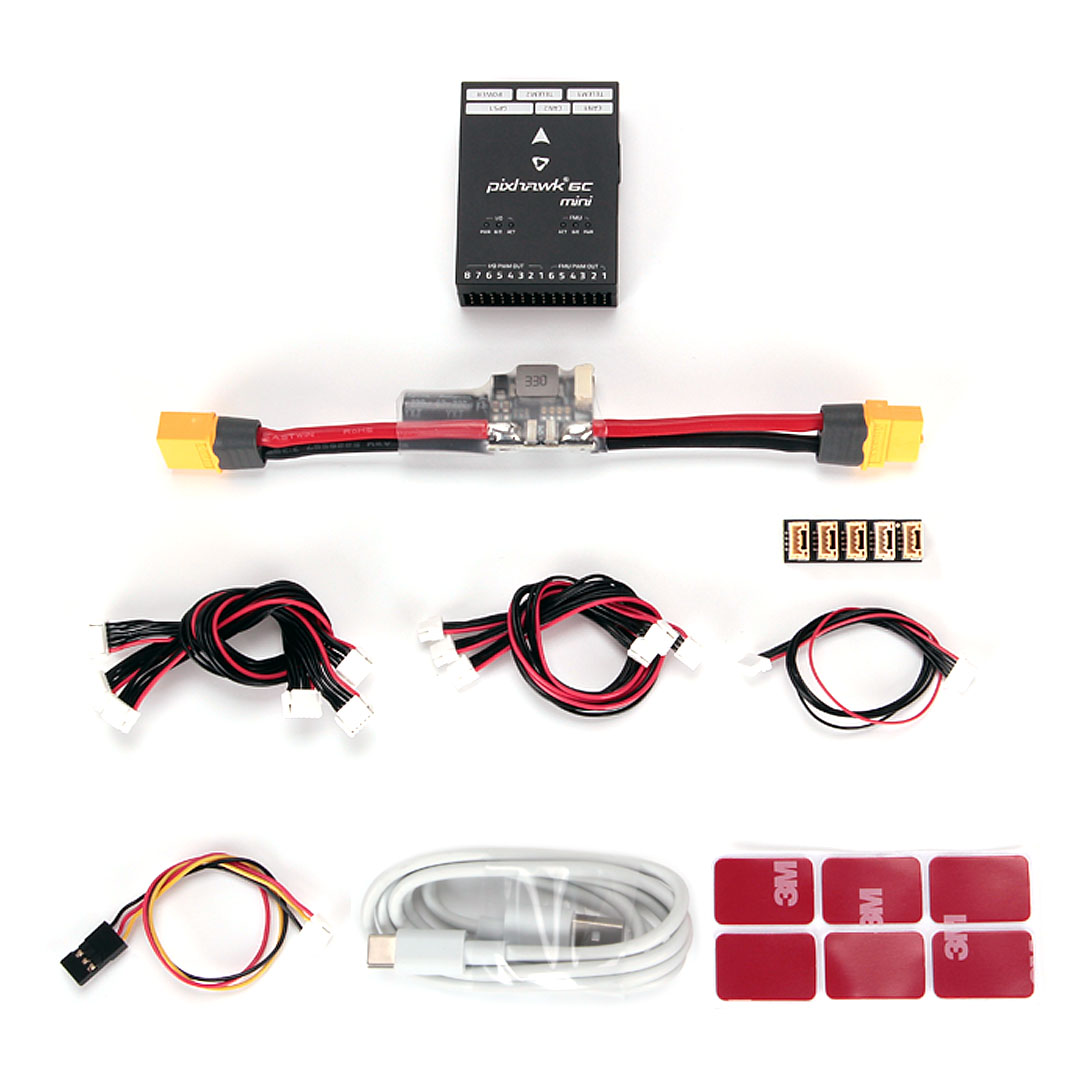
3. Package Contents
The standard package includes the following components:
- 1 x Pixhawk 6C Mini Flight Controller
- 1 x PM02 V3 12S Power Module or PM06 14S Power Module (optional, depending on selection)
- 1 x Cable Set (various connection cables)
- 3M Adhesive Pads
- 1 x USB-C Cable


4. Specifications
| Attribute | Detail |
|---|---|
| Model Number | Holybro Pixhawk 6C Mini FC Module Flight Controller |
| Processor | STM32H743 (Arm Cortex-M7, up to 480MHz) |
| Flash Memory | 2MB |
| RAM | 1MB |
| IMUs | Bosch & InvenSense (with redundancy and temperature control) |
| For Vehicle Type | Airplanes, Vehicles & Remote Control Toys |
| Material | Composite Material |
| Recommend Age | 14+ years |
| Quantity | 1 pcs |
| Is Electric | No Battery |
| Is Batteries Included | No |
5. Setup Instructions
Setting up the Holybro Pixhawk 6C Mini Flight Controller involves connecting various components and configuring the firmware. Due to the complexity and specific requirements of different autonomous vehicle setups, it is crucial to refer to the official Holybro documentation and the ArduPilot/PX4 flight stack documentation for detailed, up-to-date instructions.
5.1. Physical Connections
- Power Module Connection: Connect the selected Power Module (PM02-12S or PM06-14S) to the designated POWER port on the Pixhawk 6C Mini. Ensure correct polarity.
- PWM Outputs: Connect your ESCs (Electronic Speed Controllers) to the I/O PWM OUT and FMU PWM OUT ports as per your vehicle's configuration (e.g., multirotor, fixed-wing).
- RC Input: Connect your receiver (PPM/SBUS RC or DSM) to the appropriate input port.
- GPS Module: Connect your GPS module to the GPS1 port. If using a secondary GPS, connect it to GPS2.
- Telemetry: Connect telemetry modules to TELEM1 and TELEM2 for ground station communication.
- CAN Bus: Connect CAN bus devices (e.g., ESCs, GPS) to CAN1 and CAN2 ports.
- I2C Devices: Connect I2C peripherals (e.g., external compass) to the I2C port.
- USB Connection: Use the provided USB-C cable to connect the flight controller to your computer for initial setup and firmware flashing.


5.2. Software Configuration
After physical connections, the flight controller requires software configuration:
- Firmware Flashing: Install the appropriate flight stack firmware (e.g., ArduPilot or PX4) using a ground station software like Mission Planner or QGroundControl.
- Sensor Calibration: Calibrate all sensors, including accelerometer, gyroscope, compass, and ESCs.
- Radio Calibration: Calibrate your remote control transmitter.
- Flight Mode Setup: Configure desired flight modes and safety parameters.
- Pre-Flight Checks: Always perform thorough pre-flight checks before any flight.
6. Operating Instructions
Operating the Pixhawk 6C Mini involves proper pre-flight procedures, flight execution, and post-flight analysis. Always prioritize safety and adhere to local regulations for autonomous vehicle operation.
- Power On: Connect the main battery to power the flight controller and other components. Wait for the system to initialize and acquire GPS lock (if applicable).
- Arming: Arm the motors using your configured remote control stick combination or ground station command. Ensure the vehicle is in a safe area before arming.
- Takeoff: Execute takeoff manually or via an autonomous mission.
- Flight Control: Control the vehicle using your remote control or monitor its autonomous flight via the ground station.
- Landing: Land the vehicle safely, either manually or autonomously.
- Disarming: Disarm the motors after landing to prevent accidental propeller spin.
- Data Logging: Review flight logs after each flight for performance analysis and troubleshooting.
7. Maintenance
Regular maintenance ensures the longevity and reliable performance of your Pixhawk 6C Mini Flight Controller:
- Visual Inspection: Periodically inspect the flight controller and all connected components for any signs of physical damage, loose connections, or corrosion.
- Cable Management: Ensure all cables are securely connected and properly routed to prevent interference or accidental disconnection during flight.
- Cleanliness: Keep the flight controller free from dust, dirt, and moisture. Use a soft, dry brush or compressed air for cleaning.
- Firmware Updates: Regularly check for and install the latest stable firmware versions for your chosen flight stack (ArduPilot/PX4) to benefit from bug fixes and new features.
- Vibration Isolation: Verify that the vibration isolation system is intact and functioning correctly. Replace any worn or damaged damping materials.
- Storage: When not in use, store the flight controller in a dry, cool environment, away from direct sunlight and static electricity.
8. Troubleshooting
This section provides general troubleshooting tips. For specific issues, consult the extensive online documentation and community forums for ArduPilot or PX4.
Common Issues and Solutions:
- No Power/Boot-up Failure:
- Check all power connections, especially from the Power Module to the flight controller.
- Ensure the Power Module is receiving adequate voltage from the main battery.
- Verify the USB-C cable is functional if powering via USB.
- Sensor Errors/Bad Health:
- Recalibrate all sensors (accelerometer, compass, gyroscope).
- Check for excessive vibrations; ensure the vibration isolation system is effective.
- Ensure the flight controller is mounted correctly and away from magnetic interference (for compass).
- No RC Input:
- Verify the receiver is powered and correctly bound to the transmitter.
- Check the connection cable between the receiver and the Pixhawk 6C Mini.
- Ensure the correct RC input type (PPM/SBUS/DSM) is configured in the firmware.
- GPS Not Locking/Poor Accuracy:
- Ensure the GPS module has a clear view of the sky.
- Check the GPS module connection to the flight controller.
- Verify GPS configuration in the ground station software.
- Avoid operating near tall buildings or strong electromagnetic interference.
- Unexpected Flight Behavior:
- Review flight logs for error messages or unusual sensor readings.
- Recheck all calibrations (ESC, compass, accelerometer).
- Ensure correct propeller direction and motor order.
- Verify PID tuning parameters are appropriate for your vehicle.
9. User Tips
- Start Simple: For new users, begin with basic configurations and flight modes before attempting complex autonomous missions.
- Read Documentation: The ArduPilot and PX4 communities provide extensive and up-to-date documentation. Utilize these resources for in-depth understanding and troubleshooting.
- Bench Testing: Always perform thorough bench testing and safety checks before attempting maiden flights. Remove propellers during motor testing.
- Community Support: Engage with online forums and communities (e.g., ArduPilot forums, PX4 discuss) for assistance and shared knowledge.
- Power Redundancy: Consider implementing redundant power systems for critical applications to enhance reliability.
10. Warranty and Support
For warranty information and technical support regarding your Holybro Pixhawk 6C Mini Flight Controller, please refer to the official Holybro website or contact your point of purchase. Keep your proof of purchase for any warranty claims.
Official Holybro resources typically include:
- Product pages with detailed specifications and downloads.
- Firmware and software guides.
- Community forums or support contact information.


