1. Introduction
The MOOER GL200 is an advanced stereo looper and drum machine designed for musicians seeking a powerful and versatile tool for practice, performance, and creative exploration. Building on the success of previous models, the GL200 offers expanded connectivity, intuitive control, and intelligent features to enhance your musical workflow.

2. Features
- Stereo Looper and Drum Machine: Combines both functionalities in a single, compact pedal.
- Extensive Storage: 100 memory slots with up to 800 minutes of total recording time.
- Dual TRS MIDI I/O: For seamless synchronization with other MIDI-compatible devices.
- Bluetooth Audio: Allows for practicing and jamming along with tracks from external devices.
- Flexible Inputs: Supports instruments, line-level signals, and microphones (with switchable phantom power).
- Custom Drum Kits & MIDI Import: Import your own drum kits and MIDI patterns for personalized grooves.
- DrumMatch AI: Automatically selects grooves that complement your playing style.
- Intuitive Touchscreen: Features a 1.28-inch round touchscreen display for easy navigation and control.
- Time-Stretch Function: Change tempo without altering the pitch of your loops.
- Auto-Rec: Input detection for precise and seamless loop recording starts.
- Headphone Output: For silent practice sessions.
3. Package Contents
The MOOER GL200 package includes the following items:
- MOOER GL200 Phrase & Drum Station Unit
- Power Supply (9V DC, 500mA, center positive)
- USB-C to USB-A Cable
- 3.5mm TRS to 5-pin MIDI Adapter
- Quick Start Guide

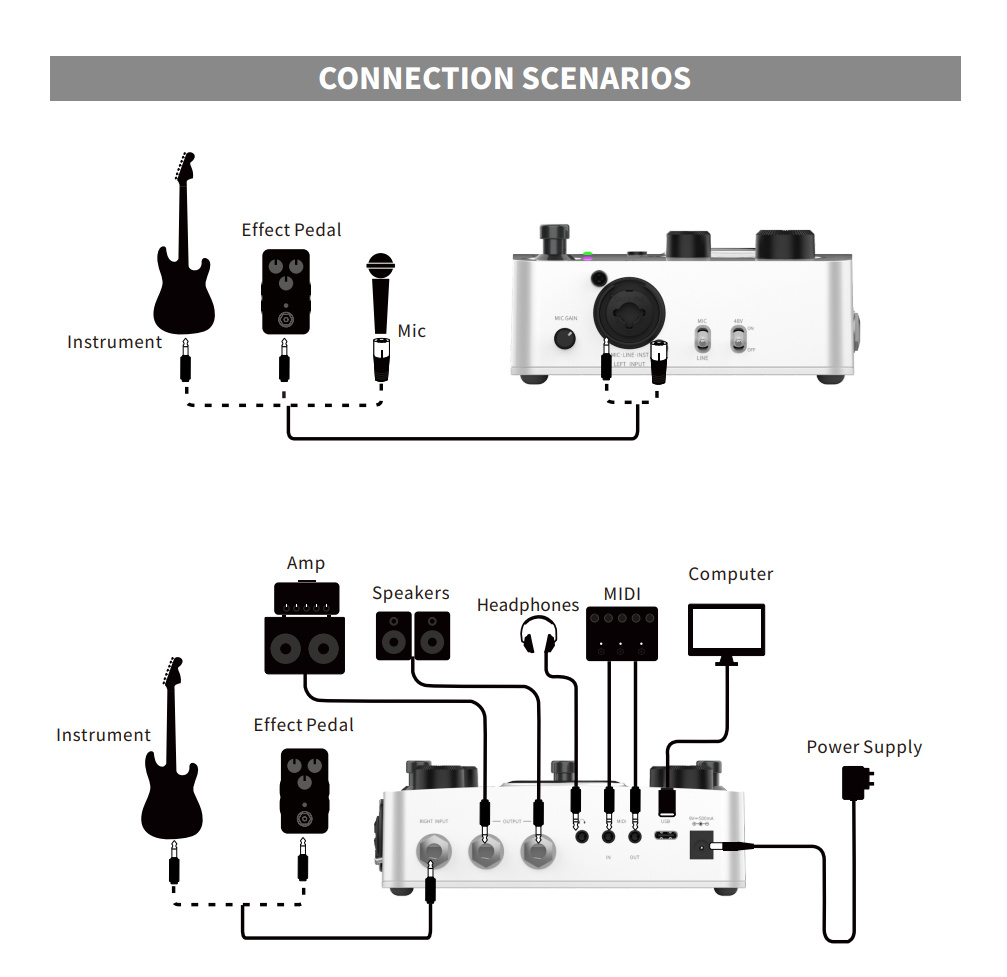
4. Controls and Connections
Familiarize yourself with the various controls and connection points on your GL200 unit.

Front Panel Controls:
- DRUM Knob: Adjusts drum volume.
- SPEED Knob: Controls the tempo of the drum machine.
- LOOPER Knob: Adjusts looper volume.
- MENU/SAVE/DELETE Knob: Navigates menus, saves, and deletes loops/settings.
- AUTO REC Button: Activates automatic recording.
- TAP Button: Tap tempo for drum machine.
- DRUM Button: Toggles drum machine on/off or selects drum patterns.
- REC/PLAY/DUB/UNDO/REDO Footswitch: Multi-function footswitch for recording, playback, overdubbing, undo, and redo.
- STOP/TAP/CLEAR/DELETE Footswitch: Multi-function footswitch for stopping, tap tempo, clearing, and deleting.
- DRUM Footswitch: Dedicated footswitch for drum control.
- 1.28" Round Touchscreen: Main display for visual feedback and interaction.
Side and Rear Panel Connections:

- XLR/¼" Combo Input (Left Input): Connect microphones (XLR) or instruments/line-level sources (¼").
- MIC GAIN Knob: Adjusts the input gain for the microphone/left input.
- 48V ON/OFF Switch: Activates/deactivates 48V phantom power for condenser microphones.
- MIC/LINE/INST Switch: Selects input type for the combo jack.
- ¼" Mono Input (Right Input): Connect instruments or line-level sources for stereo operation.

- L/R Output (¼" Mono): Stereo outputs to an amplifier, mixer, or audio interface.
- Headphones Output (⅛" Stereo): Connect headphones for monitoring.
- MIDI IN/OUT: Connect to MIDI devices using the included 3.5mm TRS to 5-pin MIDI adapter.
- USB-C Port: Connect to a computer for firmware updates, importing/exporting files, and USB audio.
- 9V DC Power Input: Connect the included power adapter.
5. Setup
Follow these steps to set up your MOOER GL200:
- Power Connection: Connect the included 9V DC power adapter to the GL200's power input and then to a power outlet. Use only the original adapter for optimal performance.
- Audio Input:
- For Instruments (Mono): Connect your instrument to the ¼" mono Right Input.
- For Instruments (Stereo) or Line-Level: Connect your instrument/source to both the ¼" Left Input and ¼" Right Input. Ensure the MIC/LINE/INST switch for the Left Input is set appropriately.
- For Microphones: Connect your microphone to the XLR part of the Left Input. If using a condenser microphone, switch on the 48V phantom power. Adjust the MIC GAIN knob as needed.
- Audio Output: Connect the L and R Outputs to your amplifier, speakers, or audio interface using ¼" mono cables. For silent practice, connect headphones to the ⅛" stereo headphone output.
- MIDI Connection (Optional): If using MIDI devices, connect them to the GL200's MIDI IN/OUT ports using the provided 3.5mm TRS to 5-pin MIDI adapter.
- USB Connection (Optional): Connect the USB-C port to your computer using the USB-C to USB-A cable for file management or USB audio functionality.
- Power On: The unit will power on automatically once connected to power.
6. Operating Instructions
6.1 Basic Looping
- Start Recording: Press the REC/PLAY/DUB footswitch once to start recording your loop. The display will indicate recording status.
- Stop Recording/Start Playback: Press the REC/PLAY/DUB footswitch again to stop recording and immediately begin playback of your loop.
- Overdub: While a loop is playing, press the REC/PLAY/DUB footswitch to enter overdub mode. Any new audio played will be added to the existing loop. Press again to exit overdub and continue playback.
- Stop Playback: Press the STOP/TAP footswitch once to stop the loop playback.
- Undo/Redo: While playing or overdubbing, press and hold the REC/PLAY/DUB footswitch to undo the last recorded layer. Press and hold again to redo.
- Clear Loop: With the loop stopped, press and hold the STOP/TAP footswitch to clear the current loop.
6.2 Drum Machine Operation
- Activate Drum Machine: Press the dedicated DRUM footswitch or the DRUM button on the front panel to turn the drum machine on/off.
- Select Drum Pattern: Use the MENU knob and touchscreen to browse and select from 220 patterns in 11 styles.
- Adjust Tempo: Use the SPEED knob to change the drum tempo. Alternatively, tap the TAP button multiple times to set the tempo.
- Adjust Drum Volume: Use the DRUM knob to control the volume of the drum track.
- DrumMatch AI: The GL200 can analyze your playing and suggest suitable drum grooves. Explore this feature via the touchscreen menu.
- Custom Kits & MIDI Patterns: Connect the GL200 to your computer via USB to import custom drum kits and MIDI patterns. Refer to the full manual (if available online) for detailed instructions on file management.
6.3 Touchscreen Control

The 1.28" round touchscreen provides a visual interface for navigating settings, selecting drum patterns, managing loops, and accessing advanced features. Use the MENU knob to scroll through options and tap the screen to confirm selections. Dedicated buttons and footswitches complement the touchscreen for quick access to core functions.
6.4 MIDI Synchronization
The GL200 supports dual TRS MIDI I/O, allowing it to send and receive MIDI clock and control messages. This enables synchronization with other MIDI-compatible devices such as synthesizers, sequencers, or other loopers. Connect your MIDI devices using the provided 3.5mm TRS to 5-pin MIDI adapter and configure MIDI settings via the GL200's menu.
6.5 Bluetooth Audio
The Bluetooth audio feature allows you to stream audio from your smartphone, tablet, or computer directly to the GL200 for practice or jamming. Pair your device with the GL200 through its Bluetooth menu. The streamed audio will be routed through the GL200's outputs, allowing you to play along with backing tracks or lessons.
7. Maintenance
- Cleaning: Use a soft, dry cloth to clean the unit. Do not use liquid cleaners or solvents.
- Storage: Store the GL200 in a dry environment away from extreme temperatures and direct sunlight.
- Power: Always disconnect the power adapter when the unit is not in use for extended periods.
- Firmware Updates: Periodically check the MOOER official website for firmware updates to ensure optimal performance and access to new features. Updates are typically performed via the USB-C connection to a computer.
8. Troubleshooting
| Problem | Possible Cause | Solution |
|---|---|---|
| No power | Incorrect power adapter; loose connection; power outlet issue. | Ensure the correct 9V DC, 500mA (center positive) adapter is used and securely connected. Check the power outlet. |
| No sound output | Incorrect input/output connections; volume knobs turned down; incorrect input type selected. | Verify all audio cables are correctly connected. Check DRUM and LOOPER volume knobs. Ensure MIC/LINE/INST switch is set correctly for your input source. |
| Microphone not working | 48V phantom power off (for condenser mics); MIC GAIN too low; incorrect input type. | Turn on 48V phantom power if using a condenser mic. Increase MIC GAIN. Ensure MIC/LINE/INST switch is set to MIC. |
| Loops sound distorted | Input gain too high. | Reduce the input gain (e.g., MIC GAIN knob) of your instrument or microphone. |
| MIDI sync issues | Incorrect MIDI cable; incorrect MIDI settings. | Ensure you are using the correct 3.5mm TRS to 5-pin MIDI adapter. Check MIDI settings on both the GL200 and your external device. |
| Bluetooth connection fails | Device not in pairing mode; interference. | Ensure the GL200 is in Bluetooth pairing mode and your external device is discoverable. Try restarting both devices. |
9. Specifications
| Feature | Detail |
|---|---|
| Inputs | 1 × XLR/¼" combo (XLR: 2.14 kΩ, ¼": 2.2 MΩ), 1 × ¼" mono (2.2 MΩ) |
| Outputs | 2 × ¼" mono (120 Ω) |
| Headphones | ⅛" stereo (32 Ω) |
| Storage | 100 slots, 800 minutes total recording time |
| Audio Quality | 44.1 kHz / 24-bit |
| Supported File Formats (Import) | WAV, FLAC, APE, MP3, M4A, AAC, OGG, MP4, MOV, WMA, AVI, MPEG |
| Supported File Formats (Export) | WAV |
| Power Requirement | 9V DC, 500 mA, center positive |
| Dimensions (L × W × H) | 146 × 115.6 × 53.2 mm |
| Weight | 364.8 g |
10. User Tips
- Power Adapter: Always use the original 9V DC, 500mA (center positive) power adapter for stable performance and to prevent potential damage.
- Experiment with AI Band: Don't hesitate to explore the DrumMatch AI feature. It can provide unexpected and inspiring drum grooves that adapt to your playing.
- Silent Practice: Utilize the dedicated headphone output for focused practice sessions without disturbing others.
- File Management: Regularly back up your loops and custom drum kits to your computer via the USB-C connection to avoid data loss.
- MIDI Integration: If you have other MIDI gear, integrate the GL200 to unlock synchronized performances and expand your creative possibilities.
11. Warranty and Support
MOOER products are designed and manufactured to high-quality standards. For warranty information, technical support, and service inquiries, please refer to the official MOOER website or contact your authorized dealer. Keep your purchase receipt as proof of purchase for any warranty claims.


