1. Product Overview
The Redragon GMK914 is a single monitor mount designed to enhance your workspace ergonomics and efficiency. Featuring a gas spring adjustable arm, it offers wide compatibility with various monitor sizes and VESA patterns, along with flexible adjustment options for optimal viewing.

Image: The Redragon GMK914 monitor mount, showcasing its main components including the VESA plate, gas spring arm, and both C-clamp and grommet base options.
2. Specifications
| Feature | Detail |
|---|---|
| Model | GMK914 |
| Monitor Size Compatibility | 13 to 32 inches |
| Weight Capacity | 4.4 to 17.6 lbs (2-8 kg) |
| VESA Compatibility | 75x75 mm, 100x100 mm |
| Height Adjustment Range | 10 inches (Min 6.3" to Max 16.3" from desk) |
| Max Extension | 19.27 inches |
| Tilt Angle | +90° / -45° |
| Swivel Angle | 180° (at arm joint), 360° (at base) |
| Rotation | 360° |
| Clamp Mount Desk Thickness | 0.39 - 4.53 inches |
| Grommet Mount Desk Thickness | 0.39 - 3.15 inches |
| Grommet Mount Hole Diameter | 0.39 - 2.36 inches |
3. Setup and Installation
Before installation, ensure your monitor and desk meet the compatibility requirements. The Redragon GMK914 offers two installation methods: C-Clamp and Grommet Mount.
3.1 Compatibility Check
Verify the following before proceeding:
- Monitor Size: Max. 32 inches.
- Monitor Weight: Between 4.4 lbs (2 kg) and 17.6 lbs (8 kg).
- VESA Pattern: 75x75mm or 100x100mm. If your monitor does not have these patterns, a VESA adapter (not included) may be required.
- Desk Compatibility:
- C-Clamp Mount: Desk thickness between 0.39" and 4.53".
- Grommet Mount: Desk thickness between 0.39" and 3.15", with a hole diameter between 0.39" and 2.36".

Image: Visual guide for checking monitor size, weight, VESA pattern, and desk compatibility for both clamp and grommet mounts.
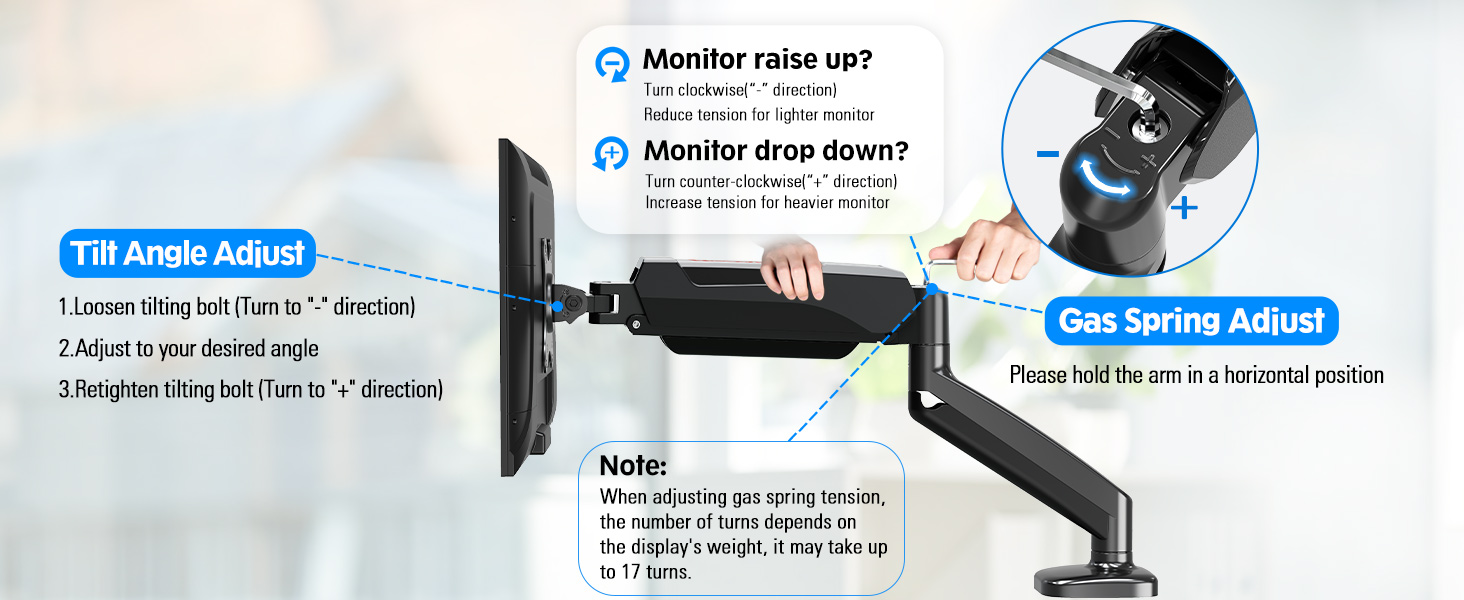
Image: Detailed requirements for clamp mount installation, including minimum contact surface width for underframes, side panel width, and back panel height.
3.2 Choosing an Installation Method
Select the method that best suits your desk setup:
- C-Clamp Mount: Ideal for desks without existing holes or if you prefer a non-permanent solution.
- Grommet Mount: Suitable for desks with a pre-drilled hole or if you desire a more flush and permanent installation.

Image: Visual representation of the C-Clamp and Grommet Mount options, including their respective desk thickness and hole diameter requirements.
3.3 General Installation Steps (Refer to included hardware for specific fasteners)
- Attach Mounting Base to Desk: Securely fasten either the C-clamp or grommet base to your desk according to the chosen method. Ensure it is tight and stable.
- Assemble Arm: Connect the gas spring arm components as per the diagram in your product packaging.
- Attach VESA Plate to Monitor: Screw the VESA plate to the back of your monitor using the appropriate screws for your monitor's VESA pattern.
- Mount Monitor to Arm: Carefully slide or attach the monitor (with VESA plate) onto the arm's VESA head. Ensure it clicks into place or is securely fastened.
- Adjust Gas Spring Tension: This is crucial for proper monitor balance. Refer to the "Operating" section for detailed instructions.
4. Operating Instructions
The Redragon GMK914 monitor mount provides extensive adjustability to achieve an ergonomic viewing position.
4.1 Height Adjustment
The gas spring arm allows for smooth vertical movement. Gently push or pull your monitor to the desired height. The arm offers a 10-inch adjustable range, with a minimum height of 6.3 inches and a maximum height of 16.3 inches from the desk surface.

Image: The monitor arm demonstrating its vertical height adjustment capabilities, showing minimum and maximum heights and the total adjustable range.
4.2 Tilt, Swivel, and Rotation
Customize your viewing angle with the following movements:
- Tilt: Adjust the monitor screen +90° upwards to -45° downwards. Loosen the tilting bolt (turn "-" direction), adjust to your desired angle, then retighten the tilting bolt (turn "+" direction).
- Swivel: The arm can swivel 180° at the arm joint and 360° at the base.
- Rotation: Rotate the monitor 360° for seamless transitions between landscape and portrait orientations.

Image: Visual guide to the monitor arm's full range of motion, including 360° swivel, 180° swivel, 360° rotation, and +90°/-45° tilt.

Image: Further illustration of the tilt, 360° rotation, and 180° swivel adjustments available with the monitor arm.
4.3 Gas Spring Tension Adjustment
The gas spring tension needs to be adjusted to match your monitor's weight for proper balance and smooth movement. Please hold the arm in a horizontal position during adjustment.
- Monitor raises up (too light): Turn the adjustment screw clockwise ("-" direction) to reduce tension for a lighter monitor.
- Monitor drops down (too heavy): Turn the adjustment screw counter-clockwise ("+" direction) to increase tension for a heavier monitor.
Note:
- When adjusting gas spring tension, the number of turns depends on the display's weight. It may take up to 17 turns to find the optimal tension.
- Always support the monitor when making adjustments to prevent sudden drops or movements.
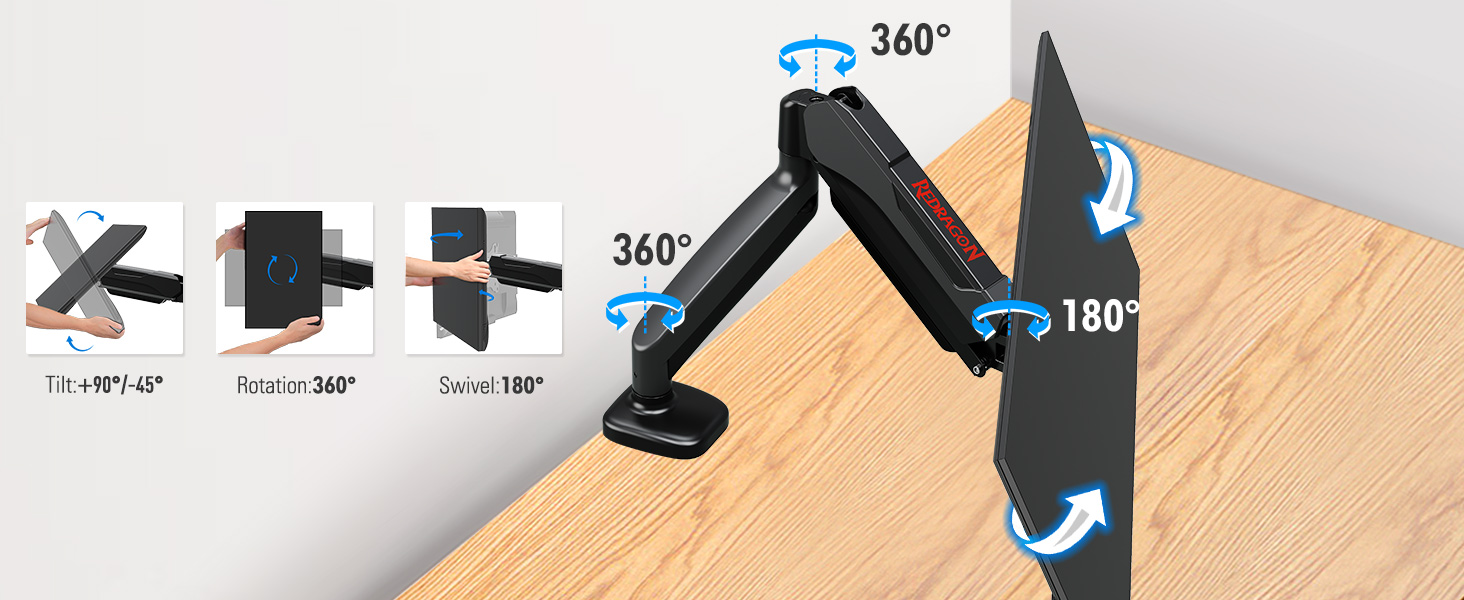
Image: Instructions for adjusting the gas spring tension (clockwise for lighter, counter-clockwise for heavier monitors) and tilt angle adjustment.
5. Cable Management
The Redragon GMK914 features an integrated cable management system to keep your workspace tidy and free from clutter.
- Route your monitor cables (power, video, etc.) along the underside of the arm.
- Use the provided cable clips or channels to secure the cables neatly.
- Ensure cables have enough slack to allow for full range of motion without tension.

Image: The monitor arm with a blue cable routed through its integrated cable management system, demonstrating how to hide wires.
6. Maintenance
The Redragon GMK914 monitor mount is designed for durability and requires minimal maintenance.
- Cleaning: Wipe the surface of the mount with a soft, damp cloth. Avoid using abrasive cleaners or solvents that could damage the finish.
- Periodic Check: Periodically check all screws and connections to ensure they remain tight and secure. Re-tighten if necessary.
- Gas Spring: The gas spring is a sealed unit and does not require lubrication or maintenance. If you experience issues with the gas spring, refer to the troubleshooting section or contact support.
7. Troubleshooting
- Monitor is too high/low or drifts: Adjust the gas spring tension as described in Section 4.3. Ensure the monitor weight is within the specified range (4.4-17.6 lbs).
- Monitor does not tilt or rotate smoothly: Check if the tilt bolt is too tight. Loosen it slightly, adjust, then re-tighten. Ensure no cables are obstructing movement.
- Mount feels unstable: Ensure the C-clamp or grommet base is securely fastened to the desk. Check desk thickness compatibility.
- Cables are not staying in place: Ensure cables are properly routed through the cable management channels and secured with any provided clips.
8. User Tips
While no specific user reviews or Q&A were available for direct inclusion, here are some general tips for optimizing your monitor mount experience:
- Ergonomic Setup: Position your monitor so the top of the screen is at or slightly below eye level. Your eyes should be about an arm's length away from the screen.
- Cable Management: Take advantage of the integrated cable management to keep your desk clean and prevent cable damage.
- Regular Adjustments: Don't be afraid to adjust your monitor's position throughout the day to reduce strain, especially during long work sessions.
- Desk Stability: Ensure your desk is stable enough to support the weight of the monitor and the mount, especially when extending the arm.
9. Warranty and Support
For warranty information, technical support, or replacement parts, please contact Redragon customer service or refer to the official Redragon website. Keep your purchase receipt as proof of purchase.