
1. Introduction
The XIEGU VM-01 is a portable vertical telescopic shortwave antenna designed for amateur radio enthusiasts. It covers a wide frequency range from 5MHz to 50MHz, making it suitable for various HF shortwave radio operations, including use with XIEGU G90 and X6100 transceivers. Its segmented, detachable design and included carrying bag ensure easy transport and quick setup for outdoor use.

2. Safety Information
WARNING:
- Antennas are metal conductors. Always keep the antenna away from unsafe locations such as high-voltage cables, power lines, and other electrical hazards.
- If operating this equipment during thunderstorms, take appropriate lightning protection measures to avoid harm to personnel and equipment. However, it is strongly recommended to completely remove the antenna and avoid use during thunderstorm weather.
- Ensure the ground nail is securely inserted into the ground to provide proper grounding and stability.
3. Package Contents
Please check the package carefully to ensure all items are present and undamaged:
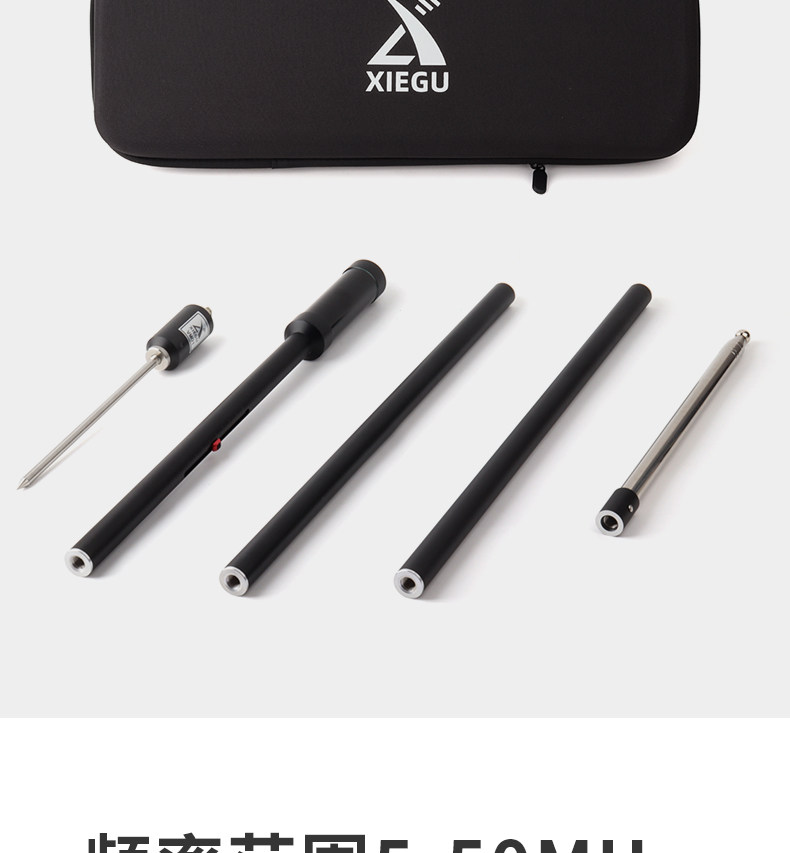
- 1 x Ground Nail and Antenna Base
- 1 x Tuning Coil
- 1 x Main Connection Rod (consists of multiple segments)
- 1 x Telescopic Antenna (Pull Rod Antenna)
- 3 x Grounding Wires (approx. 5m each)
- 1 x Storage Bag
- Instruction Manual (this document)
- Warranty Card


4. Setup and Installation
The antenna is designed for easy assembly. Follow these steps for proper installation:
-
Insert Ground Nail: Insert the "ground nail and pre-installed antenna base" almost completely into the ground. The deeper the insertion, the better the grounding effects, but ensure the antenna base remains above ground level.

Figure 4: Step 1 of installation: Inserting the ground nail. -
Install Tuning Coil: Install the "tuning coil" onto the "grounding pin with pre-installed antenna base".

Figure 5: Step 2 of installation: Connecting the tuning coil. -
Connect Main Connecting Rods: Install the two segments of the "main connecting rod" on top of the "tuning coil". These rods extend the overall length of the antenna.

Figure 6: Step 3 of installation: Connecting the first main connecting rod. 
Figure 7: Step 4 of installation: Connecting the second main connecting rod. -
Install Telescopic Antenna: Finally, install the "telescopic antenna" (pull rod antenna) on top of the main connecting rods.

Figure 8: Step 5 of installation: Connecting the pull rod antenna. -
Connect Ground Cables: Use banana plugs to connect the three accompanying "ground cables" to the three holes on the grounding pin with the pre-installed antenna base. In portable situations, distribute the wires evenly around the antenna base as much as possible.

Figure 9: Step 6 of installation: Connecting the ground network cable. 
Figure 10: The three 5m ground network cables.
At this point, the physical construction of your antenna is complete.
5. Operating and Tuning
After assembly, the antenna needs to be tuned to achieve optimal SWR (Standing Wave Ratio) at your desired operating frequency. An antenna analyzer (such as NanoVNA, not included) is required for this process.
- Connect Antenna Analyzer: Connect your antenna analyzer to the antenna base using a suitable length of 50ohm coaxial cable.
-
Tuning for Frequencies Below 18MHz:
- Pull the "telescopic antenna" to its maximum length.
- Use the "tuning coil" to adjust for optimal SWR. Slide the red marker on the tuning coil to find the best SWR for your desired frequency.

Figure 11: Adjustment for frequencies below 18MHz: Adjust tuning coil scale when pull rod antenna is fully open. -
Tuning for Frequencies Above 18MHz:
- Either remove the 'tuning coil' completely or move its slider to the very top (maximum inductance bypassed).
- Adjust the length of the 'telescopic antenna' (pull rod antenna) to achieve optimal SWR at the desired frequency.

Figure 12: Adjustment for frequencies higher than 18MHz: Remove tuning coil or move slider to top, adjust length of pull rod antenna.
The antenna covers amateur bands from 5MHz to 50MHz. The SWR can be adjusted to less than 1.5:1.


6. Specifications
| Feature | Specification |
|---|---|
| Brand | XIEGU |
| Model | VM-01 (NL-550) |
| Frequency Range | 5MHz - 50MHz |
| SWR (after tuning) | ≤ 1.5 : 1 |
| Impedance | 50 ohms |
| Maximum Power | 100W (CW); 150W (PEP for SSB) |
| Maximum Visible Length | 3.7m |
| Ground Radial Length | Approx. 5m (3 cables) |
| Total Weight | 1.8kg |
| Net Weight | 1.0kg |
| Storage Bag Size | 54 x 19 x 8cm |
| Body Material | Metal |
| Interface | M female |
| Battery Included | No |
| Bluetooth | No |
| Origin | Mainland China |
| Certification | None |


7. Maintenance
- Cleaning: Wipe down the antenna components with a clean, dry cloth after each use, especially if used in dusty or damp environments.
- Storage: When not in use, disassemble the antenna and store all components in the provided carrying bag to protect them from damage and environmental exposure.
- Inspection: Periodically inspect all connections, rods, and cables for any signs of wear, corrosion, or damage. Replace any damaged parts immediately to ensure optimal performance and safety.
- Ground Nail: Ensure the ground nail is clean and free of rust for effective grounding.
8. Troubleshooting
- High SWR readings:
-
- Ensure all antenna components are securely connected.
- Verify that the ground cables are properly connected and spread out.
- Re-tune the antenna carefully using an antenna analyzer, following the instructions in Section 5.
- Check for any obstructions or nearby metal objects that might be affecting antenna performance.
- Inspect the coaxial cable connecting the antenna to the radio/analyzer for damage.
- Poor signal reception/transmission:
-
- Confirm the antenna is tuned to the correct frequency.
- Check the connection to your radio.
- Ensure the antenna is deployed in an open area, away from buildings or dense foliage.
9. User Tips
- For best results, always use an antenna analyzer to fine-tune the SWR for each operating frequency.
- When deploying the ground radials, try to lay them out as straight as possible and evenly spaced around the antenna base for optimal performance.
- Consider using additional guy lines or supports in windy conditions to ensure antenna stability, although not explicitly included, this can prevent damage.
- Keep the telescopic elements clean and lubricated (if necessary, with a non-conductive lubricant) to ensure smooth extension and retraction.
10. Warranty and Support
This product comes with a warranty card included in the package. Please refer to the warranty card for details regarding warranty coverage and terms. For technical support or inquiries, please contact your retailer or the manufacturer directly using the contact information provided on the warranty card or the product packaging.