
1. Introduction
The Nicetymeter 0310-019T (Model WS0300) is a professional WiFi wireless weather station designed to provide comprehensive weather data. It features an integrated outdoor sensor array and a large, high-definition color LCD indoor display console. This manual will guide you through the setup, operation, and maintenance of your weather station to ensure accurate and reliable weather monitoring.

2. Package Contents
Please check the box for the following items:
- Indoor Display Console (1 PC)
- Outdoor Sensor Array (1 PC)
- Base Upper and Lower Cover (1 Set)
- Straight Rod (30CM length) (1 PC)
- φ3 Screws (2 Sets)
- φ5 Screws (4 Sets)
- Power Adapter (1 PC)
- User Manual (Neutral English) (1 PC)
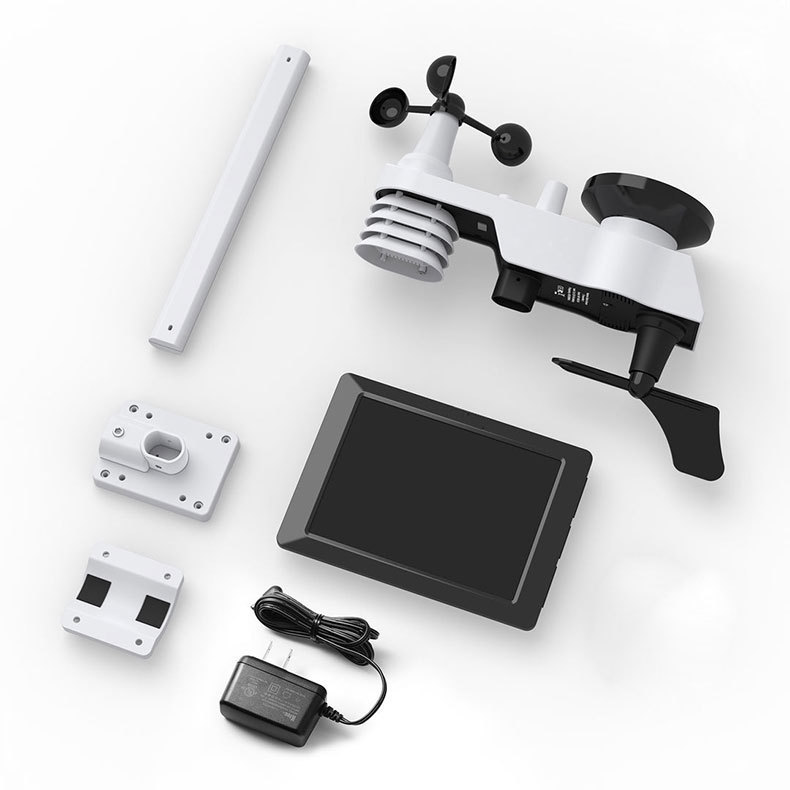
3. Components Overview
3.1 Outdoor Sensor Array
The outdoor sensor is an all-in-one integrated unit capable of measuring multiple environmental parameters simultaneously. It includes:
- Wind Cups: Measure wind speed.
- Rain Collector: Measures rainfall.
- UV and Light Sensor: Detects UV index and illuminance.
- Level Indicator: Helps ensure proper horizontal mounting.
- Solar Panel: Provides power to the sensor.
- Thermo-Hygrometer Radiation Shield: Protects temperature and humidity sensors from direct sunlight and rain.
- Wind Vane: Measures wind direction.

3.2 Indoor Display Console
The indoor receiver features a large, high-definition color LCD display that shows indoor temperature and humidity, atmospheric pressure, weather forecast, moon phase, perpetual calendar, and alarm clock functions.

4. Setup Instructions
Follow these steps to set up your weather station:
4.1 Power Supply
Ensure both the outdoor sensor and indoor console have power before proceeding.
- Indoor Display Console: Can be powered by the included 5.9V/500mA power adapter or 3 AA alkaline batteries (not included).
- Outdoor Sensor Array: Primarily powered by its integrated solar panel. For backup or initial setup, insert 2 AA alkaline batteries (not included).

4.2 Outdoor Sensor Assembly and Mounting
- Assemble the outdoor sensor array components as shown in the diagram, ensuring all parts are securely attached.
- Insert 2 AA alkaline batteries into the outdoor sensor's battery compartment.
- Mount the outdoor sensor in an open area, away from obstructions, to ensure accurate readings for wind, rain, and sunlight. Use the provided straight rod and mounting brackets. The sensor can be mounted on top, on the side, or on a pole.
- Ensure the sensor is level using the built-in level indicator for optimal accuracy.
Important Note: The outdoor sensor array must be powered and updating before powering up the console, or the console will stop scanning and connecting with the sensors.
4.3 Initial Power-Up and Synchronization
- After powering the outdoor sensor, plug in the indoor display console using the power adapter or insert 3 AA batteries.
- The console will automatically attempt to connect with the outdoor sensor. This may take a few minutes.
- Once connected, outdoor data will appear on the display.
4.4 WiFi Setup and Online Synchronization
Your weather station can synchronize data with online weather services like Weather Underground and Weathercloud. This requires a 2.4GHz WiFi network.
- Follow the on-screen instructions on the display console or refer to the detailed manual for WiFi configuration steps.
- Connect the console to your home's 2.4GHz WiFi network (802.11 b/g/n standard).
- Once connected, you can register your station on www.wunderground.com and www.weathercloud.net to view your data online and via mobile apps.

5. Operation
The display console provides a wealth of information at a glance. Values are displayed in different colors for clarity.
5.1 Displayed Information
The 8.3-inch LCD screen shows the following data:
- Indoor and Outdoor Temperature (°C/°F)
- Indoor and Outdoor Humidity
- Wind Speed (m/s, km/h, knots, mph, bft)
- Wind Direction (8 points)
- 24-Hour Weather Forecast
- Atmospheric Pressure (hPa)
- Rainfall Data (in inches or millimeters): 1 hour, 24 hours, week, month, and total
- Light Intensity and UV Index
- Time, Week, and Calendar Display
- Moon Phase
- Dew Point
5.2 Alarm Clock Function
The indoor console includes an alarm clock feature. Refer to the detailed manual for setting and managing alarms.
6. Maintenance
To ensure the longevity and accuracy of your weather station, follow these maintenance guidelines:
- Battery Replacement: Replace AA batteries in both the console and outdoor sensor when the low battery indicator appears on the display.
- Cleaning: Periodically clean the outdoor sensor array, especially the rain collector and solar panel, to remove dirt, leaves, or debris that may affect readings. Use a soft, damp cloth. Do not use abrasive cleaners.
- Sensor Placement: Regularly check that the outdoor sensor remains securely mounted and level.
7. Troubleshooting
If you encounter issues with your weather station, try the following:
- No Outdoor Data: Ensure the outdoor sensor has fresh batteries and is powered on before the indoor console. Check the transmission distance (max 100 meters in open areas) and any potential obstructions.
- Incorrect Readings: Verify the outdoor sensor is mounted level and free from obstructions. Ensure the rain collector is clean.
- WiFi Connection Issues: Confirm your WiFi network is 2.4GHz. Re-enter WiFi credentials if necessary. Ensure the console is within range of your router.
- Console Not Responding: Try restarting the console by removing and reinserting batteries or unplugging and replugging the power adapter.
8. Specifications
| Parameter | Value |
|---|---|
| Model Number | WS0300 / 0310-019T |
| DIY Supplies | Electrical |
| Origin | Mainland China |
| Certification | CE |
| Outdoor Temperature Range | -40 °C ~ +60 °C (±1 °C accuracy) |
| Indoor Temperature Range | 0 °C ~ +60 °C (±1 °C accuracy) |
| Humidity Range | 10% ~ 99% RH (1% resolution, ±5% accuracy) |
| Air Pressure Range | 300 to 1100 hPa (±3 hPa accuracy) |
| Rainfall Range | 0 - 9999 mm |
| Wind Speed Range | 0 ~ 50 m/s |
| Wind Speed Accuracy | 2 m/s ~ 50 m/s |
| Wind Direction Accuracy | 8 points |
| Sampling Time | 60 seconds |
| WiFi Standard | 802.11 b/g/n |
| Wireless Frequency | 2.4 GHz |
| WiFi Transmission Line of Sight | 20 meters |
| Data Base Stations | www.wunderground.com and www.weathercloud.net |
| Receiver Power Source | 3 AA alkaline batteries or 5.9V/500mA power adapter |
| Transmitter Power Source | Solar panel with 2 AA alkaline batteries (backup) |
| Display Console Frame Size (LxHxW) | 215 x 22 x 158 mm |
| LCD Size (LxW) | 125 x 170 mm |
| Product Gross Weight | 1750g |
9. User Tips
- For best wind and rain readings, ensure the outdoor sensor is mounted in an open area, free from trees, buildings, or other obstructions.
- Regularly check the solar panel on the outdoor sensor for cleanliness to ensure efficient charging of the backup batteries.
- If you experience intermittent data, try repositioning the indoor console or outdoor sensor to improve signal strength, keeping within the 100m transmission range.
10. Warranty and Support
For any technical assistance, warranty claims, or product inquiries, please contact the seller directly. Keep your purchase receipt as proof of purchase for warranty purposes.
Contact Information:
Email: suya416@163.com