1. Introduction
This manual provides essential information for the safe and efficient operation, assembly, and maintenance of your DEKOPRO 13-Amp Electric Leaf Mulcher/Shredder. Please read this manual thoroughly before initial use and keep it for future reference.

Figure 1: DEKOPRO Electric Leaf Mulcher/Shredder with included leaf scoops and cutting lines.
2. Safety Information
Always observe basic safety precautions to reduce the risk of fire, electric shock, and personal injury. This device is intended for shredding leaves and light garden debris only. Do not use for other purposes.
- Wear appropriate personal protective equipment (PPE), including eye protection, gloves, and hearing protection.
- Ensure the mulcher is on a stable, level surface before operation.
- Keep hands, feet, and loose clothing away from the shredding mechanism.
- Do not operate in wet conditions or allow water to come into contact with electrical components.
- Unplug the unit before performing any maintenance or clearing jams.
- Keep children and pets away from the operating area.
3. Product Features
- Powerful Motor: 13-Amp motor with 8200 RPM no-load speed.
- High Efficiency: Shreds up to 55 gallons of leaves per minute.
- Blade-Free Design: Utilizes durable nylon cutting lines for shredding.
- Tool-Free Line Replacement: Cutting lines can be easily replaced without tools. Includes 20 extra cutting lines.
- High Mulching Ratio: Achieves a 17:1 mulching ratio, significantly reducing debris volume.
- Adjustable Control Dial: Allows selection of cutting modes for various debris types (wet leaves/grass/thatch, coarse, pine needle).
- Portable Design: Lightweight, disassemblable for storage, and equipped with two sturdy wheels for easy transport.
- Output Power: 2500W.
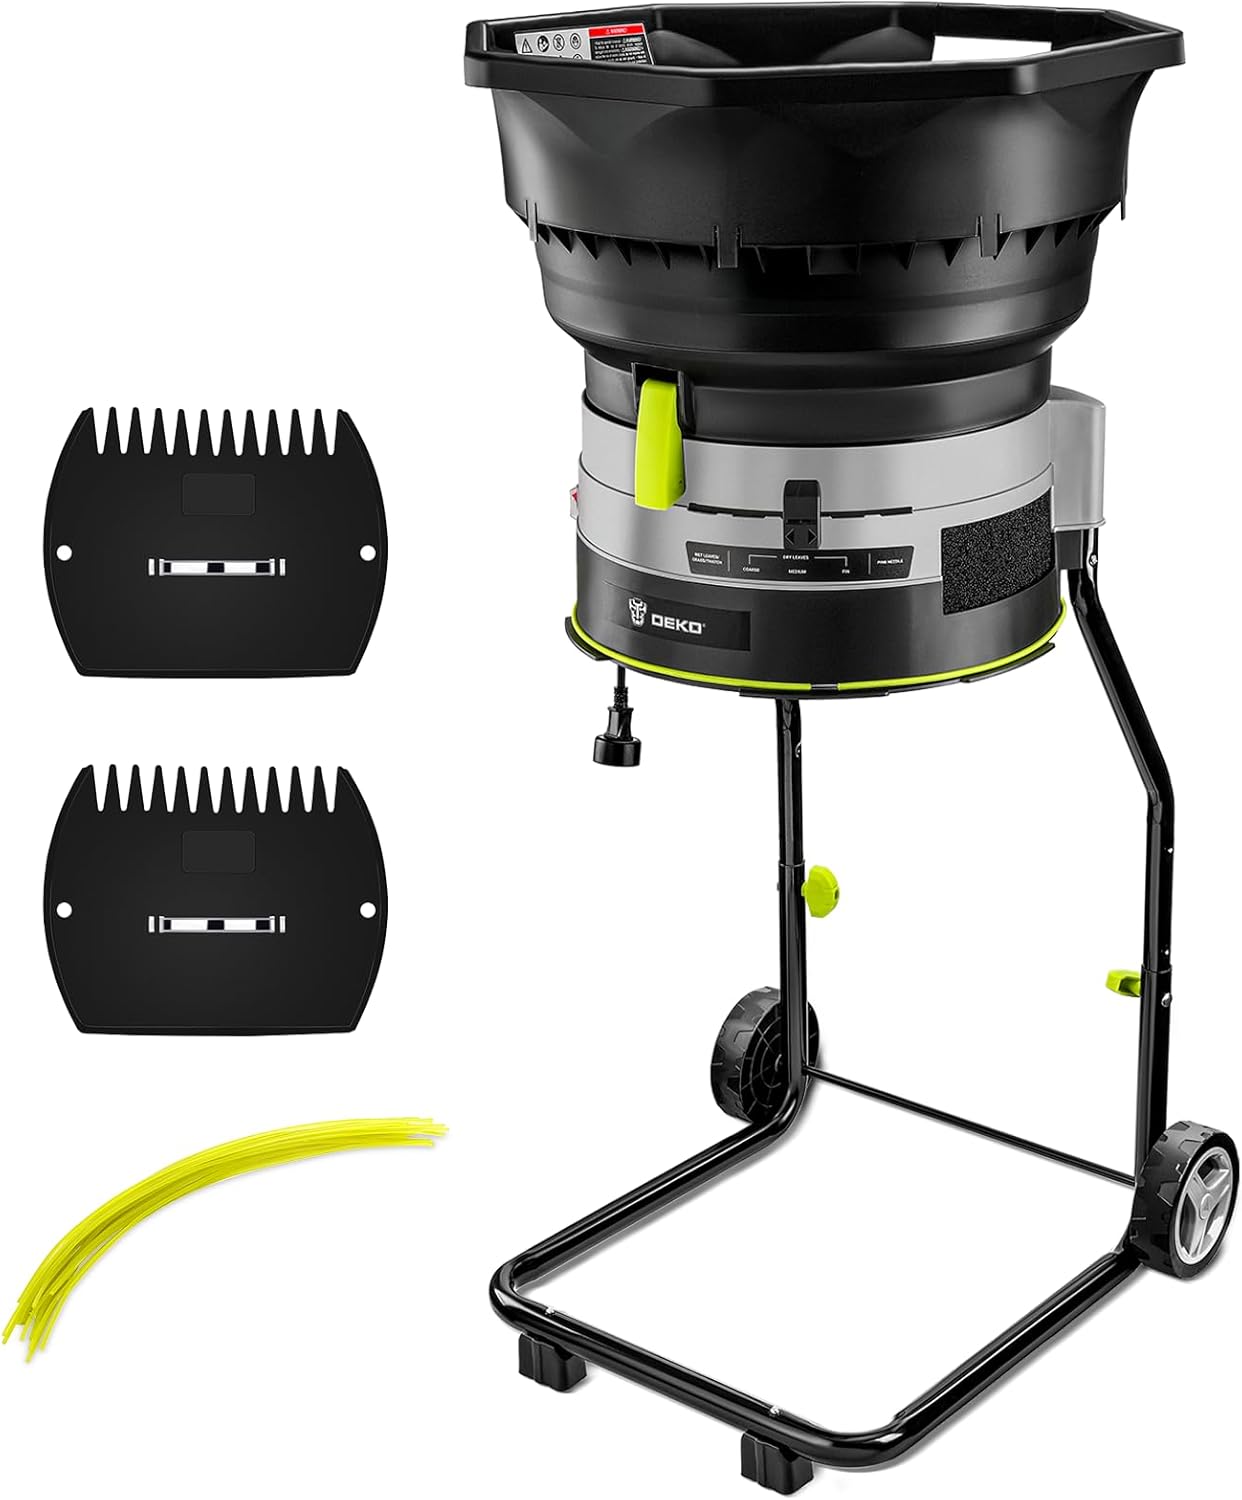
Figure 2: Key features including 21-inch cutting diameter and adjustable control lever.
4. Assembly and Setup
The DEKOPRO Electric Leaf Mulcher/Shredder is designed for easy assembly. Follow these steps to set up your unit:
- Unpack Components: Carefully remove all parts from the packaging. Verify that all components are present: main mulcher unit, stand with wheels, leaf scoops, and cutting lines.
- Assemble the Stand: Attach the main mulcher unit to the wheeled stand. Ensure all fasteners are securely tightened.
- Install Cutting Lines: The mulcher uses nylon cutting lines. Ensure they are properly installed in the designated slots. Refer to the maintenance section for detailed instructions on replacing cutting lines.
- Position the Unit: Place the assembled mulcher on a firm, level surface in your work area. Ensure there is adequate space around the unit for safe operation and debris collection.
- Prepare for Debris Collection: Position a collection bag (not included) or container directly beneath the mulcher's output chute to collect shredded material.
5. Operating Instructions
Before operating, ensure the unit is properly assembled and all safety precautions are observed.
- Connect Power: Plug the mulcher into a standard 120V, 60Hz electrical outlet. Ensure the power cord is free from damage and positioned to avoid tripping hazards.
- Select Mulching Setting: Use the adjustable control dial on the side of the unit to select the appropriate setting for the type of debris you are processing.
- "WET LEAVES/GRASS/THATCH": For moist, soft materials.
- "COARSE": For general dry leaves and mixed debris.
- "PINE NEEDLE": For fine, stringy materials like pine needles.
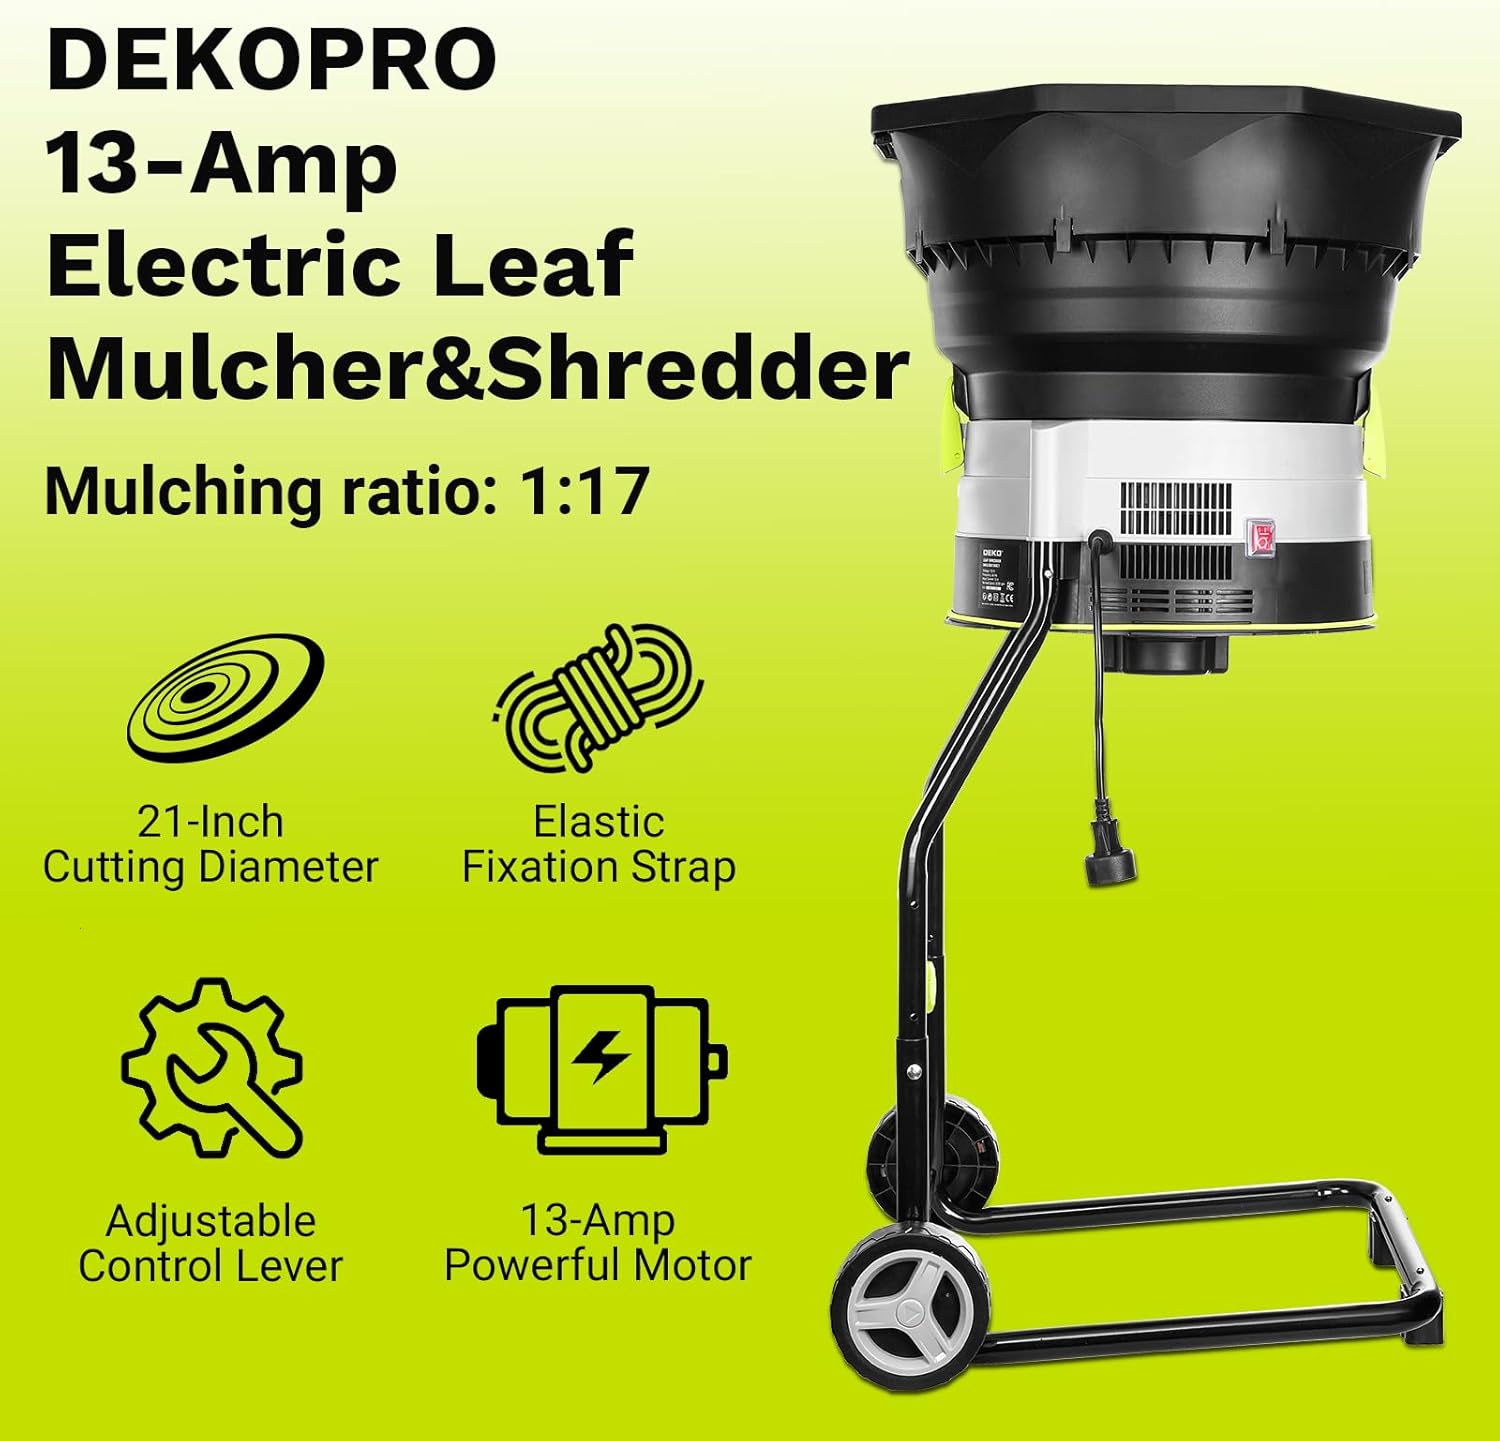
Figure 3: Control lever for adjusting pellet sizes based on material type.
- Start the Unit: Turn on the mulcher using the power switch. Allow the motor to reach full speed before feeding material.
- Feed Material: Carefully feed leaves and other approved garden debris into the top hopper. Do not overload the unit. Use the included leaf scoops to safely guide material into the hopper, keeping hands clear of the opening.
- Monitor Debris Collection: Periodically check the collection bag/container and empty it as needed to prevent clogging.
- Shut Down: When finished, turn off the power switch and unplug the unit from the electrical outlet. Allow the motor to come to a complete stop before leaving the area.
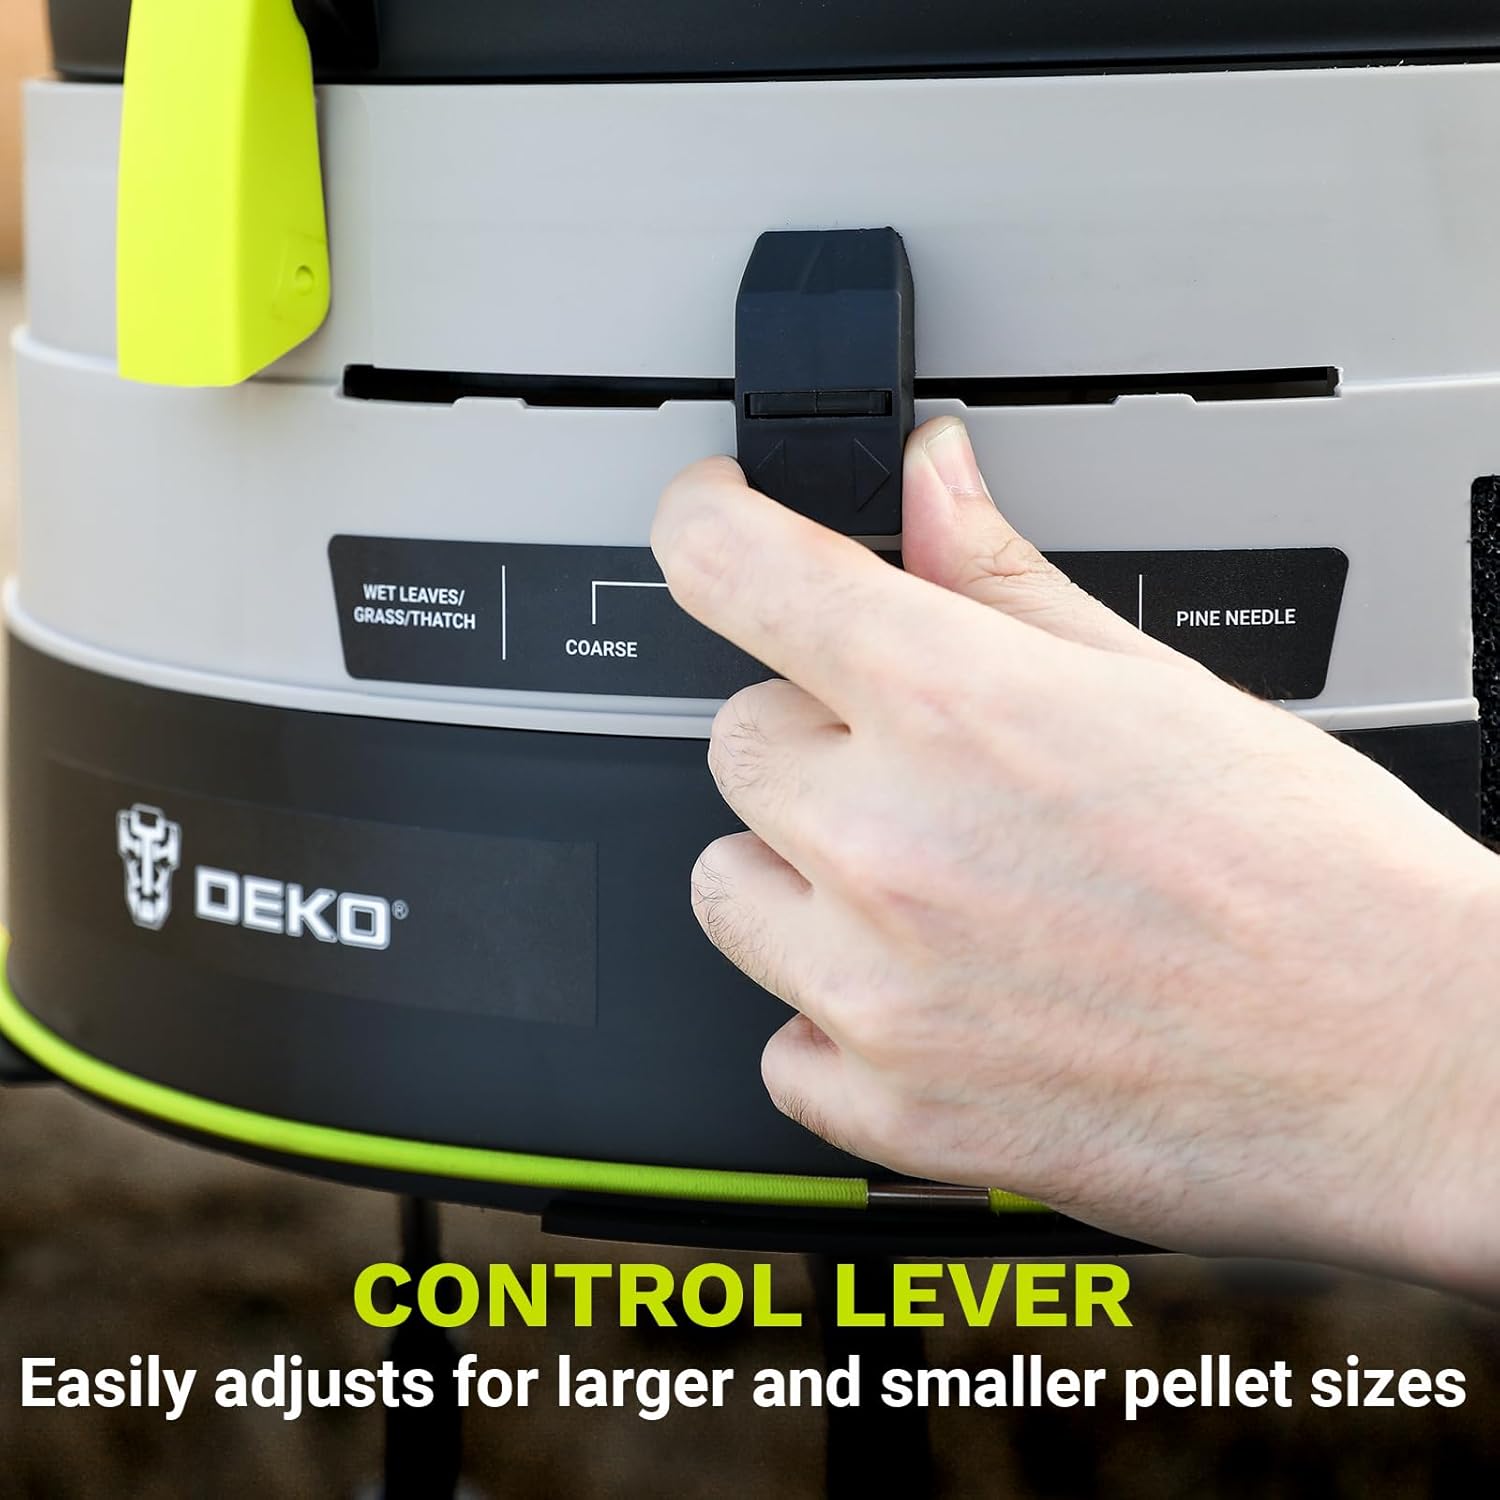
Figure 4: Mulcher in use with a collection bag.
6. Maintenance
Regular maintenance ensures optimal performance and extends the life of your mulcher. Always unplug the unit before any maintenance.
6.1. Replacing Cutting Lines
The mulcher's blade-free design uses nylon cutting lines that wear over time. Replacement is simple and tool-free.
- Ensure the mulcher is unplugged and the motor has completely stopped.
- Locate the cutting line slots within the shredding chamber.
- Remove the worn cutting lines by pulling them out.
- Insert new nylon cutting lines (20 extra lines are included with your purchase) into the slots until they are securely seated.
- Ensure the new lines are properly aligned before resuming operation.
6.2. Cleaning and Storage
- After each use, unplug the unit and allow it to cool.
- Clean any accumulated debris from the hopper, shredding chamber, and output chute. A brush or compressed air can be used.
- Wipe down the exterior surfaces with a damp cloth. Do not use harsh chemicals or abrasive cleaners.
- For long-term storage, the unit can be disassembled. Store the mulcher in a dry, protected area away from direct sunlight and extreme temperatures.
7. Troubleshooting
This section addresses common issues you might encounter. For problems not listed here, please contact customer support.
| Problem | Possible Cause | Solution |
|---|---|---|
| Unit does not start |
|
|
| Poor shredding performance |
|
|
| Unit clogs frequently |
|
|
8. Specifications

Figure 5: Electrical and performance parameters.
| Parameter | Value |
|---|---|
| Brand | DEKOPRO |
| Power Source | Electric (Corded) |
| Motor | 13-Amp |
| Voltage Frequency | 120V, 60Hz |
| No-load Speed | 8200 RPM |
| Output Power | 2500W |
| Mulching Ratio | 17:1 |
| Cutting Diameter | 21 inches |
| Product Dimensions (Approx.) | 21" (W) x 41" (H) x 17.5" (D) |
| Leaf Scoop Dimensions (Approx.) | 15" (W) x 11.5" (H) |
| Weight | 10.57 kg (23.3 lbs) |
| Included Accessories | 20 extra cutting lines, 2 leaf scoops |
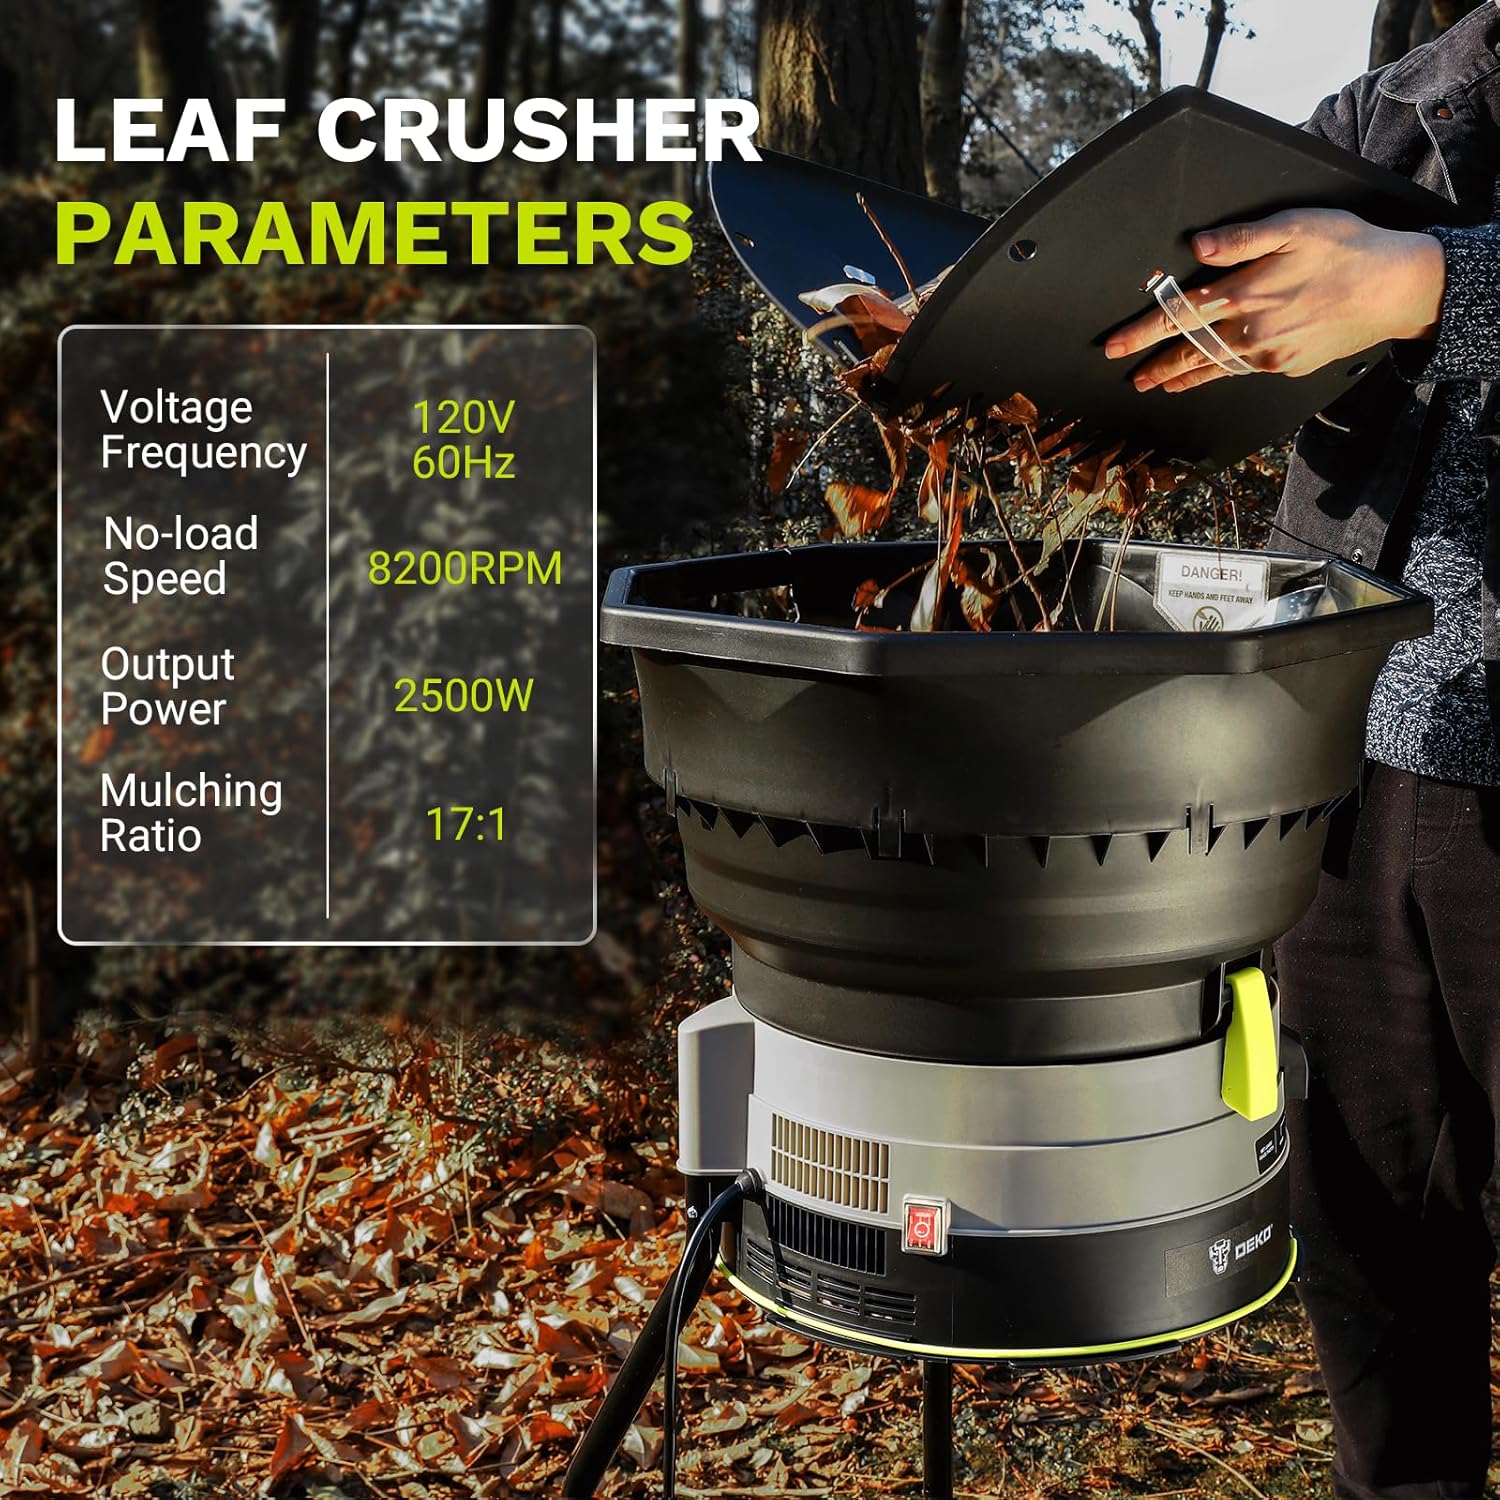
Figure 6: Product dimensions and included accessories.
9. User Tips
- For best results, ensure leaves are as dry as possible before mulching, unless using the "WET LEAVES" setting.
- Vary the type of material fed into the mulcher to prevent clogs and ensure even shredding.
- Regularly check the condition of the nylon cutting lines and replace them promptly when they show signs of wear to maintain optimal performance.
- When mulching large quantities, take short breaks to allow the motor to cool and prevent overheating.
10. Warranty and Support
For any questions, technical assistance, or support regarding your DEKOPRO Electric Leaf Mulcher/Shredder, please contact customer service through your order platform. Our professional support team aims to provide a response within 18 hours.
Please retain your proof of purchase for any warranty claims.