1. Product Overview
The CEM DT-172 is a compact and reliable data logger designed to measure and record temperature and humidity levels. It features a large LCD display, sound and light alarms, and the capacity to store up to 32,000 data points (16,000 for temperature and 16,000 for humidity). This device is ideal for monitoring environmental conditions in warehouses, buildings, laboratories, and during transportation.
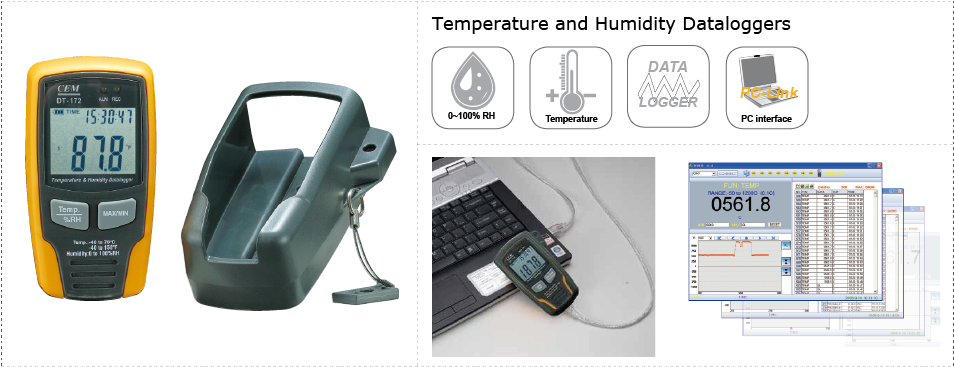
Figure 1: Front view of the DT-172 Data Logger, highlighting the display and control buttons.
Video 1: Unboxing and demonstration of mounting the DT-172 data logger.
2. Package Contents
Ensure all items are present and in good condition:
- CEM DT-172 Data Logger
- Mounting bracket
- USB cable
- Software CD (for data analysis)
- Security lock (optional, for securing the device)
- User Manual (this document)
- Battery (1/2AA 3.6V Lithium battery)

Figure 2: Contents of the DT-172 package.
3. Setup and Installation
3.1 Battery Installation
- Locate the battery compartment on the back of the device.
- Unscrew the battery cover.
- Insert the 1/2AA 3.6V Lithium battery, ensuring correct polarity.
- Replace the battery cover and secure it with the screw.

Figure 3: Back view of the DT-172, showing the battery compartment and safety notice.
3.2 Software Installation
- Insert the provided software CD into your computer's CD-ROM drive.
- Follow the on-screen instructions to install the data logger software.
- Once installed, connect the data logger to your computer using the supplied USB cable.
- The software should automatically detect the device.
3.3 Mounting the Device
The DT-172 comes with a mounting bracket for secure placement:
- Attach the mounting bracket to a desired surface using appropriate screws (not included).
- Slide the DT-172 data logger into the mounting bracket until it clicks securely into place.
- Optionally, use the provided security lock to prevent unauthorized removal.
4. Operating Instructions
4.1 Basic Operation
- Power On/Off: The device typically powers on automatically upon battery insertion. To power off, remove the battery.
- Display Readings: The LCD display shows current temperature and humidity readings, along with time and battery status.
- Temp. %RH Button: Press this button to cycle through temperature (°C/°F) and humidity (%RH) display modes.
- MAX/MIN Button: Press this button to view the maximum and minimum recorded temperature and humidity values.
4.2 Data Logging
The DT-172 automatically logs data at a user-defined interval. Configuration is done via the PC software:
- Connect the data logger to your computer and launch the software.
- In the software, set the desired logging interval (from 1 second to 24 hours).
- Configure alarm thresholds for temperature and humidity if needed.
- Start the logging process from the software. The device will begin recording data.
- Disconnect the device from the computer. It will continue logging independently.
4.3 Data Retrieval and Analysis
- Reconnect the data logger to your computer.
- Open the data logger software.
- Download the recorded data from the device to your computer.
- The software allows for graphical analysis, data export (e.g., to Excel), and report generation.
4.4 Alarm Function
The DT-172 features sound and light alarms. These alarms are triggered when measured temperature or humidity values exceed the pre-set upper or lower limits configured in the software. The device will emit an audible alert and flash an LED indicator.
5. Maintenance
- Cleaning: Wipe the device with a soft, dry cloth. Do not use abrasive cleaners or solvents.
- Battery Replacement: Replace the 1/2AA 3.6V Lithium battery when the low battery indicator appears on the display. Ensure proper disposal of old batteries.
- Storage: When not in use for extended periods, store the data logger in a cool, dry place, preferably with the battery removed to prevent leakage.
- Software Updates: Periodically check the manufacturer's website for software updates to ensure optimal performance and compatibility.
6. Troubleshooting
- Device not powering on: Check battery installation and ensure the battery has sufficient charge.
- No data logging: Verify that logging was initiated through the software and that the logging interval is correctly set. Ensure the device's memory is not full.
- Incorrect readings: Ensure the device is placed in an environment free from direct sunlight, strong air currents, or extreme temperature fluctuations that could affect sensor accuracy. Calibrate if necessary (refer to software instructions for calibration options).
- Software not detecting device: Ensure the USB cable is securely connected to both the data logger and the computer. Try a different USB port or restart the software/computer. Reinstall the software if issues persist.
- Alarms not triggering: Check that alarm thresholds are correctly set in the software and that the alarm function is enabled.
7. Specifications
| Feature | Specification |
|---|---|
| Model | 172 |
| Temperature Range | -40 to 70℃ (-40 to 158℉) |
| Temperature Accuracy | ±1℃ |
| Humidity Range | 0 to 100%RH |
| Humidity Accuracy | ±3.5%RH |
| Memory | 32000 data points (16000 for temperature, 16000 for humidity) |
| Measuring Rate | 1 second to 24 hours (configurable) |
| Battery Life | Typically 3 years |
8. User Tips
- For long-term monitoring, ensure the data logger is securely mounted and protected from physical damage.
- Regularly download data to prevent memory overflow, especially if using short logging intervals.
- When setting alarm thresholds, consider the specific requirements of the environment being monitored to avoid false alarms or missed critical events.
- Keep the software updated for the best experience and compatibility with newer operating systems.
9. Warranty and Support
For warranty information, technical support, or service inquiries, please refer to the contact details provided with your purchase documentation or visit the official CEM Instruments website. Keep your proof of purchase for warranty claims.