
Introduction
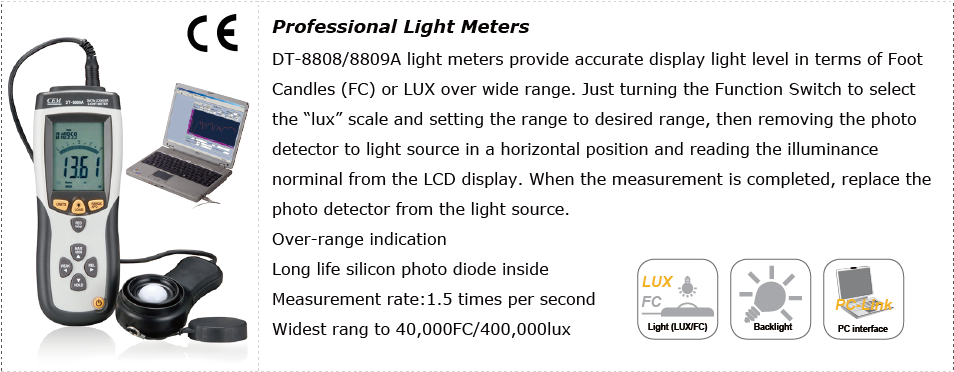
The CEM DT-8809A is a professional digital light meter designed for accurate measurement of illuminance (light intensity) in various environments. It features a 4000-count LCD display, a wide measurement range up to 400,000 Lux, and advanced functions such as data logging and USB output for industrial and professional applications.

Setup
- Battery Installation: Locate the battery compartment on the back of the device. Open the cover and insert the required batteries (typically 9V, not specified in data, assume standard) ensuring correct polarity. Close the compartment securely.
- Connect Photo Detector: Plug the cable of the remote photo detector into the input jack located on the top or side of the main unit. Ensure a firm connection.
- Power On: Press the power button (
 ) to turn on the device. The LCD display will illuminate.

Operating Instructions
- Power On/Off: Press the Power button to turn the meter on or off.
- Unit Selection (Lux/FC): Press the UNITS button to toggle between Lux and Foot-candle (FC) measurement units.
- Auto Ranging: The DT-8809A features auto-ranging, automatically selecting the appropriate measurement range for the detected light level.
- Data Hold: Press the HOLD button to freeze the current reading on the display. Press again to release.
- MAX/MIN Measurement: Press the MAX/MIN button to record the maximum or minimum light intensity detected during a measurement session.
- Peak Hold: Use the PEAK button to capture and hold the peak light intensity reading.
- Relative Mode (REL): Press the REL button to set the current reading as a reference point (zero) and display subsequent measurements as a deviation from this reference.
- Backlight: The meter includes a backlight for the LCD display, activated by a dedicated button (often integrated with another function or automatic).
- Auto Power Off (APO): The device has an Auto Power Off feature to conserve battery life. This can typically be disabled by pressing the 'Disable APO' button or a combination of buttons during power-on.
- Data Logging (REC/Setup): The DT-8809A supports data logging for up to 99 readings. Press the REC/Setup button to initiate or manage data recording. Refer to the detailed software manual for PC interface and data transfer via USB.
- USB Output: Connect the meter to a PC using a USB cable (see Figure 4) to transfer logged data and for real-time monitoring with the appropriate software.


Maintenance
- Cleaning: Wipe the meter and photo detector with a soft, dry cloth. Do not use abrasive cleaners or solvents. Keep the photo detector lens clean and free from dust or smudges for accurate readings.
- Battery Replacement: When the low battery indicator appears on the LCD, replace the batteries promptly to ensure continuous and accurate operation.
- Storage: Store the device in a cool, dry place away from direct sunlight and extreme temperatures. If storing for extended periods, remove the batteries to prevent leakage.
- Sensor Protection: Always keep the protective cap on the photo detector when not in use to prevent damage and maintain calibration.

Troubleshooting
- No Display/Meter Not Turning On: Check battery installation and ensure batteries are not depleted. Replace if necessary.
- Inaccurate Readings: Ensure the photo detector lens is clean. Verify the unit is set to the correct measurement mode (Lux or FC). Avoid measuring in rapidly changing light conditions or with the sensor obstructed.
- Display Shows 'OL' (Overload): The light intensity exceeds the meter's maximum range. Move the sensor to a less intense light source or ensure the meter is functioning correctly within its specified range.
- Data Logging Issues: Ensure the meter is properly connected to the PC via USB and the correct software drivers are installed. Check the meter's internal memory capacity.
Specifications
| Feature | DT-8808 | DT-8809A |
|---|---|---|
| LCD display counts | 4000 | 4000 |
| Auto Ranging | * | * |
| Analog bargraph/segments | 41-segments | 41-segments |
| Peak Hold | * | * |
| Relative mode | * | * |
| Max and Data Hold | * | * |
| Auto Power Off | * | * |
| Low battery indication | * | * |
| User selectable FC/Lux | * | * |
| Output | USB | |
| Capacity for data logging | 99 | * |
| Total accuracy: for C.I.E standard illuminate A(2856K) | ||
| Specification | DT-8808 | DT-8809A |
|---|---|---|
| Max Range | 400,000Lux | 400,000Lux |
| Accuracy (<10,000Lux) | ±5%±10d | ±3% rdg ±5% f.s. |
| Accuracy (>10,000Lux) | ±10%±10d | ±4%rdg ±10d |
| Max Resolution | 0.1Lux/0.01Fc | |
| Measuring rate | 1.5 times/second | |
| Photo Detector Dimensions | 115mm x 60mm x 27mm | |

User Tips
- For the most accurate readings, ensure the photo detector is positioned directly facing the light source and is not shaded by any objects.
- When measuring in environments with varying light, use the MAX/MIN or Peak Hold functions to capture critical light levels.
- Utilize the data logging feature for long-term monitoring or when documenting light conditions over time. Remember to transfer data regularly to avoid exceeding the 99-reading capacity.
- The USB output allows for real-time data streaming to a computer, which can be useful for detailed analysis and graphical representation of light changes.
Warranty and Support
This CEM DT-8809A Professional Light Meter is covered by a standard manufacturer's warranty against defects in materials and workmanship. For specific warranty terms, duration, and support inquiries, please refer to the documentation provided with your purchase or contact the manufacturer's customer service. Keep your purchase receipt as proof of purchase.
For technical assistance or further information, please contact your local distributor or the CEM Instruments support team.