1. Introduction
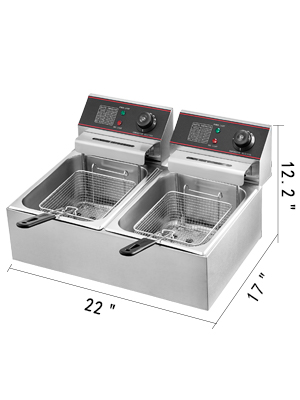
This manual provides essential information for the safe and efficient operation and maintenance of your VEVOR 12L Commercial Deep Fryer. This dual-tank electric deep fryer is constructed from high-quality stainless steel and is designed for commercial applications such as restaurants, supermarkets, fast food shops, and snack bars. It features twin 6-liter tanks and powerful immersion elements for rapid heating, allowing you to fry a variety of foods to perfection.

2. Safety Instructions
Please read and understand all safety warnings and instructions before using this appliance. Failure to follow these instructions may result in electric shock, fire, or serious injury.
- Electrical Safety: Ensure the power supply matches the voltage specified on the appliance (220 V). Do not operate with a damaged cord or plug. Keep electrical components away from water.
- Hot Oil Hazard: Oil can reach very high temperatures. Always exercise extreme caution when handling hot oil. Never move the fryer when it contains hot oil.
- Stable Placement: Place the fryer on a stable, level, heat-resistant surface, away from walls and flammable materials. Ensure adequate ventilation.
- Filling Oil: Do not overfill or underfill the oil tanks. Always fill oil between the MIN and MAX marks.
- Water and Oil: Never add water to hot oil. Water can cause hot oil to splatter violently, leading to severe burns. Ensure food is dry before frying.
- Supervision: Never leave the deep fryer unattended while in operation.
- Cleaning: Always disconnect the power supply and allow the oil and appliance to cool completely before cleaning.
- Children and Pets: Keep children and pets away from the appliance during operation and while it is cooling.
3. Product Overview
3.1 Components
- Stainless Steel Fryer Body
- Dual Oil Tanks (6L each)
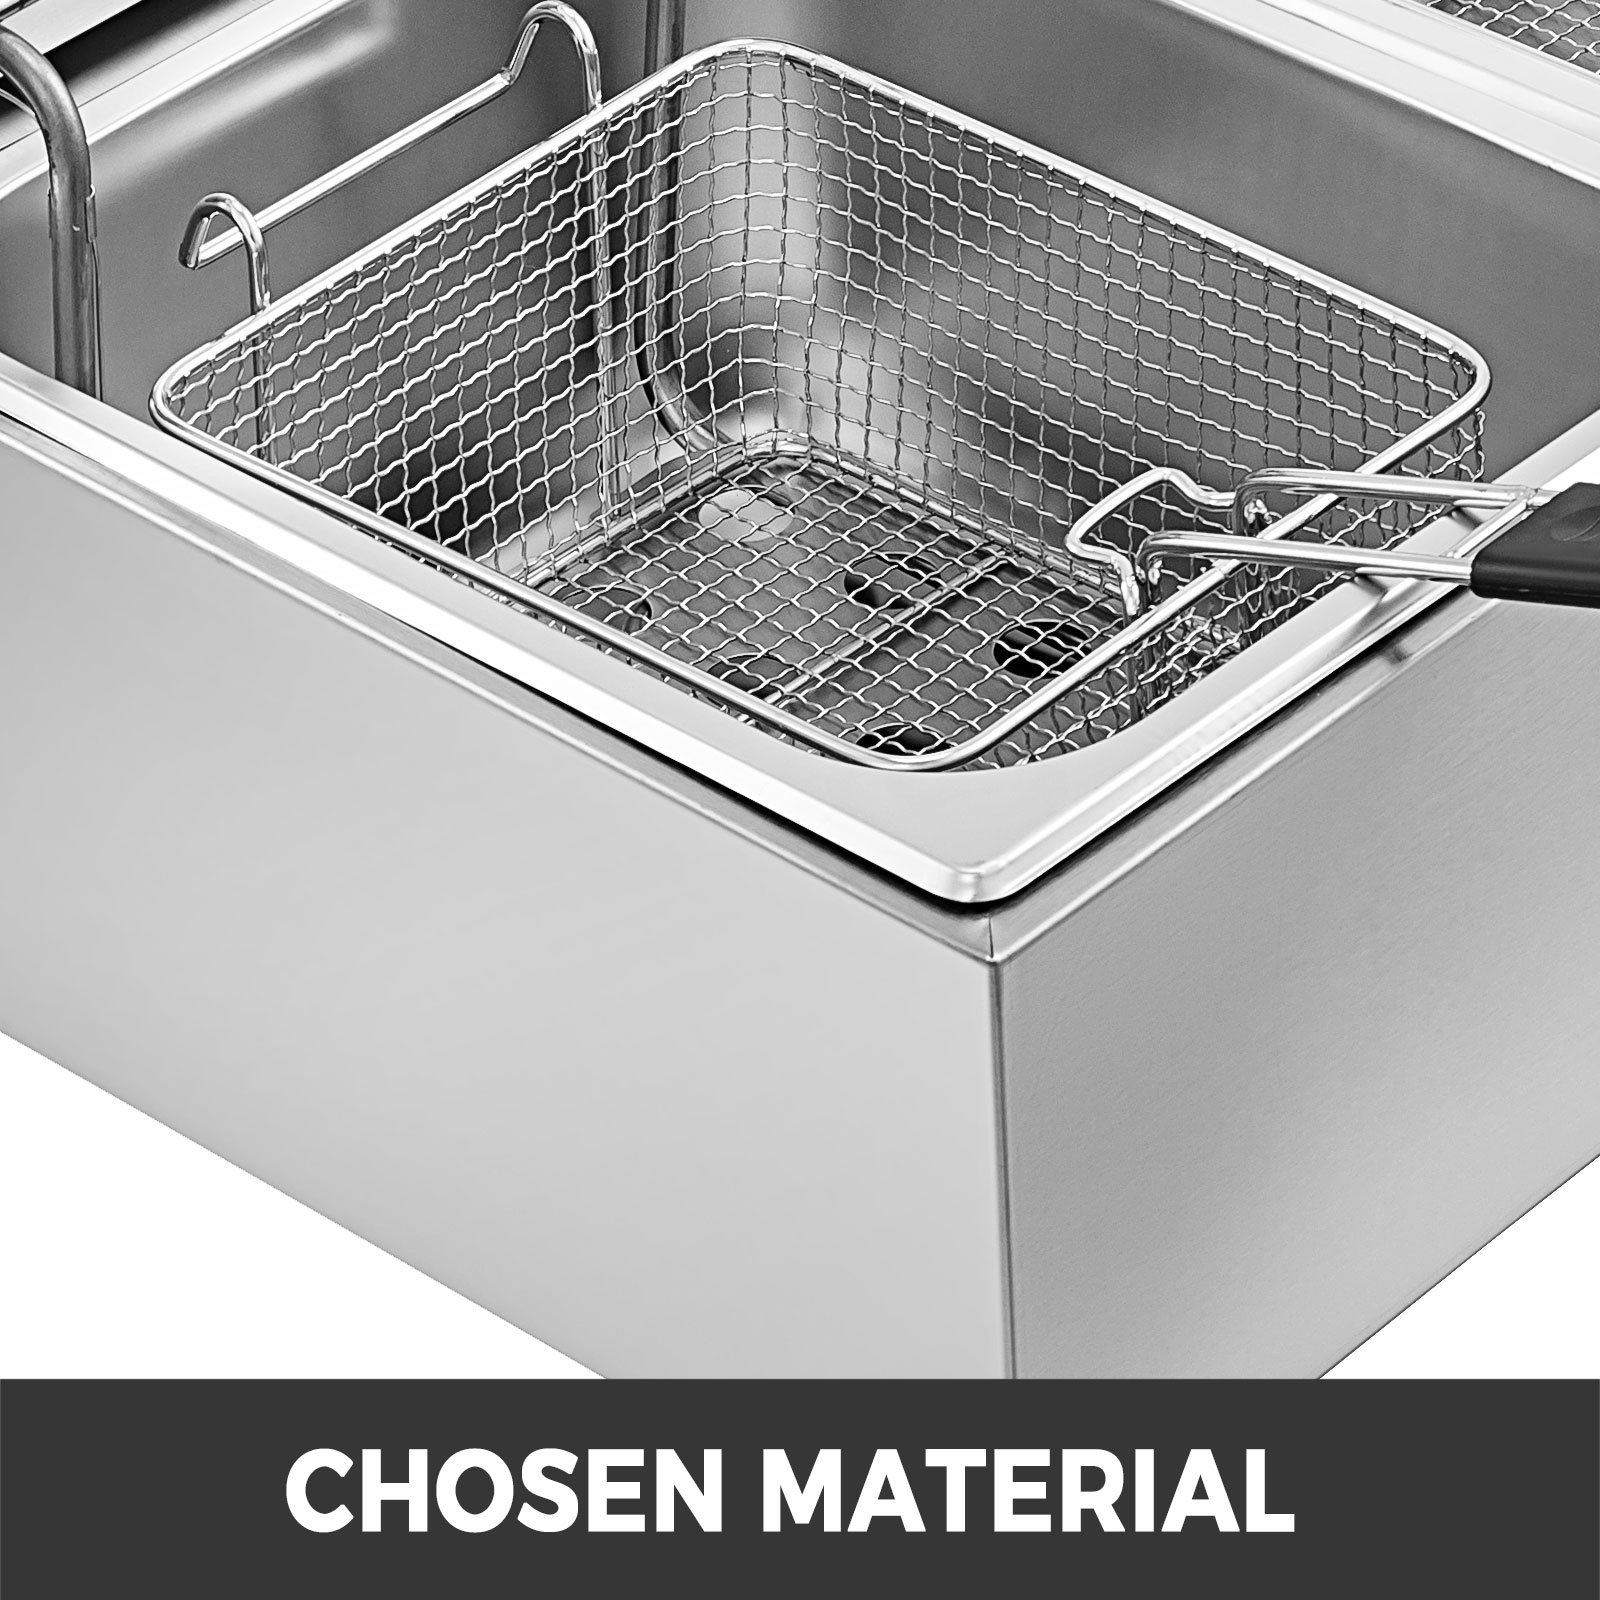
- Two Frying Baskets with Heat-Resistant Rubber Handles
- Two Stainless Steel Covers with Handles
- Independent Control Panels (for each tank)
- Temperature Selection Knobs
- Power Indicator Lights (Green)
- Hot Indicator Lights (Red)
- 5-Ring Heating Tubes
- Baffle Plates (to prevent direct contact with heating tubes)
3.2 Key Features
- Sufficient Capacity: Two 6L tanks (total 12L) provide ample space for frying large quantities of food simultaneously.
- Precise Control: Each tank has an independent control panel with a temperature selection knob (50~200 °C), power light, and hot light. A sticker provides suggested temperatures for various foods.
- Fast Heating: Upgraded 5-ring heating tubes ensure even and rapid heating. Baffle plates prevent direct contact between the basket and heating elements, reducing food residue adhesion.
- Advanced Quality: Constructed entirely from high-quality stainless steel for durability, rust resistance, and easy cleaning.
- Considerate Design: Each tank includes a cover with a handle to facilitate faster heating and protect against dust and debris when not in use.
- Wide Application: Ideal for commercial use in fast food restaurants, fried chicken stands, catering businesses, and more.


4. Specifications
| Attribute | Value |
|---|---|
| Capacity | 6L + 6L (0.2 + 0.2 cu. ft.) |
| Max Oil Capacity | 5.5L + 5.5L (0.19 + 0.19 cu. ft.) |
| Temperature Range | 50~200 °C |
| Material | Stainless steel |
| Maximum Wattage | 5000W |
| Constant Wattage | 3400W |
| Voltage | 220 V |
| Tank Dimensions | 240 x 300 x 153 mm |
| Gross Weight | 10 kg (21.5 lbs) |
| Overall Dimensions | 560 x 430 x 310 mm (22" x 17" x 12.2") |
| Certification | CE |

5. Setup
- Unpacking: Carefully remove all components from the packaging. Retain packaging for future storage or transport.
- Initial Cleaning: Before first use, wash the oil tanks, frying baskets, and covers with warm, soapy water. Rinse thoroughly and dry completely. Wipe down the exterior of the fryer body with a damp cloth.
- Placement: Place the fryer on a stable, level, and heat-resistant countertop or surface. Ensure there is sufficient clearance around the fryer for ventilation and to prevent heat damage to surrounding surfaces.
- Assembly: Insert the baffle plates into the bottom of each oil tank, ensuring they sit correctly above the heating elements. Place the empty frying baskets into the tanks.
- Fill with Oil: Pour cooking oil into each tank, ensuring the oil level is between the 'MIN' and 'MAX' indicators marked inside the tank. Do not exceed the 'MAX' line to prevent overflow during frying.
- Power Connection: Ensure the temperature knobs are set to 'OFF' (minimum temperature). Plug the fryer into a grounded electrical outlet that matches the specified voltage (220 V).
6. Operating Instructions
- Power On: Turn the temperature selection knob for the desired tank to the desired temperature. The green 'POWER' light will illuminate, indicating the unit is receiving power.
- Set Temperature: Refer to the suggested temperature guide on the control panel for common foods (e.g., Potato: 143°C/280°F, Chicken Wing: 179°C/350°F, Fish Steak: 179°C/350°F, Meat Block: 179°C/350°F). Adjust the temperature knob accordingly.
- Preheating: The red 'HOT' light will illuminate when the heating elements are active. It will cycle on and off as the fryer maintains the set temperature. Allow the oil to preheat until the 'HOT' light turns off, indicating the target temperature has been reached. This may take several minutes.
- Prepare Food: Ensure food items are dry before placing them in the frying basket. Excess moisture can cause oil to splatter. Do not overload the basket.
- Frying: Carefully lower the frying basket containing the food into the hot oil. Avoid sudden movements. The 'HOT' light may come on again as the oil temperature drops, then cycle off once the temperature recovers.
- Monitor Cooking: Fry food until it reaches the desired crispness and doneness.
- Remove Food: Once cooked, carefully lift the frying basket out of the oil. Hook the basket onto the side rest to allow excess oil to drain.
- Power Off: When finished frying, turn the temperature selection knob to the 'OFF' (minimum temperature) position. Unplug the fryer from the electrical outlet.
7. Maintenance and Cleaning
Regular cleaning and maintenance will extend the life of your deep fryer and ensure optimal performance.
- Cool Down: Always ensure the fryer is unplugged and the oil has cooled completely before attempting any cleaning. This can take several hours.
- Drain Oil: Carefully remove the oil tanks from the fryer body. Pour the cooled oil into a suitable container for disposal or filtering and reuse.
- Clean Tanks and Baskets: Wash the oil tanks, frying baskets, baffle plates, and covers with warm, soapy water. Use a non-abrasive sponge or cloth. For stubborn residue, a plastic brush may be used. Rinse thoroughly and dry completely.
- Clean Heating Elements: The heating elements are typically attached to the control panel and can be lifted out for cleaning the tank. Wipe the heating elements with a damp cloth. Do not immerse the control panel or heating elements in water.
- Clean Exterior: Wipe the stainless steel exterior of the fryer body with a damp cloth and mild detergent. Dry immediately to prevent water spots. Do not use abrasive cleaners or scouring pads, as they can scratch the surface.
- Storage: Once all parts are clean and dry, reassemble the fryer. Store it in a clean, dry place. You may place the covers on the tanks to protect them from dust.
8. Troubleshooting
| Problem | Possible Cause | Solution |
|---|---|---|
| Fryer does not turn on (no 'POWER' light) | Not plugged in; power outlet fault; temperature knob not turned on. | Ensure the fryer is securely plugged into a working outlet. Turn the temperature knob to a setting above 'OFF'. Check circuit breaker. |
| Oil is not heating (green 'POWER' light is on, but red 'HOT' light is off or oil remains cold) | Temperature setting too low; heating element malfunction. | Increase the temperature setting. If the problem persists, contact customer support. |
| Oil overflows during frying | Oil level too high; too much food in basket; food contains too much moisture. | Ensure oil is filled between MIN/MAX lines. Do not overload baskets. Pat food dry before frying. |
| Uneven cooking | Overloading basket; oil not at correct temperature. | Fry in smaller batches. Ensure oil is fully preheated before adding food. |
9. User Tips
- Plug Compatibility: Before purchasing or using, verify that the fryer's plug type (e.g., EU plug) is compatible with your region's electrical outlets. An adapter may be required if not compatible.
- Oil Management: To extend oil life, filter the oil after each use to remove food particles. Store cooled, filtered oil in an airtight container in a cool, dark place.
- Batch Frying: For best results and to maintain oil temperature, avoid overcrowding the baskets. Fry food in smaller batches.
- Preheat Thoroughly: Always allow the oil to reach the set temperature before adding food. This ensures crispy results and prevents soggy food.
10. Warranty and Support
VEVOR is dedicated to providing high-quality equipment and tools. For any issues or inquiries regarding your deep fryer, please contact VEVOR customer service. VEVOR offers:
- Premium Tough Quality
- 30-Day Free Returns
- 24/7 Attentive Service
Please refer to your purchase documentation or the VEVOR website for specific warranty terms and contact information.


