Thank you for choosing the VEVOR Low Profile Floor Jack. This manual provides essential information for the safe and effective operation, maintenance, and troubleshooting of your new floor jack. Please read this manual thoroughly before use and keep it for future reference.
The VEVOR Low Profile Floor Jack is a heavy-duty steel racing floor jack designed for lifting various vehicles. It features a versatile lifting range, a dual piston pump for quick lifting, and robust all-steel construction. It is ideal for tasks such as tire changes, oil maintenance, and brake servicing.
2. Safety Information
WARNING: Failure to follow these safety instructions may result in serious injury or property damage.
Always operate the floor jack on a hard, level surface.
Never exceed the rated capacity of the jack.
Use appropriate jack stands to support the vehicle immediately after lifting. Do not rely solely on the jack for support.
Ensure the vehicle is in park (automatic) or gear (manual) and the parking brake is engaged. Block wheels that are not being lifted.
Position the jack saddle under the vehicle's designated lifting points as specified by the vehicle manufacturer.
Keep hands and feet clear of the jack and vehicle during lifting and lowering operations.
Wear appropriate personal protective equipment (PPE), such as safety glasses and gloves.
Do not modify the jack or use it for purposes other than its intended use.
This jack complies with CE certification (2006/42/EC (EN1494)), UKCA certification (SI 2008 NO.1597(BS EN1494)), and ASME PALD-2014 SAFETY STANDARD. It features a built-in safety load system to prevent use beyond its load capacity.
3. Product Overview
3.1 Key Features
High Capacity: Available in 2.5 Ton (5500 lbs), 3 Ton (6600 lbs), and 4 Ton (8800 lbs) models.
Versatile Lifting Range: Minimum height as low as 2.9" / 75 mm (for low-clearance vehicles) and maximum height up to 21" / 533 mm (suitable for SUVs and pickups).
Dual Piston Pump: Achieves maximum height in 7 full strokes, offering 5 times faster lifting compared to single pump designs.
Robust Construction: Made from heavy-strength, all-steel for long-term durability and stability in both everyday and industrial use.
Protective Design: Features a 360° rotatable rubber saddle and a foam handle bumper to prevent damage to your vehicle.
Extended Handle: A 45.3" / 1150 mm (or 52" / 1320 mm for some 4-ton models) long handle provides excellent leverage and is a two-piece design for easy storage.
Easy Maneuverability: Equipped with steel wheels, including two universal rear wheels, for smooth positioning and movement.
Convenient Magnetic Tray: A magnetic tray on top of the jack provides a handy spot for small tools and parts.
3.2 Components Diagram
Figure 1: Main components of the VEVOR Low Profile Floor Jack.
The main components include the lifting arm, saddle, handle, pump mechanism, and wheels. Specific details may vary slightly between models (e.g., 2.5 Ton, 3 Ton, 4 Ton).
3.3 Visual Features
Figure 2: Low profile design with 3 Ton / 6600 lbs capacity.Figure 3: Versatile lifting range for various vehicle types.Figure 4: Dual Piston Pump for efficient and fast lifting.Figure 5: Protective rubber saddle and foam handle for vehicle safety and user comfort.
4. Specifications
The VEVOR Low Profile Floor Jack is available in several capacities. Please refer to the specific model you own for exact specifications.
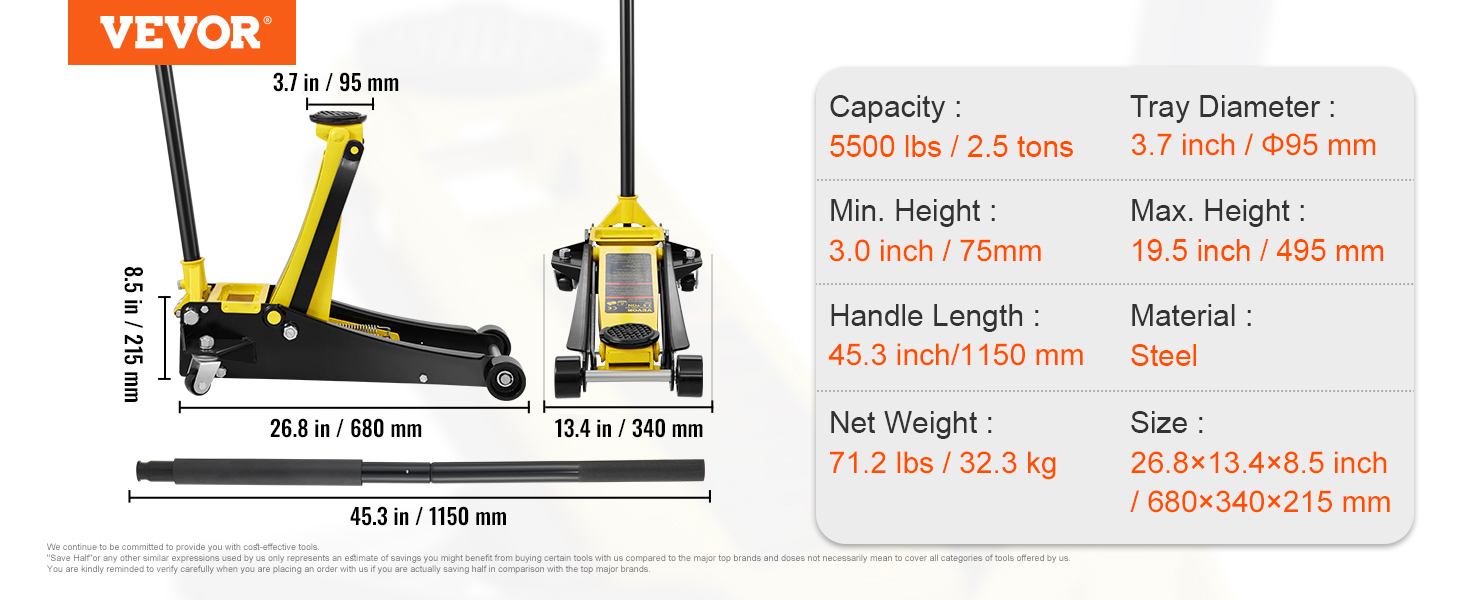
4.1 2.5 Ton (5500 lbs) Dual Pump Model
Figure 6: Specifications for the 2.5 Ton Dual Pump Floor Jack.
Feature
Specification
Capacity
5500 lbs / 2.5 tons
Tray Diameter
3.7 inch / 95 mm
Min. Height
3.0 inch / 75 mm
Max. Height
19.5 inch / 495 mm
Handle Length
45.3 inch / 1150 mm
Material
Steel
Net Weight
71.2 lbs / 32.3 kg
Dimensions (L x W x H)
26.8 x 13.4 x 8.5 inch / 680 x 340 x 215 mm
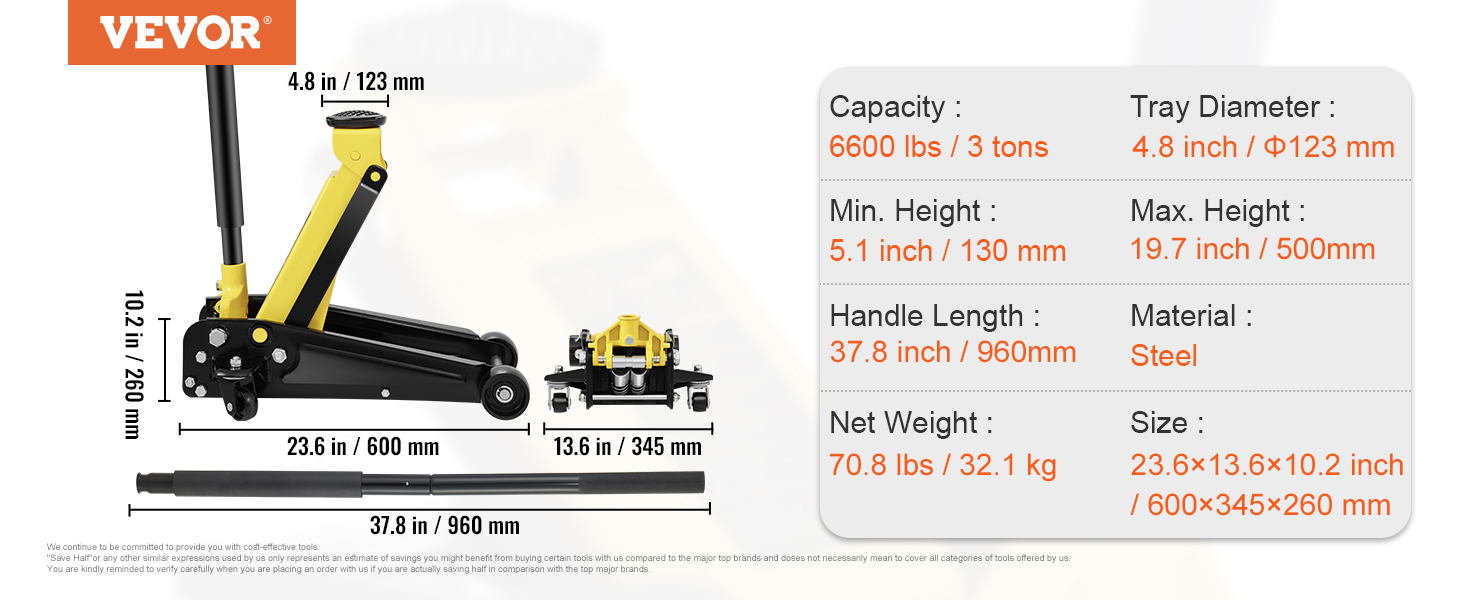
4.2 3 Ton (6600 lbs) Single Pump Model
Figure 7: Specifications for the 3 Ton Single Pump Floor Jack.
Feature
Specification
Capacity
6600 lbs / 3 tons
Tray Diameter
4.8 inch / 123 mm
Min. Height
5.1 inch / 130 mm
Max. Height
19.7 inch / 500 mm
Handle Length
37.8 inch / 960 mm
Material
Steel
Net Weight
70.8 lbs / 32.1 kg
Dimensions (L x W x H)
23.6 x 13.6 x 10.2 inch / 600 x 345 x 260 mm
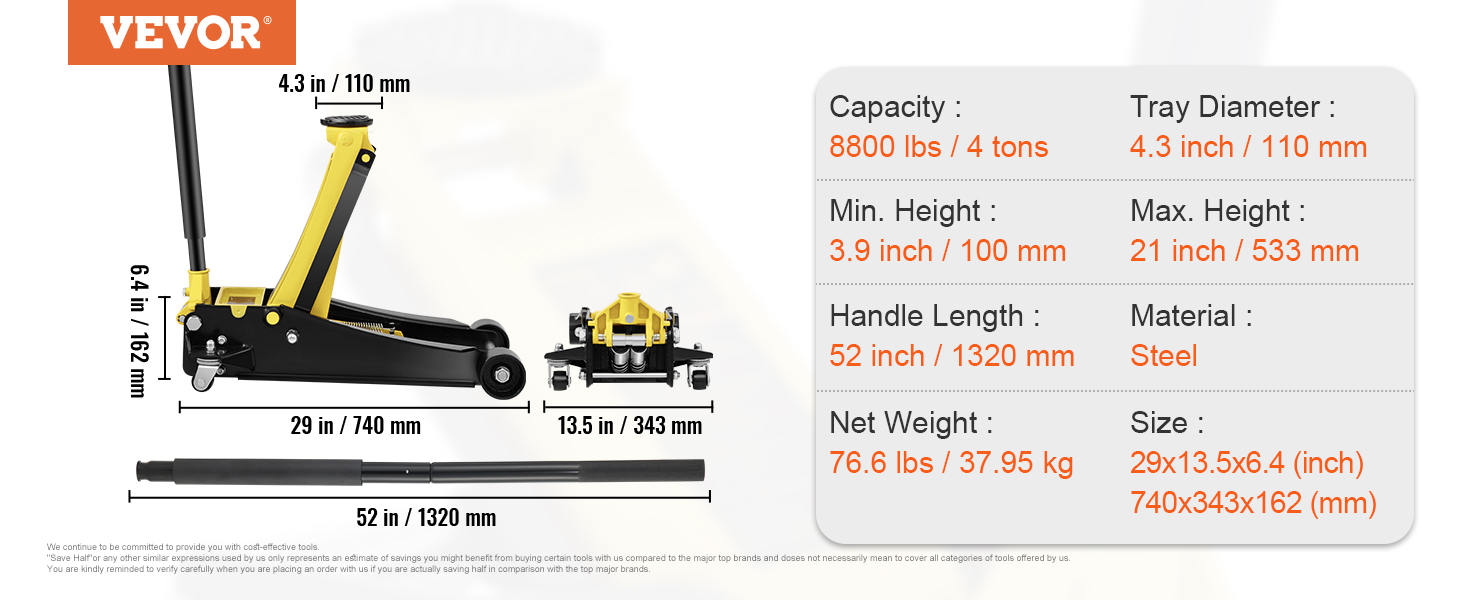
4.3 4 Ton (8800 lbs) Dual Pump Model
Figure 8: Specifications for the 4 Ton Dual Pump Floor Jack.
Feature
Specification
Capacity
8800 lbs / 4 tons
Tray Diameter
4.3 inch / 110 mm
Min. Height
3.9 inch / 100 mm
Max. Height
21 inch / 533 mm
Handle Length
52 inch / 1320 mm
Material
Steel
Net Weight
76.6 lbs / 37.95 kg
Dimensions (L x W x H)
29 x 13.5 x 6.4 inch / 740 x 343 x 162 mm
Note: Another 4 Ton model (Item Model Number: WD-B-04000-B00-0) has a Net Weight of 100.6 lbs / 45.6 kg, Product Dimensions of 30.7 x 16.9 x 9.1 in / 780 x 430 x 230 mm, a 50" / 1260 mm Handle Length, and a Tray Diameter of 4.7" / 119 mm.
5. Setup Instructions
Follow these steps to assemble and prepare your VEVOR Floor Jack for use:
Connect the Handle:Figure 9: Connecting the two-piece handle.Connect the two pieces of the handle together. Insert the assembled handle into the socket on the jack. Tighten the nut securely to ensure the handle is firmly attached.
Purge Air (Initial Use): Before first use, or if the jack has been stored for a long time, it's recommended to purge any air from the hydraulic system.
Turn the handle counter-clockwise to fully open the release valve.
Pump the handle rapidly several times.
Turn the handle clockwise to close the release valve. The jack should now be ready for operation.
6. Operating Instructions
Always refer to your vehicle's owner's manual for specific lifting points and procedures.
Prepare the Vehicle:
Park the vehicle on a hard, level surface.
Engage the parking brake.
Place the transmission in "Park" (automatic) or a low gear (manual).
Block the wheels that are not being lifted to prevent accidental movement.
Close the Release Valve:Figure 10: Twist the handle clockwise to the tightest position to close the valve.Twist the handle clockwise until it is in the tightest position. This closes the release valve and prepares the jack for lifting.
Position the Jack:Figure 11: Position the jack's saddle under the vehicle's lifting point.Roll the jack under the vehicle and position the rubber saddle directly under the manufacturer's recommended lifting point. Ensure the saddle is centered and stable.
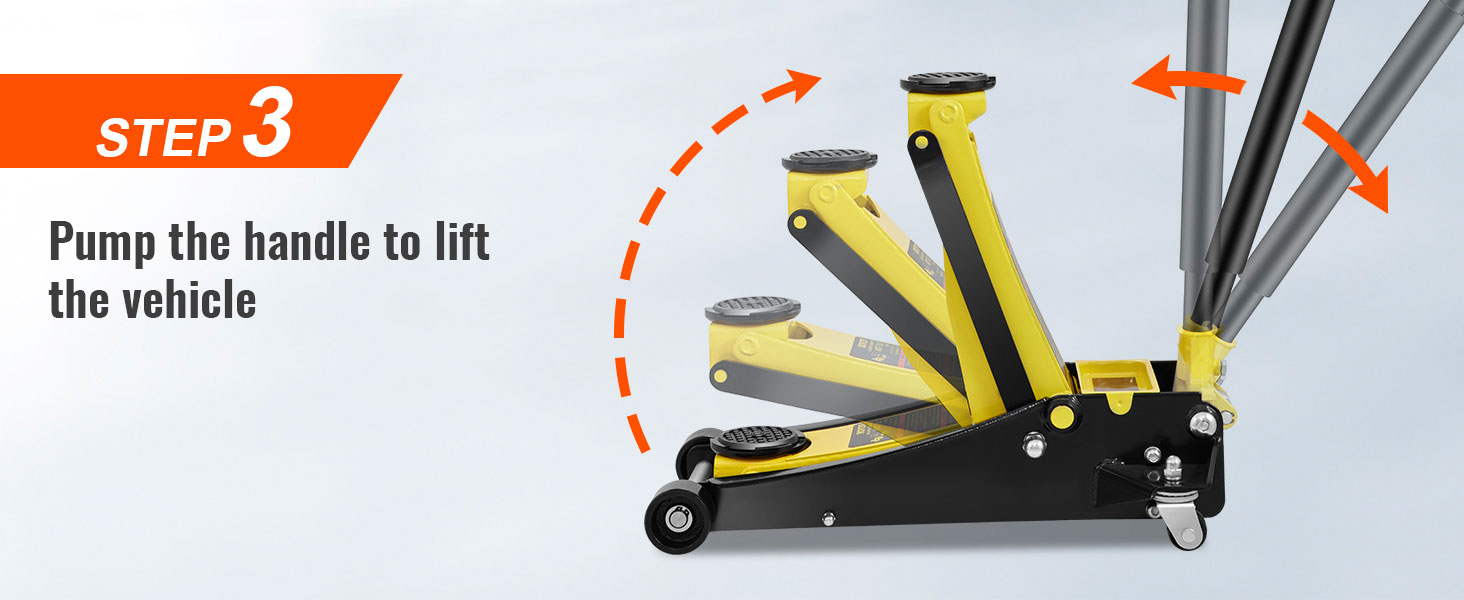
Lift the Vehicle:Figure 12: Pump the handle up and down to lift the vehicle.Pump the handle up and down with full strokes to raise the vehicle to the desired height. Lift only high enough to perform the necessary work.
Secure with Jack Stands:
IMPORTANT: Immediately place appropriately rated jack stands under the vehicle's frame or designated support points. Never work under a vehicle supported only by a floor jack.
Once the vehicle is at the desired height, carefully lower it onto the jack stands by slowly turning the handle counter-clockwise to open the release valve. Ensure the vehicle is securely resting on the jack stands before proceeding.
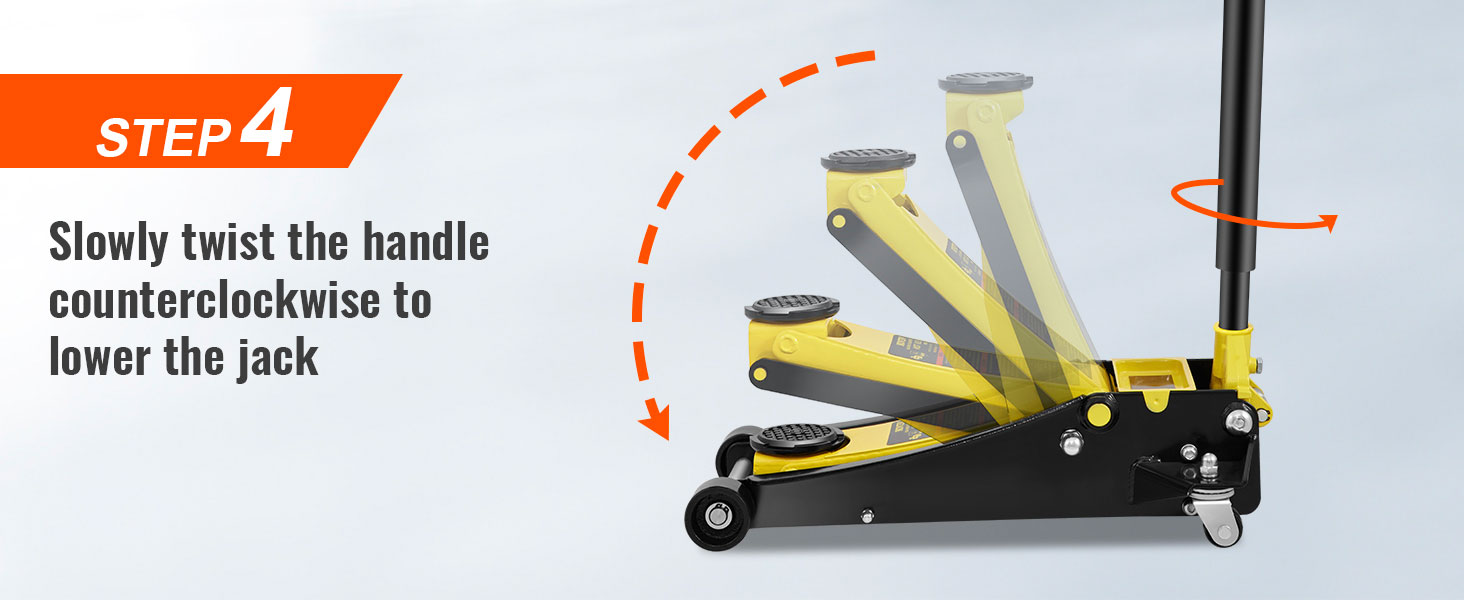
Lower the Vehicle:Figure 13: Turn the handle counter-clockwise to slowly lower the vehicle.After completing work and removing jack stands, ensure no one is under the vehicle. Slowly turn the handle counter-clockwise to open the release valve. The vehicle will lower slowly and automatically. Once fully lowered, remove the jack.
7. Maintenance
Regular maintenance ensures the longevity and safe operation of your floor jack.
Lubrication: Periodically lubricate all moving parts, including the pivot points and wheels, with light machine oil.
Hydraulic Fluid: Check the hydraulic fluid level every few months. If low, replenish with high-quality hydraulic jack oil. Do not use brake fluid or other non-approved fluids.
Cleaning: Keep the jack clean from dirt, grease, and corrosive materials. Wipe down the ram and pump mechanism after each use.
Inspection: Before each use, inspect the jack for any signs of damage, leaks, or wear. Check for loose bolts, bent components, or cracks. Do not use a damaged jack.
Storage: Store the jack in a clean, dry place with the ram fully retracted to prevent corrosion and extend seal life.
8. Troubleshooting
Here are some common issues and their potential solutions:
Problem
Possible Cause
Solution
Jack will not lift or lifts slowly.
Release valve not fully closed; Low hydraulic fluid; Air in system; Overload.
Ensure release valve is fully tightened clockwise. Check and refill hydraulic fluid. Purge air from the system (see Setup). Do not exceed rated capacity.
Jack lowers under load.
Release valve not fully closed; Leaking seals; Overload.
Ensure release valve is fully tightened. Inspect for fluid leaks; if seals are damaged, seek professional repair. Do not exceed rated capacity.
Jack does not lower completely.
Release valve not fully open; Obstruction.
Turn release valve fully counter-clockwise. Check for any physical obstructions preventing full retraction.
If problems persist, contact VEVOR customer support.
9. User Tips
Break-in Period: For new jacks, perform a few full lift and lower cycles without a load to ensure proper lubrication and air purging.
Saddle Pad: Always use the rubber saddle pad to protect the vehicle's chassis and prevent slipping.
Handle Storage: The two-piece handle design allows for compact storage. Disassemble it when not in use to save space.
Low Profile Advantage: Take advantage of the jack's low profile design (as low as 2.9 inches) to easily access lifting points on sports cars and modified vehicles.
10. Warranty and Support
For warranty information, technical support, or replacement parts, please contact VEVOR customer service. Keep your purchase receipt and product model information handy when contacting support.
VEVOR is committed to providing quality tools and equipment. For more information, visit the official VEVOR website or contact their customer support channels.
Related Documents - Low Profile Floor Jack
VEVOR Hydraulic Floor Jacks User Manual & Technical Specifications Comprehensive user manual and technical specifications for VEVOR Hydraulic Floor Jacks, including models WD-A-02500-B00-0, WD-A-03000-B00-0, and WD-A-04000-B00-0. Covers safety, operation, maintenance, and troubleshooting. Visit www.vevor.com/support for assistance.
VEVOR Hydraulic Floor Jacks User Manual and Specifications This document provides essential operating instructions, safety guidelines, maintenance procedures, troubleshooting tips, and technical specifications for VEVOR Hydraulic Floor Jacks, models WD-B-01500-B00-0 through WD-B-03000-B00-0.
VEVOR Hydraulic Floor Jacks User Manual and Specifications Comprehensive user manual and technical specifications for VEVOR Hydraulic Floor Jacks, including safety instructions, operation, maintenance, and troubleshooting for models WD-A-02000-B00-0, WD-A-02500-B00-0, WD-A-03000-B00-0, and WD-B-04250-B00-0.
VEVOR Hydraulic Floor Jacks User Manual and Technical Specifications Comprehensive user manual for VEVOR Hydraulic Floor Jacks (Models WD-A-02000-B00-0, WD-A-02500-B00-0, WD-A-03000-B00-0, WD-B-04250-B00-0). Includes safety instructions, operating procedures, maintenance, troubleshooting, and detailed technical specifications.
VEVOR MR8008 50 Ton Air-Actuated Bottle Jack User Manual Comprehensive user manual for the VEVOR MR8008 50 Ton air-actuated bottle jack, covering assembly, operation, maintenance, troubleshooting, and parts list. Ensure safe and effective use of your heavy-duty lifting equipment.