
1. Introduction
This document provides comprehensive instructions for the assembly, installation, operation, and troubleshooting of the Sumry MPS-VIII ECO Series Hybrid Solar Inverter. This multi-function inverter/charger combines the capabilities of an inverter, solar charger, and battery charger to deliver uninterrupted power support in a compact design. Its user-friendly LCD display allows for configurable settings such as battery charging current, AC/solar charger priority, and acceptable input voltage, adapting to various applications.
1.1 Features
- Pure sine wave output for sensitive electronics.
- Configurable input voltage range for home appliances and personal computers via LCD settings.
- Adjustable battery charging current based on application needs via LCD settings.
- Configurable AC/Solar Charger priority via LCD settings.
- Compatible with both mains voltage and generator power.
- Automatic restart function upon AC power recovery.
- Integrated protection against overload, over-temperature, and short circuits.
- Smart battery charger design for optimized battery performance and longevity.
- Cold start function for reliable operation.
- Built-in 120A MPPT Solar charge controller, with a maximum 4200W solar charge (for 3.6kW models).
- High PV input voltage range (60-500VDC).
- Built-in anti-dust kit for enhanced durability in harsh environments.
- Dual output capability.
1.2 Basic System Architecture
The inverter is designed to integrate seamlessly into a hybrid power system. A typical setup includes:
- Solar Panels: Provide DC power from sunlight.
- Utility Grid/Generator: Alternative AC power sources.
- Hybrid Solar Inverter: Manages power flow, converts DC to AC, and charges batteries.
- External Battery Packs: Store energy for backup or night-time use.
- Home Appliances: Powered by the inverter.

Figure 1: Basic System Architecture showing solar panels, utility grid, generator, inverter, battery, and home appliances.
2. Safety Instructions
WARNING: This chapter contains important safety and operating instructions. Read and keep this manual for future reference.
- Before using the unit, read all instructions and cautionary markings on the unit, the batteries, and all appropriate sections of this manual.
- CAUTION: To reduce the risk of injury, charge only deep-cycle lead-acid type rechargeable batteries. Other types of batteries may burst, causing personal injury and damage.
- Do not disassemble the unit. Take it to a qualified service center when service or repair is required. Incorrect re-assembly may result in a risk of electric shock or fire.
- To reduce the risk of electric shock, disconnect all wirings before attempting any maintenance or cleaning. Turning off the unit will not reduce this risk.
- CAUTION: Only qualified personnel can install this device with a battery.
- NEVER charge a frozen battery.
- For optimum operation of this inverter/charger, please follow the required specifications to select appropriate cable sizes. It is very important to correctly operate this inverter/charger.
- Be very cautious when working with metal tools on or around batteries. A potential risk exists to drop a tool to spark or short circuit batteries or other electrical parts and could cause an explosion.
- Please strictly follow the installation procedure when you want to disconnect AC or DC terminals. Refer to the INSTALLATION section of this manual for details.
- One piece of 150A fuse is provided as over-current protection for the battery supply.
- GROUNDING INSTRUCTIONS: This inverter/charger should be connected to a permanent grounded wiring system. Be sure to comply with local requirements and regulations to install this inverter.
- NEVER cause AC output and DC input short circuits. Do NOT connect to the mains when DC input short circuits.
- Warning!! Only qualified service persons are able to service this device. If errors still persist after following the troubleshooting table, please send this inverter/charger back to a local dealer or service center for maintenance.
3. Installation
3.1 Unpacking and Inspection
Before installation, carefully inspect the unit. Ensure that nothing inside the package is damaged. The package should contain the inverter unit and this user manual.
3.2 Preparation
Before connecting any wiring, remove the bottom cover of the inverter by unscrewing the two screws as shown in the product video.
3.3 Mounting the Unit
Consider the following points when selecting an installation location:
- Do not mount the inverter on flammable construction materials.
- Mount the unit on a solid surface.
- Install this inverter at eye level to ensure the LCD display is easily readable.
- For proper air circulation and heat dissipation, allow a clearance of approximately 20 cm to the sides and 50 cm above and below the unit.
- The ambient temperature should be between 0°C and 55°C for optimal operation.
- The recommended installation position is vertically adhered to a wall.
- Ensure enough space for heat dissipation and wire removal.
Note:
- Suitable for mounting on concrete or other non-combustible surfaces only.
- Install the unit by screwing two M6 screws.
3.4 Battery Connection
CAUTION: For safety and regulation compliance, it is recommended to install a separate DC over-current protector or disconnect device between the battery and the inverter. This ensures the inverter can be securely disconnected during maintenance and is protected from overcurrent.
Recommended Battery Cable Size:
| Model | Wire Size | Cable (mm²) | Torque Value (max) |
|---|---|---|---|
| 3.6KW/6.2KW | 1 x 2AWG | 25 | 2 Nm |
WARNING: Shock Hazard! Installation must be performed with care due to high battery voltage in series.
CAUTION: Before making the final DC connection or closing the DC breaker/disconnector, ensure positive (+) is connected to positive (+) and negative (-) is connected to negative (-).

Figure 2: Battery connection diagram showing 120A PV Max, 100A AC Max, 24V, and compatibility with GEL, FLD, LI, and USE battery types.
Video 1: Product overview and connection demonstration, including battery wiring.
3.5 AC Input/Output Connection
CAUTION: Before connecting to the AC input power source, install a separate AC breaker between the inverter and the AC input power source. This ensures the inverter can be securely disconnected during maintenance and is fully protected from overcurrent. The recommended AC breaker specifications are 32A for 3.6KW models and 50A for 6.2KW models.
CAUTION: There are two terminal blocks marked "IN" and "OUT". Do NOT mis-connect input and output connectors.
WARNING: All wiring must be performed by qualified personnel.
Recommended AC Wire Sizes:
| Model | Gauge | Cable (mm²) | Torque Value |
|---|---|---|---|
| 3.6KW | 12 AWG | 4 | 1.2 Nm |
| 6.2KW | 10 AWG | 6 | 1.2 Nm |
WARNING: Be sure that the AC power source is disconnected before attempting to hardwire it to the unit.
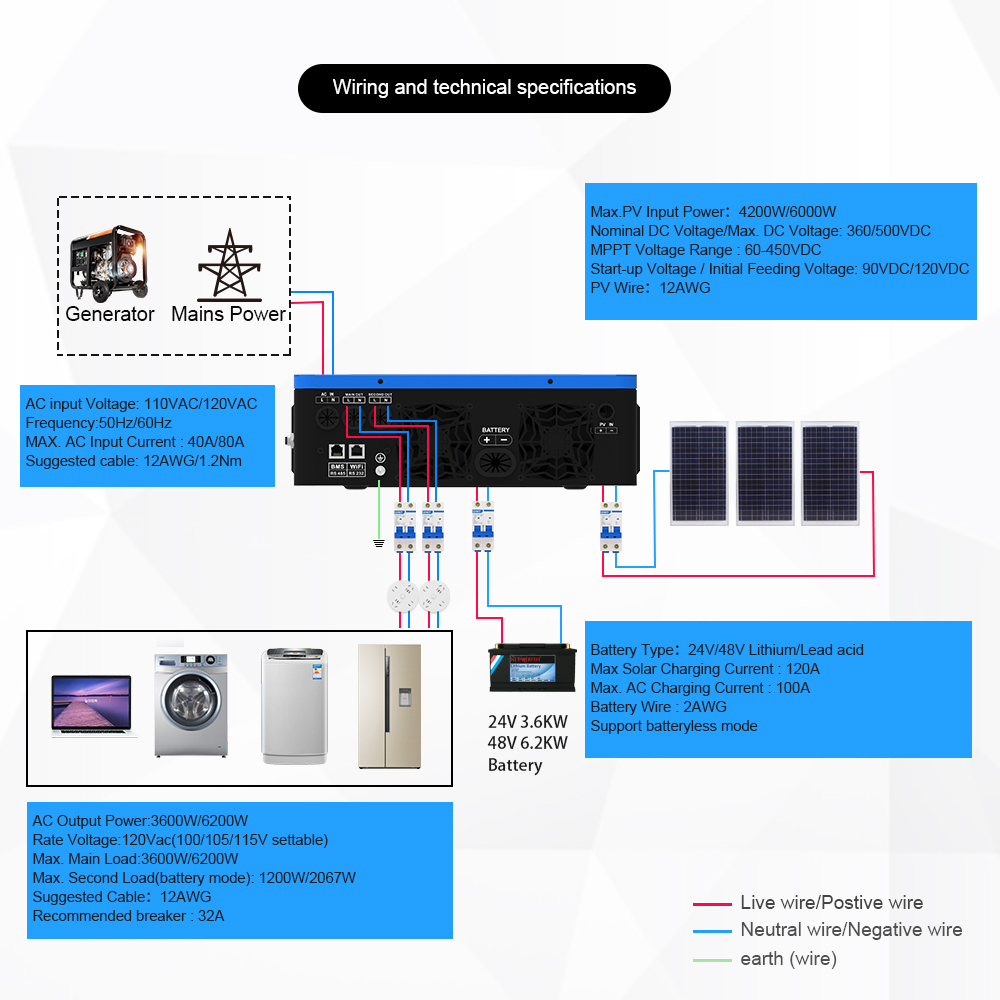
Figure 3: Circuit breaker specifications for the 3.6KW model, indicating 2P100A for battery, 2P20A for PV, 2P50A for utility input, and 2P30A for output.

Figure 4: Wiring and technical specifications diagram, illustrating connections for generator, mains power, inverter, solar panels, battery, and AC output appliances. Includes details on AC input/output, PV input, battery type, and max charge currents.
3.6 PV Connection
CAUTION: Before connecting to PV modules, install a DC circuit breaker separately between the inverter and PV modules.
WARNING: It is very important for system safety and efficient operation to use appropriate cable for PV module connection.
Recommended PV Cable Size:
| Model | Wire Size | Cable (mm²) | Torque Value (max) |
|---|---|---|---|
| 3.6KW/6.2KW | 1 x 12AWG | 4 | 1.2 Nm |
PV Module Selection:
When selecting proper PV modules, consider the following parameters:
- The Open Circuit Voltage (Voc) of PV modules should not exceed the maximum PV array open circuit voltage of the inverter (500Vdc).
- The Open Circuit Voltage (Voc) of PV modules should be higher than the minimum battery voltage.
| INVERTER MODEL | 3.6KW | 6.2KW |
|---|---|---|
| Max. PV Array Open Circuit Voltage | 500Vdc | |
| PV Array MPPT Voltage Range | 60Vdc~450Vdc | |
3.7 Communication Connection
The Sumry eco lv series machine has two communication ports:
- RS232 Communication Port: Used for Wi-Fi module communication. The Wi-Fi module (sold separately) enables remote monitoring and basic parameter settings via a mobile app or webpage. If you wish to use this feature, please acquire the Wi-Fi module separately.
- RS485 Communication Port: Used for lithium battery BMS (Battery Management System) communication. If you intend to use lithium battery BMS communication, you must select batteries that support the PACE or PYLONTECH communication protocols.

Figure 5: RS485 communication line diagram, showing connection between the inverter's COMM port and the battery's RS485 port.

Figure 6: Inverter communication ports, including the RS232 port for optional Wi-Fi/GPRS module and the RS485 port for BMS communication.
4. Operation
4.1 Power ON/OFF
Once the unit is properly installed and the batteries are connected, simply press the On/Off switch (located on the bottom of the case) to turn on the unit.
4.2 Operation and Display Panel
The operation and display panel is located on the front of the inverter. It includes three indicators, four function keys, and an LCD display, providing information on operating status and input/output power.
RGB Light Indicators (Optional)
- Red Light: Battery Mode
- Blue Light: Utility Mode
- Purple Light: PV Mode
LCD Display Icons and Messages
The LCD display provides various icons and messages to indicate the inverter's status:
| Indicator | Status | Message |
|---|---|---|
| INV/AC | Solid Green | Output is powered by utility in Line mode. |
| Flashing Green | Output is powered by battery or PV in battery mode. | |
| CHG | Solid Green | Battery is fully charged. |
| Flashing Green | Battery is charging. | |
| FAULT | Solid Red | Fault occurs in the inverter. |
| Flashing Red | Warning condition occurs in the inverter. |
Function Keys
- ESC: To exit setting mode.
- UP: To go to the previous selection.
- DOWN: To go to the next selection.
- ENTER: To confirm the selection in setting mode or enter setting mode.
4.3 LCD Setting
To enter setting mode, press and hold the ENTER button for 3 seconds. Use the UP or DOWN buttons to select programs, and ENTER to confirm or ESC to exit. Key settings include:
- Output Source Priority: Configure whether solar, utility, or battery is prioritized.
- Maximum Charging Current: Set total charging current for solar and utility chargers.
- Battery Type: Select from AGM, Flooded, User-Defined, or Lithium.
- Output Voltage/Frequency: Adjust AC output voltage (100-120V) and frequency (50/60Hz).
- Battery Equalization: Enable or disable, set voltage, time, and interval.
4.4 Operating Mode Description
The inverter supports various operating modes, including:
- Standby Mode: Inverter is on but not actively supplying power to loads.
- Line Mode: Inverter draws power from the utility grid to supply loads and charge batteries.
- Grid-Tie Operation: Inverter feeds excess solar energy back to the grid.
4.5 Battery Equalization Description
The equalization function helps prevent the buildup of negative chemical effects in batteries, such as stratification and sulfation, which can reduce battery capacity. It is recommended to equalize batteries periodically.
How to Apply Equalization Function:
- Enable battery equalization in LCD setting program 30.
- Set the equalization interval in program 35, or activate immediately in program 36.
When to Equalize:
In float stage, when the set equalization interval is reached or immediate equalization is activated, the controller will enter the Equalize stage. The controller will supply power to charge the battery until it reaches the equalization voltage, maintaining it until the set equalized time is reached.
5. Maintenance
5.1 Clearance and Maintenance for Anti-Dust Kit
The inverter comes with a factory-installed anti-dust kit to protect internal components and enhance reliability. This kit should be cleaned regularly.
Cleaning Procedure:
- Loosen the screws on the top of the inverter in a counterclockwise direction.
- Carefully remove the dustproof case and take out the air filter foam.
- Clean the air filter foam and the dustproof case.
- After cleaning, re-assemble the dust-kit back onto the inverter.
NOTICE: The anti-dust kit should be cleaned from dust every one month.
6. Troubleshooting
This section provides guidance for common issues. If problems persist after following these steps, please contact your local dealer or service center.
| Problem | LCD/LED/Buzzer | Explanation / Possible Cause | What to do |
|---|---|---|---|
| Unit shuts down automatically during startup process. | LCD/LEDs and buzzer active for 3 seconds then off. | The battery voltage is too low (<1.91V/Cell). | 1. Re-charge battery. 2. Replace battery. |
| No response after power on. | No indication. | 1. The battery voltage is far too low (<1.4V/Cell). 2. Internal fuse tripped. | 1. Contact repair center for replacing the fuse. 2. Re-charge battery. 3. Replace battery. |
| Mains exist but the unit works in battery mode. | Input voltage is displayed as 0 on the LCD and green LED is flashing. | Input protector is tripped. | Check if AC breaker is tripped and AC wiring is connected well. |
| Green LED is flashing. | Insufficient quality of AC power (Shore or Generator). | 1. Check if AC wires are too thin and/or too long. 2. Check if generator (if applied) is working well or if input voltage range setting is correct (UPS Appliance). | |
| Green LED is flashing. | Set "Solar First" as the priority of output source. | Change output source priority to Utility first. | |
| When the unit is turned on, internal relay is switched on and off repeatedly. | LCD display and LEDs are flashing. | Battery is disconnected. | Check if battery wires are connected well. |
| Fault code 07 | Overload error. The inverter is overload 110% and time is up. | Reduce the connected load by switching off some equipment. | |
| Fault code 05 | Output short circuited. | Check if wiring is connected well and remove abnormal load. | |
| Fault code 02 | Temperature of internal converter component is over 120°C. Internal temperature of inverter component is over 100°C. | Check whether the air flow of the unit is blocked or whether the ambient temperature is too high. | |
| Buzzer beeps continuously and red LED is on. | Fault code 03 | Battery is over-charged. The battery voltage is too high. | Return to repair center. Check if spec and quantity of batteries meet requirements. |
| Fault code 01 | Fan fault. | Replace the fan. | |
| Fault code 06/58 | Output abnormal (Inverter voltage below 190Vac or higher than 260Vac). | 1. Reduce the connected load. 2. Return to repair center. | |
| Fault code 08/09/53/57 | Internal components failed. | Return to repair center. | |
| Fault code 51 | Over current or surge. | Restart the unit. If the error happens again, please return to repair center. | |
| Fault code 52 | Bus voltage is too low. | ||
| Fault code 55 | Output voltage is unbalanced. |
7. Specifications
7.1 Line Mode Specifications
| Feature | 3.6KW | 6.2KW |
|---|---|---|
| Input Voltage Waveform | Sinusoidal (utility or generator) | |
| Nominal Input Voltage | 100Vac | |
| Low Loss Voltage | 90Vac±5V (UPS); 90Vac±5V (Appliances) | |
| Low Loss Return Voltage | 95Vac±5V (UPS); 95Vac±5V (Appliances) | |
| High Loss Voltage | 145Vac±5V | |
| High Loss Return Voltage | 140Vac±5V | |
| Max AC Input Voltage | 150Vac | |
| Nominal Input Frequency | 50Hz / 60Hz (Auto detection) | |
| Low Loss Frequency | 40±1Hz | |
| Low Loss Return Frequency | 42±1Hz | |
| High Loss Frequency | 65±1Hz | |
| High Loss Return Frequency | 63±1Hz | |
| Output Short Circuit Protection | Circuit Breaker | |
| Efficiency (Line Mode) | >95% (Rated R load, battery full charged) | |
| Transfer Time | 10ms typical (UPS); 20ms typical (Appliances) | |
7.2 Inverter Mode Specifications
| Feature | 3.6KW | 6.2KW |
|---|---|---|
| Rated Output Power | 3.6KW | 6.2KW |
| Output Voltage Waveform | Pure Sine Wave | |
| Output Voltage Regulation | 100/105/110/115/120Vac±5% | |
| Output Frequency | 50Hz | |
| Peak Efficiency | 93% | |
| Overload Protection | 3s@≥150%; 5s@101%~150% load | |
| Surge Capacity | 2* rated power for 5 seconds | |
| Nominal DC Input Voltage | 24Vdc | 48Vdc |
| Cold Start Voltage | 23.0Vdc | 46.0Vdc |
| Low DC Warning Voltage @load < 50% | 22.0Vdc | 44.0Vdc |
| Low DC Warning Voltage @load ≥ 50% | 21.0Vdc | 42.0Vdc |
| Low DC Warning Return Voltage @load < 50% | 22.5Vdc | 45.0Vdc |
| Low DC Warning Return Voltage @load ≥ 50% | 22.0Vdc | 44.0Vdc |
| Low DC Cut-off Voltage @load < 50% | 20.5Vdc | 41.0Vdc |
| Low DC Cut-off Voltage @load ≥ 50% | 20.0Vdc | 40.0Vdc |
| High DC Recovery Voltage | 32Vdc | 62Vdc |
| High DC Cut-off Voltage | 33Vdc | 63Vdc |
| No Load Power Consumption | 45W | 50W |
7.3 Two Load Output Power
| Feature | 3.6KW | 6.2KW |
|---|---|---|
| Full Load | 3600W | 6200W |
| Maximum Main Load | 3600W | 6200W |
| Maximum Second Load (battery model) | 1200W | 2066W |
| Main Load Cut Off Voltage | 26VDC | 52VDC |
| Main Load Return Voltage | 27VDC | 54VDC |
7.4 Charge Mode Specifications
| Feature | 3.6KW | 6.2KW |
|---|---|---|
| Utility Charging Mode | ||
| Charging Algorithm | 3-Step | |
| AC Charging Current (Max) | 80Amp (@VI/P=100 Vac) | |
| Bulk Charging Voltage (Flooded Battery) | 29.2 | 58.4 |
| Bulk Charging Voltage (AGM / Gel Battery) | 28.2 | 56.4 |
| Floating Charging Voltage | 27Vdc | 54Vdc |
| MPPT Solar Charging Mode | ||
| Max. PV Array Power | 4200W | 6500W |
| Nominal PV Voltage | 240Vdc | 360Vdc |
| PV Array MPPT Voltage Range | 60Vdc~500Vdc | |
| Max. PV Array Open Circuit Voltage | 500Vdc | |
| Max Charging Current (AC charger plus solar charger) | 120Amp | 120Amp |
7.5 Grid-Tie Operation
| Feature | 3.6KW | 6.2KW |
|---|---|---|
| Nominal Output Voltage | 100/105/110/115/120VAC | |
| Feed-in Grid Voltage Range | 90~150VAC | |
| Feed-in Grid Frequency Range | 49~51±1Hz/59~61±1Hz | |
| Nominal Output Current | 30A | 51.7A |
| Power Factor Range | >0.99 | |
| Maximum Conversion Efficiency (DC/AC) | 97% | |
7.6 General Specifications
| Feature | 3.6KW | 6.2KW |
|---|---|---|
| Safety Certification | CE | |
| Operating Temperature Range | -10°C to 50°C | |
| Storage Temperature | -15°C~60°C | |
| Humidity | 5% to 95% Relative Humidity (Non-condensing) | |
| Dimension (D*W*H), mm | 110X334X423 | 110X334X423 |
| Net Weight, kg | 9 | 10 |
8. User Tips
- Solar Panel Sizing: When determining the number of solar panels needed, refer to the 'PV Module Selection' section in this manual (Section 3.6) to ensure compatibility with the inverter's voltage range and power capacity. Consider your total power requirements and consult the 'Approximate Back-up Time Table' (Appendix 9 in the full PDF manual) for guidance.
- Inverter Weight: The 6.2KW model of this inverter weighs approximately 10 kg (about 22 lbs). Ensure your mounting surface can safely support this weight.
9. Warranty and Support
The Sumry MPS-VIII ECO Series Hybrid Solar Inverter is certified with CE, RoHS, and FC standards, indicating compliance with relevant safety and environmental regulations.
For detailed warranty information, service procedures, and technical support, please refer to the complete user manual available in PDF format. This manual contains comprehensive details regarding product guarantees and how to obtain assistance if needed.
Reference: Sumry Hybrid Inverter User Manual (PDF)