Introduction
The Terrans OnStep Smart Hand Controller (SHC) is designed to provide intuitive and precise control over your astronomical telescope mount. This manual will guide you through the setup, operation, and maintenance of your SHC, ensuring you can effectively utilize its features for celestial observation and astrophotography.

Setup
Follow these steps to set up your Smart Hand Controller:
- Connect to OnStep Control Box: Locate the "Control Port" on the bottom of the SHC. Connect this port to your OnStep Control Box using the provided cable.
- Avoid Simultaneous Connections: Ensure that the "Upgrade Port" (USB) is NOT connected to a computer at the same time as the "Control Port" during normal operation. Connecting both simultaneously can lead to unexpected behavior.
- Power On: Once connected, power on your OnStep Control Box. The SHC display should illuminate.


Operating Instructions
Button Description
The SHC features a directional pad, function keys, and an LED button for various operations. Refer to the diagram below for button locations.

- N / S Button: Controls the rotation of the equatorial declination axis. Pressing 'N' moves the telescope towards the north celestial pole. This button also functions as 'Page Up' in menus.
- E / W Button: Controls the rotation of the equatorial right ascension axis. In menu navigation, 'W' acts as the 'Confirm' button, and 'E' acts as the 'Return' button. This button also functions as 'Page Down' in menus.
- Center Button:
- Short press: Switches between displayed information on the main interface.
- Long press: Enters the main menu.
- Double-click: Sets the function of the F1/F2 buttons.
- F1 / F2 Buttons: F1 decreases values, and F2 increases values. These are typically used to adjust manual control speed. Pressing F2 can increase the speed of the equatorial movement when using the directional keys.
- LED Key: Press and hold this button to turn on the red LED auxiliary light located at the top of the controller, useful for illumination in dark environments.
Menu Structure and Functions
The SHC provides a comprehensive menu system for controlling various aspects of your telescope mount. Navigate through menus using the directional keys (N/S for page up/down, E for back, W for confirm) and the Center button for selection.
GOTO Menu
- Stars: Select from Bright Stars (4th magnitude or brighter), STF (Struve The Father), STT (the other Struve), and GCVS (General Catalog of Variable Stars).
- Deep Sky: Access catalogs such as Messier, Caldwell, Herschel400, Collinder, NGC, and IC objects.
- Solar System: Select from Sun, Mercury, Venus, Mars, Jupiter, Saturn, Uranus, Neptune, and Moon.
- User: Select up to 16 user catalogs uploaded via SmartWebServer or Sky Planetarium interface.
- Filter: Define filters for catalog objects displayed in 'Stars' and 'Deep Sky' menus. Options include 'Above Horizon', 'Constellation' (list of 88 IAU constellation names), and 'Type' (All, Galaxy, Open Cluster, Star, Double Star, Other, Galaxy Pair, Galaxy Triplet, Galaxy Group, Globular Cluster, Planetary Nbla, Nebula, Hii Region, Cluster+Nebula, Asterism, Reflectn Nbla, SuperNov Rmnt, Emission Nbla, Non Existant, Nova, Duplicate, Dark Nebula).
- Coordinates: Enter arbitrary RA/Dec coordinates (e.g., for comets or asteroids).
- Spiral Search: Initiates a spiral search at the current guide rate around the current position. Press any button to stop. (New as of version 3.02a)
- Last: Returns to the last used 'Goto' coordinates. (New as of version 3.02d)
- Nearby: Displays angular distance from current position (OFF/Within 1, Within 5, Within 10, Within 15 degrees).
- Var* Max Per: Maximum period for variable star filter (Off, <=0.5, <=1.0, <=2.0, <=5, <=10, <=20, <=50, <=100 days).
- Dbl* Min Sep: Minimum separation for double star filter (Off, >=0.2", >=0.5", >=1.0", >=1.5", >=2.0", >=3.0", >=5.0", >=10", >=20", >=50" arc-seconds).
- Dbl* Max Sep: Maximum separation for double star filter (Off, <=0.5", <=1.0", <=1.5", <=2.0", <=3.0", <=5.0", <=10", <=20", <=50", <=100" arc-seconds).
Align Menu
- 1..n-Star Align: Performs a multi-star alignment (e.g., '1-Star Align', '2-Star Align', '3-Star Align'). 'n' must be at least 3 for processors.
- Resume Align: Appears if an alignment is already in progress, replacing '1..n-Star Align'.
- Show Model: Displays pointing model coefficients derived from alignment points.
- Clear Model: Clears the current pointing model.
- Reset Home: Sets the OnStep position to home after physical telescope movement to home.
- Refine PA: For equatorial mounts, guides through adjustment of the mount's polar alignment controls using star offsets.
Parking Menu
- Park: Moves the telescope to the park position (default is home position) and saves the alignment model in preparation for power down.
- Un-Park: When powered up at a park position (following use of the Park command in a previous session), this restores the alignment model and starts tracking.
- Set-Park: Used to define a custom park position at the current axis locations.
Tracking Menu
- Start / Stop: Toggles tracking on or off.
- Tracking Rate Selection:
- Sidereal: Standard rate for stellar objects.
- Solar: Rate for tracking the Sun.
- Lunar: Rate for tracking the Moon.
- Compensation (Alt/Az mounts only):
- Comp Full: Compensates for atmospheric refraction and polar alignment inaccuracies.
- Comp Refr: Compensates for atmospheric refraction only.
- Comp Off: Turns off all compensation.
- Comp Sngl Ax: Applies selected compensation only to the R.A. axis.
- Comp Dual Ax: Applies compensation to both R.A. and Dec axes.
- Rate Reset: Resets the tracking rate to a standard rate.
- Rate +0.02Hz / -0.02Hz: Used to adjust tiny tracking rate errors due to gearing parameter inaccuracies.
PEC (Periodic Error Correction) Menu
- Play: Starts applying previously recorded PEC. (Option displayed only if PEC is enabled in the controller).
- Stop: Stops applying PEC.
- Clear: Deletes the PEC recording.
- Record: Records a new PEC buffer or averages in an additional cycle.
- Write to NV: Saves PEC to non-volatile memory. PEC is not permanent until saved using this function.
Settings Menu
- Date/Time: Set local date and time. Questions are asked about AM/PM and if the time was DST-adjusted.
- Site: Select one of 4 user-defined sites. GPS site data is always stored in 'Site 1' as 'GPS'.
- Latitude
- Longitude
- UTC Offset: Inverse of your timezone offset (e.g., +5 for North American Eastern). Do not adjust for Daylight/summer time.
- Display:
- Turn off: Press any key to turn on. The first key press is ignored to prevent telescope motion.
- Contrast: Adjust brightness (Min, Low, High, MAX).
- Dim Timeout: Dims display after key inactivity (Disable, 30, 60 seconds).
- Blank Timeout: Blanks display after key inactivity. For wireless SHC, 1 minute is advised for low-power mode.
- Meridian Flip: Options to disable or set a delay (1, 2, 3, 4, or 5 minutes).
- Pause at home: OnStep pauses at home position for user to verify no cabling snags. Requires button press to continue.
- Automatic: If a meridian flip is possible at current coordinates, it will be performed automatically.
- Configuration:
- Goto Speed: Sets the Goto speed to 2x, 1.5x, 1x, .75x or .5x of the configured SLEW_RATE_BASE_DESIRED (Fastest, Faster, Default Speed, Slower, Slowest).
- Backlash: Sets gear backlash for axis 1 (RA/Az) and axis 2 (Dec/Alt).
- Limits:
- Horizon Limit: Sets number of degrees telescope is allowed to point below the horizon while tracking or slewing.
- Overhead Limit: Sets number of degrees above the horizon that the telescope is allowed to point while tracking or slewing. Important for Alt/Az telescopes.
- Meridian Limit E/Meridian Limit W: For GEM or FORK mounts, sets how close the telescope is allowed to track to the meridian before a meridian flip is required.
- Pier Side: Sets the 'preferred pier side' (Best, East, West).
- Firmware Ver: Displays SHC and OnStep firmware version/dates of compilation.
Rotator Menu (if configured)
- Return Home: Returns the rotator to the zero-degree (middle) position.
- At Home: Used to synchronize OnStep's 'at zero-degrees of rotation' with physical reality.
- De-rotate (Alt/Az mounts only): Turns on or off the function that runs the rotator at the appropriate speed to compensate for field rotation.
- Move to PA (Alt/Az mounts only): Moves the rotator to the parallactic angle.
- Reverse: Reverses the direction of rotation of the de-rotator.
Focuser Menu (if configured)
- Focuser 1...N: For each configured focuser, a numbered selection is available to set parameters.
- Run selected focuser in or out. Starts at low speed, switches to high speed if held for >= 5 seconds.
- Return home: Returns the focuser to the home, 'half-travel', position.
- At Home: Used to synchronize OnStep's 'At half-travel' status with physical reality.
- Backlash: Compensate for geartrain backlash, if any.
- Temp Comp?: Turn on or off temperature compensation. Controller must have either ambient temperature sensor (e.g., BME280) or TELESCOPE_TEMPERATURE sensor present.
- T.C. Coef.: The temperature compensation coefficient (microns per degree Celsius of temperature change).
- T.C. Deadband: How many microns must the temperature compensation algorithm want to change the focuser position before an adjustment is actually done.
Feature Key Menu (Version 3.02b+)
Center button double tap. Select desired Feature [ N ] [ S ] to scroll, [ W ] to accept then press f or F button to alter selected feature. Depending on configurations not all of these selections may be present.
- Guide Rate: Select guide rate between 2x and Max slew speed.
- Pulse Guide Rate: Select pulse guide rate between 1/4x and 1x.
- Utility Light: Off or one of 5 levels.
- Auxiliary Features: (New as of version 3.02a) A list of named auxiliary features as defined in the controller's Config.h. For DEW_HEATER type features, a submenu allows adjustment of 'Zero' and 'Span' parameters. For INTERVALOMETER type features, a submenu allows adjustment of 'Exp Count', 'Exp Delay' and 'Exp Length' parameters. If the feature is an ANALOG_OUTPUT type, the 'f' and 'F' buttons adjust the value down or up by 5%, otherwise the 'f' or 'F' buttons turn the feature off or on.
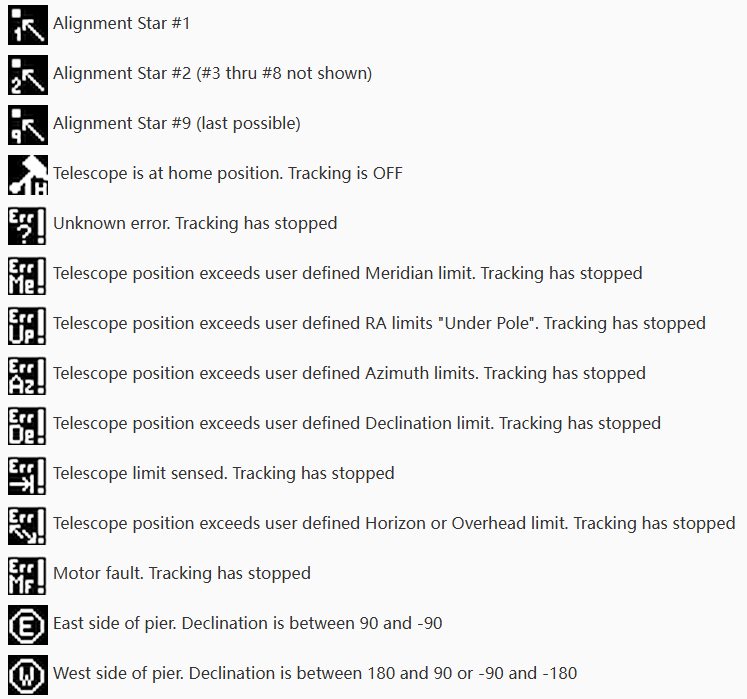
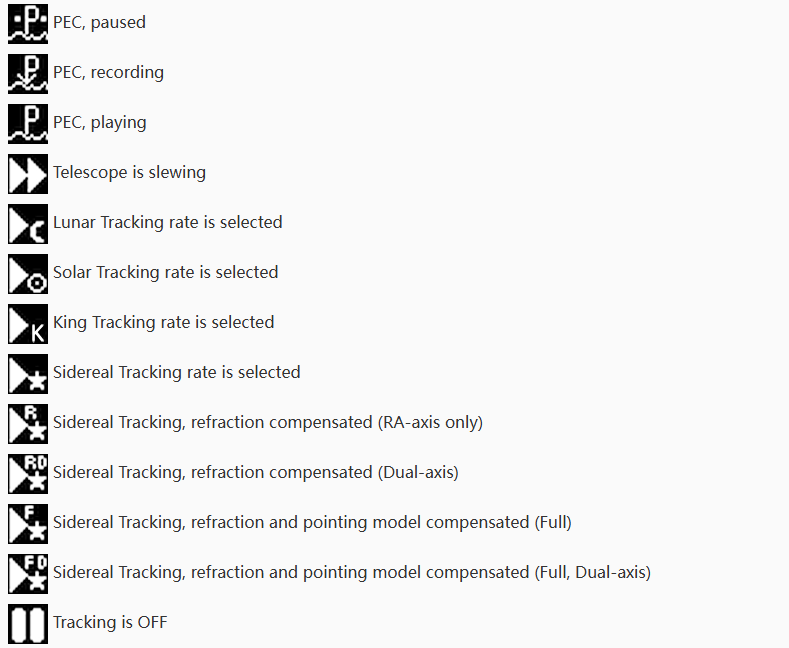
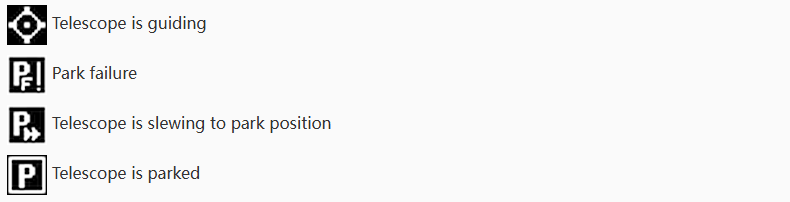
Icon Descriptions
The SHC display uses various icons to convey status, errors, and tracking modes. Familiarize yourself with these icons for effective operation.

- Alignment Stars: Icons for Alignment Star #1, Alignment Star #2 (#3 thru #8 not shown), Alignment Star #9 (last possible).
- Home Position: Telescope is at home position. Tracking is OFF.
- Error Icons:
- Unknown error. Tracking has stopped.
- Telescope position exceeds user defined Meridian limit. Tracking has stopped.
- Telescope position exceeds user defined RA limits "Under Pole". Tracking has stopped.
- Telescope position exceeds user defined Azimuth limits. Tracking has stopped.
- Telescope position exceeds user defined Declination limit. Tracking has stopped.
- Telescope limit sensed. Tracking has stopped.
- Telescope position exceeds user defined Horizon or Overhead limit. Tracking has stopped.
- Motor fault. Tracking has stopped.
- Pier Side:
- East side of pier. Declination is between 90 and -90.
- West side of pier. Declination is between 180 and 90 or -90 and -180.

- PEC Status: Icons for PEC paused, PEC recording, PEC playing.
- Telescope Status: Telescope is slewing.
- Tracking Rate Selected: Icons for Lunar Tracking rate, Solar Tracking rate, King Tracking rate, Sidereal Tracking rate.
- Sidereal Tracking with Compensation:
- Sidereal Tracking, refraction compensated (RA-axis only).
- Sidereal Tracking, refraction compensated (Dual-axis).
- Sidereal Tracking, refraction and pointing model compensated (Full).
- Sidereal Tracking, refraction and pointing model compensated (Full, Dual-axis).
- Tracking Off: Icon indicating Tracking is OFF.

- Guiding Status: Telescope is guiding.
- Parking Status: Icons for Park failure, Telescope is slewing to park position, Telescope is parked.
Maintenance
The Terrans OnStep SHC is designed for durability and requires minimal maintenance. Keep the device clean and dry. Avoid exposing it to extreme temperatures or moisture. Periodically check cable connections for secure fit. Firmware updates may be released by the manufacturer; refer to the official Terrans Industry website for the latest information and update procedures.

Troubleshooting
If you encounter issues with your SHC, consult the icon descriptions in the Operating Instructions section for specific error messages. Here are some general troubleshooting tips:
- No Power/Display:
- Ensure the SHC is securely connected to the OnStep Control Box via the "Control Port".
- Verify that the OnStep Control Box is powered on.
- Check the connecting cable for any damage.
- Telescope Not Responding:
- Confirm that the SHC is properly connected to the OnStep Control Box.
- Check for any error icons displayed on the SHC screen and refer to the "Icon Descriptions" section for their meaning.
- Ensure no other devices are connected to the "Upgrade Port" simultaneously.
- Verify that the telescope mount itself is powered and functioning correctly.
- Tracking Errors:
- Check the "Tracking" menu settings for the correct celestial object (Sidereal, Solar, Lunar).
- If using an Alt/Az mount, ensure appropriate compensation settings (Comp Full, Comp Refr) are enabled if needed.
- Consider performing a new alignment if tracking is consistently inaccurate.
- Meridian Flip Issues:
- Review the "Meridian Flip" settings in the "Settings" menu.
- If "Pause at home" is enabled, ensure you acknowledge the prompt to continue.
- Check for any physical obstructions or cable snags that might prevent the flip.
Specifications
| Feature | Specification |
|---|---|
| Model | SHC Control Remote |
| Brand | Terrans Industry |
| Weight (approx.) | 0.5 kg |
| Origin | Mainland China |
| Connectivity | Control Port (to OnStep Control Box), Upgrade Port (USB) |
| Display | Red LED display with adjustable contrast and dim timeout |
| Control Features | GOTO, Alignment, Parking, Tracking, PEC, Focuser, Rotator, Site/Time Settings |
User Tips
- Compatibility Check: Before purchasing or using, always verify the SHC's compatibility with your specific telescope mount model (e.g., Juwei, Clearsky, etc.) to ensure full functionality.
- Firmware Updates: Regularly check the official Terrans Industry website for any available firmware updates for your SHC and OnStep Control Box. Updates often include new features, bug fixes, and performance improvements.
- Cable Management: When performing meridian flips or extensive slewing, ensure all cables connected to your telescope and mount are properly managed to prevent snagging or damage.
- Site Data: If your controller receives site data from a GPS, it will be stored in 'Site 1' with the name 'GPS'. This can be a quick way to set your location.
Warranty and Support
For warranty information, technical support, or service inquiries, please refer to the official Terrans Industry website or contact their customer service department. Keep your purchase receipt as proof of purchase.


