1. Introduction
This manual provides detailed instructions for the assembly, operation, and maintenance of your VEVOR 64-inch Adjustable Router Edge Guide and Planer Sled. This tool is designed to assist in woodworking projects, specifically for flattening large wood slabs, trimming, and planing with precision. Its adjustable design ensures compatibility with most fixed-base routers, making it a versatile addition to your workshop.

Figure 1: VEVOR 64-inch Adjustable Router Edge Guide and Planer Sled
2. Safety Information
Please read and understand all safety warnings and instructions before using the router edge guide and planer sled. Failure to follow these instructions may result in electric shock, fire, and/or serious injury.
- Always wear appropriate personal protective equipment (PPE), including safety glasses, hearing protection, and gloves.
- Ensure your router is unplugged before making any adjustments or attaching it to the sled.
- Keep your work area clean and well-lit. Cluttered or dark areas invite accidents.
- Do not operate power tools in explosive atmospheres, such as in the presence of flammable liquids, gases, or dust.
- Keep children and bystanders away while operating the tool. Distractions can cause you to lose control.
- Secure the workpiece properly to prevent movement during operation.
- Use the correct router bit for the material and task.
- Never force the tool. Let the router and sled do the work at a controlled pace.
3. Specifications
| Feature | Specification |
|---|---|
| Model | Planing Sled 64 in |
| Material | Aluminum & Iron |
| Color | Silver |
| Net Weight | 30 lbs / 13.6 kg |
| Rail Length | 64 in / 162 cm |
| Base Support (L x W) | 4.3 x 11.8 in / 11 x 30 cm |
| Certification | CE |
| Origin | Mainland China |

Figure 2: Key dimensions of the router planer sled.
4. Package Contents
Verify that all items are present and in good condition upon unpacking:
- 1 x Router Sled Assembly (includes aluminum rails, iron supports, fixture wheels, locking blocks, five-star bolts, regulating tighten handle, reverse plate fixing device)
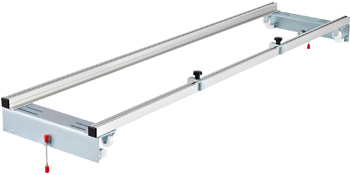
Figure 3: Illustrative image of the router sled components.
5. Setup and Assembly
The VEVOR Router Planer Sled is designed for quick and straightforward assembly. Follow these steps to set up your unit:
- Insert Moving Nuts: Carefully place the moving nuts into the sliding grooves of the aluminum rails. These nuts will be used to secure various components.
- Tighten Locking Blocks: Position the locking blocks and five-star bolts onto the rails. Tighten them securely to hold the rails in place.
- Align and Lock Nut Block: Align the nut block with the long hole on the base support and lock it into position. This provides a stable connection between the rails and the base.
- Final Assembly Check: Ensure all components are properly aligned and tightened. The sled should be in a stable, assembled state, ready for router attachment.

Figure 4: Visual guide for the assembly process.
The design includes a broadened base support and adjustable long holes for enhanced stability and versatility.

Figure 5: Broadened base support and adjustable long holes for router compatibility.
6. Operation
This router sled is compatible with most fixed-base routers. Follow these steps for effective operation:
- Attaching Your Router: Secure your fixed-base router to the sled's carriage. Ensure it is firmly attached and centered for balanced operation. The adjustable long holes allow for compatibility with various router models.
- Positioning the Sled: Place the router sled on your workpiece (e.g., a wood slab) that is securely clamped to a workbench. The iron galvanized roller supports and premium aluminum rails ensure smooth movement.
- Adjusting for Workpiece Size: Regulate the relative position between the profile and the roller support to ensure the rollers are pressed firmly on the edge of your workbench. This allows the sled to fit a wide variety of table and workpiece sizes.
- Using the Locking Devices:
- Pedestal Wheel Locking Device: The sled is equipped with 8 fixture wheels. Use the regulating tighten handle to fix the front and back direction of the trimming machine, eliminating the need to hold the support with one hand.
- Reverse Plate Fixing Device: An inversion fixed device allows the XY axis to be versatile, enabling the router to move smoothly in both X and Y directions for comprehensive flattening.
- Planing/Trimming: With the router securely attached and the sled properly adjusted, turn on your router and slowly guide the sled across the workpiece. Make shallow passes to achieve the desired flatness and finish.

Figure 6: The router planer sled is suitable for woodwork plants, furniture factories, and DIY home decoration.

Figure 7: Detailed view of the upgraded design features for enhanced control.
7. Maintenance
Regular maintenance will ensure the longevity and optimal performance of your router edge guide and planer sled:
- Cleaning: After each use, clean the aluminum rails, iron supports, and all moving parts to remove sawdust and debris. A dry cloth or compressed air is recommended.
- Lubrication: Periodically apply a light lubricant to the sliding grooves and roller bearings to ensure smooth operation.
- Inspection: Regularly inspect all bolts, nuts, and locking mechanisms for tightness. Tighten any loose fasteners. Check for any signs of wear or damage to the rails or supports.
- Storage: Store the sled in a dry, clean environment to prevent corrosion and damage.
8. Troubleshooting
If you encounter issues with your router edge guide and planer sled, refer to the following common problems and solutions:
- Problem: Router not moving smoothly.
Solution: Check for sawdust or debris in the sliding grooves and on the rollers. Clean thoroughly. Apply lubricant to the moving parts. Ensure the rails are parallel and not warped. - Problem: Difficulty in securing the router.
Solution: Verify that the router base is compatible with the sled's mounting points. Ensure all mounting screws are properly aligned and tightened. Adjust the nut block and long holes as needed for your specific router model. - Problem: Sled feels unstable during operation.
Solution: Ensure the workpiece is securely clamped to the workbench. Check that the roller supports are firmly pressed against the workbench edges and that the regulating tighten handle is fully engaged. Verify all assembly bolts are tight. - Problem: Uneven planing results.
Solution: Ensure your router bit is sharp and clean. Check that the router is securely mounted and not wobbling. Make sure the sled is level and the workpiece is stable. Take shallower passes.
9. User Tips
Maximize your woodworking efficiency and achieve better results with these practical tips:
- Start with Shallow Passes: For best results and to reduce strain on your router, always take multiple shallow passes rather than one deep cut, especially on hard or uneven wood.
- Check for Flatness: Use a straightedge or winding sticks to frequently check the flatness of your workpiece during the planing process.
- Router Bit Selection: A large-diameter, flat-bottomed router bit (e.g., a spoilboard surfacing bit) is ideal for flattening operations. Ensure it is sharp for clean cuts.
- Dust Collection: Connect a dust collection system to your router if possible to keep the work area clean and improve visibility.
- Secure Your Workpiece: Always ensure your wood slab is firmly clamped to your workbench to prevent any movement during routing, which can lead to uneven surfaces or kickback.
10. Warranty and Support
VEVOR products are built to last and come with a commitment to quality. For warranty information, technical support, or service inquiries, please refer to the official VEVOR website or contact their customer service department. Keep your purchase receipt as proof of purchase for any warranty claims.


